gckless Posted June 15, 2013 Report Share Posted June 15, 2013 Before I get into this, I have two warnings: this will be a slow build, and this log is going to have a lot of pictures in it. Those with slow connections may be frustrated. Alright, with that said, here’s the build log. Just moved back to the states in January, bought the whip, and been collecting equipment for a couple months now. Build has been and will be slow, because I’ve got no money right now due to moving back here. Costs way too much money to furnish a house, and I like to booze. :/ Here’s a brief rundown of the notable pieces: Pioneer DEH-80PRS – Head unit Vifa NE25VTS-04 - Tweeters Exodus Anarchy – Mids Custom 3HP 15” – Subs PSI 18” passive radiator – Passive Radiators DC Power Inc 270XP – Alternator Sears Diehard Platinum – Batteries KnuKonceptz and Sky High Car Audio – Wiring Will be running active, crossed at 63Hz and about 2kHz. Sub box will be about 8.5 cubes, going to play around with tuning, but going to start with a tune of 23Hz. Will be building a tiered amp/batt rack that will involve fans in a push-pull config, plexi, and amp guts Have like 60sq.ft. of AT deadener right now, I will need more of something. There’s still a lot of equipment that is on the list to buy, including tools. Goal for this build is basically the definition of SQL. Don’t plan on seeing a meter other than to just see where I am once or twice. I want it to sound great first and foremost. I’m not worried about it getting loud, with the power I am running I know it will, so everything I am doing with what I have I am trying to tailor towards SQ mostly. After the audio is done, gonna work on the vehicle itself. Want to lower it, get some new shoes, new headlights, tint, just do some cosmetic work, possibly eventually engine work. But that’s not for a little while. Alright, on to what everyone really wants, the photos. Here’s the ride when I bought it. I have since taken off the roof rack: First up, Pioneer DEH-80PRS. This was in my last ride, love this HU. Will be the first time running it active. Planning to cross at 63Hz and 2kHz. Will be using an iPod/iPhone via USB most of the time, don’t really use CD’s. For my tweeters, I’m using Vifa NE25VTS-04’s. Frequency charts look good, usable down to 1.5kHz with a fairly flat response. In the A pillars, aimed at opposite headrests. Guess I never really took good photos of these. Not a huge loss, they’re not that special. You’ll see them more later on. "Clipping" is the biggest forum boner now. It's like witchcraft... it automatically explains just about everything people don't understand. My build log: http://www.stevemeadedesigns.com/board/topic/200295-gckless-2011-chevrolet-impala/ High resolution photos: Gilbert Kless Photography Link to comment Share on other sites More sharing options...
gckless Posted June 15, 2013 Author Report Share Posted June 15, 2013 A pair of Exodus Anarchy’s will be used for mids. 125W RMS @ 8ohms, XBL^2 underhung design, they be some beefy guys. These will be going in the stock location in the doors, but some work will have to be done to fit them. Thread found here: http://mobileaudioforum.com/forum/showthread.php?1372-Exodus-Anarchy Compared to some Polk dB651's I have: "Clipping" is the biggest forum boner now. It's like witchcraft... it automatically explains just about everything people don't understand. My build log: http://www.stevemeadedesigns.com/board/topic/200295-gckless-2011-chevrolet-impala/ High resolution photos: Gilbert Kless Photography Link to comment Share on other sites More sharing options...
gckless Posted June 15, 2013 Author Report Share Posted June 15, 2013 For my subs, I have a pair of custom built 3HP 15” subs, built by Zeuslicious. Modded 3hp tall top plate and 3-1" magnet slugs instead the regular .75", dual 1 ohms big ww and 8 layer fw aluminum coil, dual spaced TC spiders and DD 8" Carbon Fiber cap. Rated at 1800W RMS. I polished the magnets. Will be mounting these inverted. Thread found here: http://mobileaudioforum.com/forum/showthread.php?1558-My-new-custom-3HP-s Here is a before/after comparison: They turned out well. Just need to clear coat them now, and I'll be done with them. "Clipping" is the biggest forum boner now. It's like witchcraft... it automatically explains just about everything people don't understand. My build log: http://www.stevemeadedesigns.com/board/topic/200295-gckless-2011-chevrolet-impala/ High resolution photos: Gilbert Kless Photography Link to comment Share on other sites More sharing options...
gckless Posted June 15, 2013 Author Report Share Posted June 15, 2013 For this build I will be using passive radiators. Was gonna go ported, but @Neo_styles talked me into it. These are 18” PR’s built by Dave at PSI. He’s a good dude, can’t say enough about the customer service over there. And these are beautiful. 3.5” p-p travel, carbon fiber caps, dual spiders to handle the power, green logo. Plan on playing around with tuning quite a bit. My first tune will be at 23Hz, and I’ll go from there. Thread found here: http://mobileaudioforum.com/forum/showthread.php?2009-PSI-18-quot-Passive-Radiators Here is the box design: 9 cubes gross, with displacements should bring me down to right around 8.5 net. I'm going to mount inverted, and being a bit bigger leaves me room to mount normally if I need/want to. It also will fit right in between the wheel wells, no building over the wells bullshit. About 6" from the hatch. "Clipping" is the biggest forum boner now. It's like witchcraft... it automatically explains just about everything people don't understand. My build log: http://www.stevemeadedesigns.com/board/topic/200295-gckless-2011-chevrolet-impala/ High resolution photos: Gilbert Kless Photography Link to comment Share on other sites More sharing options...
gckless Posted June 15, 2013 Author Report Share Posted June 15, 2013 For power up front, I’ll be running a Zed Audio Leviathan III. Channels 1 and 2 will be tweets, and channels 3 & 4 and 5 & 6 will be bridged for a Anarchy for each pair of channels. So I have 190W RMS @ 4ohms for each tweeter, and 380W RMS @ 8ohms for each mid. Power is not an issue Got this through [MENTION=142]Vertex Audio[/MENTION]'s trade-in program. Traded in my DC 175.4 and pair of DC Level 3 10's, and I paid very little cash. Thread is here: http://mobileaudioforum.com/forum/showthread.php?2557-Zed-Audio-Leviathan-III "Clipping" is the biggest forum boner now. It's like witchcraft... it automatically explains just about everything people don't understand. My build log: http://www.stevemeadedesigns.com/board/topic/200295-gckless-2011-chevrolet-impala/ High resolution photos: Gilbert Kless Photography Link to comment Share on other sites More sharing options...
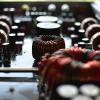
gckless Posted June 15, 2013 Author Report Share Posted June 15, 2013 For sub power, I’ll be using a DC 5.0k. Will be mounted upside-down. I made a plexi back and am showing off those guts. Compared to a 2.0k: Plexi: "Clipping" is the biggest forum boner now. It's like witchcraft... it automatically explains just about everything people don't understand. My build log: http://www.stevemeadedesigns.com/board/topic/200295-gckless-2011-chevrolet-impala/ High resolution photos: Gilbert Kless Photography Link to comment Share on other sites More sharing options...
gckless Posted June 15, 2013 Author Report Share Posted June 15, 2013 Now for pretty much the only work I have done, my A pillars. I Bondo’d in some PVC, flocked them, and installed them in the vehicle. They look pretty good and the finish is holding up pretty well so far. Thread: http://mobileaudioforum.com/forum/showthread.php?2266-A-Pillars-Flocked! First, I cut the PVC to where they would sit semi-flush, and aim at the opposite headrests. This was done with a dremel. I had originally planned on using a flush-mount baffle, but [MENTION=8]keep_hope_alive[/MENTION] recommended against it, due to the lip on the flush-mount. Then, took them down to the car and aimed them. Tacked them with superglue. Added some Bondo. Decided not to use fiberglass because of the relatively small amount I needed here. This was after a little filling and sanding work, maybe like 4 sessions with Bondo. There were a few pits in it, and I was pretty fed up with Bondo at that point lol, so I just used wood glue to dab on and fill those pits, then sanded it smooth. After some coats of paint/primer and some sanding, I had this. Not horrible, but still some imperfections. But, if I was just going to keep it a spray paint, I could have worked those out. But I decided to try flocking them. Flock is finely ground material, can be a bunch of things like ribbon, fabric, PVC, feather, a lot of things. Not a whole lot of prep work needs to be done besides getting the surface fairly smooth. You also need to paint it the color of the flock, the end goal color, if you want it a solid color. I used clear glue, so that shows through. You may also get colored glue, or paint the surface a separate color for an effect. Anyway, here are the products I used. Found them at Michael's, it's called "embossing powder". They looked at me like I was speaking Thai when I said "flock". So here I tried a test patch on the back of the pillars. The process is simple: you brush on the glue, then sprinkle on the powder. They sell a kind of shooter for the powder, and I also think you can spray it on with an airbrush, which would probably yield better results. But I just sprinkled it on. Then just tapped it off the next day. Now I knew it was go time. Took the whole pillar, spread the glue all over it. You want to use a good amount, want to make sure every part you want flock on covered. And then when you're applying, you want to turn the piece so that it's horizontal, so gravity does work for you. If you just let it fall off the side, it doesn't stick as good. Here's where the airbrush or shooter would come in handy. You also want to put paper or something underneath, because you can reclaim the excess flock when you're done. When I was applying, I used about 3.5 of those little jars. After I reclaimed, it turned out that only less than 1 actually stuck on there. You have to make sure not to touch it AT ALL after you apply. If you happen to accidentally touch it, throw some flock on the exposed glue. You can then gently dab out the mark as best you can. I know because I did this You also need to make sure to let the glue fully dry. Best to let it sit a full day before you even think about touching it. Didn't seem to try until day 2 for me. After it's dry, just hold it up, and tap off the excess. You can brush it off the surface at this point, most of it should be stuck on by now. Here's what the finished product looks like. I think it turned out pretty good. It's something different, and wasn't too much work. I have a couple little spots I can dab glue and touch up with some flock, but all in all I'm happy with it. The texture is somewhere in the middle of suede and sandpaper. Here they are installed: "Clipping" is the biggest forum boner now. It's like witchcraft... it automatically explains just about everything people don't understand. My build log: http://www.stevemeadedesigns.com/board/topic/200295-gckless-2011-chevrolet-impala/ High resolution photos: Gilbert Kless Photography Link to comment Share on other sites More sharing options...
gckless Posted June 15, 2013 Author Report Share Posted June 15, 2013 Worked the small panel where my tape player is. Tape player will be coming out. That panel pops right off, and I cut a small piece of plastic and worked some Bondo in there. This is where I will be putting my meters, the USB connection for the 80PRS, my PAC LC-1, and possibly other switches/electronic stuff. Also ordered a dual ammeter/voltmeter gauge and shunt. Going to try it out, see if I can make it work. Ordered these ones: DC 0 100V 0 500A Dual LED Digital Volt Meter Ammeter Voltage Amp Power F 12V Car | eBay 500A 75mV DC Current Shunt Resistor for Amp Panel Meter | eBay "Clipping" is the biggest forum boner now. It's like witchcraft... it automatically explains just about everything people don't understand. My build log: http://www.stevemeadedesigns.com/board/topic/200295-gckless-2011-chevrolet-impala/ High resolution photos: Gilbert Kless Photography Link to comment Share on other sites More sharing options...
gckless Posted June 15, 2013 Author Report Share Posted June 15, 2013 So, I determined that free-hand measuring this amp/battery rack is going to be impossible. Since I don't have the tools to make it here, I've decided to mock it up with cardboard. It's going to be a tiered design, batteries/fuses/all excess wiring on the bottom, and the amps on top enclosed in a hinged box, with fans on each side in a push-pull configuration and a removable top that's secured with magnets. The top will have plexi on it to show off the amps, and my DC 5.0k will be mounted upside-down (I made a plexi cover). Pretty sure I'll be putting some lights in there too. No one is going to want to build this when I'm done mocking up lol. Here is the space I have, with the seat removed: Here are my G31's: And here is where I stopped for today: Was pretty nice out, decided to go for a run. If anyone has any ideas, I'm very open to them. "Clipping" is the biggest forum boner now. It's like witchcraft... it automatically explains just about everything people don't understand. My build log: http://www.stevemeadedesigns.com/board/topic/200295-gckless-2011-chevrolet-impala/ High resolution photos: Gilbert Kless Photography Link to comment Share on other sites More sharing options...
gckless Posted June 15, 2013 Author Report Share Posted June 15, 2013 So, got my badass cardboard box pretty much done. Got tore up by about 3,465 mosquitoes. Or that's what I estimated. Pics: And here's how I am going to lay the amps out on top: I was going to do a top piece over the amps, but not sure now. Might just throw some fans underneath the amps instead. "Clipping" is the biggest forum boner now. It's like witchcraft... it automatically explains just about everything people don't understand. My build log: http://www.stevemeadedesigns.com/board/topic/200295-gckless-2011-chevrolet-impala/ High resolution photos: Gilbert Kless Photography Link to comment Share on other sites More sharing options...


Recommended Posts
Archived
This topic is now archived and is closed to further replies.