bcbrassard Posted March 9, 2014 Report Share Posted March 9, 2014 I did a small RF budget build on my brothers 2009 Ranger Truck. He decided on a Pioneer AppRadio because he is kind of a geek and loads music, apps, and movie on his phone and want the HU to handle everything like it was off his phone. For speakesr i went with RF P683s for the doors and pods behind the seats. I wanted T168s but the price jump was to great and was able to get 2 sets of punch for less than 1 set of T1s. To run them i have had a new RF PBR300x4 for 3 years that need a home so i installed it in his truck. We want a small sub stage to fill in the lows but didnt have much space so we went with a RF R2S-1x10 RS Shallow enclosure and to power that i got a P300x1. I had alot of RF wirng left over from my build for this so that helped in keeping the budget down. Nice stock little truck. Need to paint shell white or black this summer. He would like to get a chip for it, Airintake and exhaust in the future. RF goodies that are going in. 3rd gen AppRadio. When we took the stock for radio out there is a decal said made by Pioneer. Too funny! Tear down of interior and removal of HU. Doors are super easy to tear down. Horrible place for a jack. I would relocate it if i was my truck. Had to work around this the whole build. You'll see. Pretty much all the pics of tear down. Now to address the doors Link to comment Share on other sites More sharing options...
Pasta Prime Posted March 9, 2014 Report Share Posted March 9, 2014 I had a single cab Ranger. Not much room to work with. The best thing about them though is that Ford didn't use those stupid push tabs to hols the doors on. Made tear down so much easier. I took the jack out of mine completely when I had it. New build coming........ YouTube:http://www.youtube.c...6?feature=guide Old Build Log: http://www.stevemead...d-on-the-cheap/ Old Screen name: Redrebel66 Link to comment Share on other sites More sharing options...
bcbrassard Posted March 9, 2014 Author Report Share Posted March 9, 2014 For the doors i bought some cheap sound deadener, I did about 95% coverage and it made a huge difference. I took about 2 1/2 hrs per door to complete. Link to comment Share on other sites More sharing options...
oldsoundguy Posted March 9, 2014 Report Share Posted March 9, 2014 Looks good. Keep it up. 80prs Arc Audio Xdi 1200.6 (using active crossovers) Freaking awesome amplifier Incriminator IA 10.1 Focal PS 130v 5.25 (doors) 4" Faital pro Neo (kick panels) 3" Faital pro Neo and focal tweets( dash) DC Audio level 3 12" custom box designed by joex built by me AGM front, XS 750SE batteries rear DC 180 alt 99 Toyota Tacoma extra cab http://www.stevemeadedesigns.com/board/topic/179476-my-small-build-turned-into-the-ongoing-build/ Link to comment Share on other sites More sharing options...
bcbrassard Posted March 9, 2014 Author Report Share Posted March 9, 2014 Now for some Dynomat acoustic foam, 1/4" seems to add an extra layer and help with road noise. also makes the speakers sound better IMO. I used it on the Lancer and like the results so i bought some for this build too. Link to comment Share on other sites More sharing options...
bcbrassard Posted March 9, 2014 Author Report Share Posted March 9, 2014 Door sound deadening done, time to install RF P683s and finish sealing the doors up. I tried to seal all the holes as much as possible. The door panel slide into certain opening to attach to the door with 2 screws to help hold it to the door. Speakers mounted perfectly and added 2 extra screws to help secure it. Not bat looking speakers. I will give a budget break down at the end of the build. I know most will say why not cheap comps. Well i had 2 days to do it and i tried to keep it stock and simple if he ever sells the truck. He wont though, he loves it, its his comuter and get like 27 mpg and he drives like 2 hrs a day. My OCD kicked in and i had to go back to the passanger door to retape the stock vapor barrier the same way. It was driving me nuts! lol Link to comment Share on other sites More sharing options...
FknCrawler Posted March 9, 2014 Report Share Posted March 9, 2014 Looking good. Tuned in. 1992 Honda Civic CX Hatchback K24a2 Swap Link to comment Share on other sites More sharing options...
bcbrassard Posted March 9, 2014 Author Report Share Posted March 9, 2014 Not to work on the rear speaker pods behind the seats. I wish i had more time to have made these pods more solid. I would have like to tear all the rear panels off to sound deaden the rear of the cab but it was hurry, hurry, hurry. Never again. People want my to install a system it will be my way or they can pay someone. I had the materials to do more just not the time. Anyway, rear pods. Stock system came with these that where empty.I guess thats extra! lol Again, sound deadened with acoustic faom. Weird mounting system. Speaker mount to grills, grills mount to pods. Ended up pretty solid. Finished and mounted to pod. Link to comment Share on other sites More sharing options...
bcbrassard Posted March 10, 2014 Author Report Share Posted March 10, 2014 Now for installing the Pioneer AppRadio, It was pretty straight forward on removing stock HU, and the ease of the kit to put the new HU in was nice. It gave 3 positions on mounting and of course a flush mount finish was going to look the best, The stock HU was counter sunk about a inch and a half from dash bezel, so finish product looked 10x better, plus the clean look of the Pioneer. Stock HU removed! HU has GSP so it had an external antenna mounted to dash, Mic for phone use mounted high on A pillar by windsheild. And all cables to run off of phone are routed to glove box. Clean HU. Hu had front and rear/sub pre-out RCAs so rear to sub amp, front running PBR300x4 in 2 ch mode. So no rear fade on the speaker. I tried the pass thru on the amp in full range but sub wouldnt run in LP mode and send rear to PBR so i switched it around just to work with no fading. Time issue at 3:30am after 17 hrs of working on irt. Link to comment Share on other sites More sharing options...
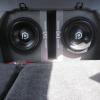
bcbrassard Posted March 10, 2014 Author Report Share Posted March 10, 2014 So now forSub stage and mounting of amps. First off very disappointed in Fords design under the seats. Not one flat spot or clearnce to mount the amps. Mot even the PBR300x4 as small as it is. So that ment everything was going to be mounted behind the seats in a order that worked to still have access to the jack, and so it looked clean. Kinda was a challenge, i wasnt expecting ubder the seats to be so F'ed up. But i made it work the best i can and keep it clean, P300x1 mounted, everything else is loose. I had to to DD-1 everything. Finished product. Now you get an idea of how i had to do space management. Thats whats behind the seats. Link to comment Share on other sites More sharing options...


Recommended Posts
Archived
This topic is now archived and is closed to further replies.