Doorz1009 Posted July 13, 2015 Report Share Posted July 13, 2015 I'm glad she's taking kindly to her system, that box looks hella clean though. All white ftw... ...white power Link to comment Share on other sites More sharing options...
RainStryke Posted July 13, 2015 Report Share Posted July 13, 2015 Nice! Lots of progress. I really like the paint job on the box with the decal. Clean job on the rear deck, I remember sound deadening mine... That was worse than the trunk for my back. Nice job on the A-pillars as well. Curious though... I see you have speaker baffles for those 6x9's but you cut out the bottom of it. I kept mine in to ensure the pressure from the sub doesn't effect my 6x9's. Link to comment Share on other sites More sharing options...
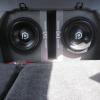
bcbrassard Posted July 14, 2015 Author Report Share Posted July 14, 2015 Nice! Lots of progress. I really like the paint job on the box with the decal. Clean job on the rear deck, I remember sound deadening mine... That was worse than the trunk for my back. Nice job on the A-pillars as well. Thank you, ya the rear deck sucked to do thats why i only did 50% or so. Time is always an issue with this build because she cant live without the car for more than 4-5 hrs at a time. Mine is down, wont even start so she cant use it. I had to get creative with the A-Pillars to make them look half good. Curious though... I see you have speaker baffles for those 6x9's but you cut out the bottom of it. I kept mine in to ensure the pressure from the sub doesn't effect my 6x9's. So the baffle was to keep the sub pressures away from the 6x9s but they sounded like ass so i used them to help seal the speakers to the rear deck and cut them out from inside the trunk. I also wasn't sure if the rear trunk roof panel was going back in with these 6x9s and the sub set up but everything went back together really well. I think it will help keep the pressures away. Link to comment Share on other sites More sharing options...
bcbrassard Posted July 14, 2015 Author Report Share Posted July 14, 2015 Here are some pics of trunk panels to show you what i mean.  The shape up the 6x9's are molded into the trunk lid panel and they rest on the top of the box. See... like that. Both sides of the enclosure have a 2 1/2" gap so pressure should escape from behind the seat some. And back of the box again. Red RF 18 awg wires will be signal wire. The Black and Grey RF 16 awg will be amplified speaker wire. And the RF 12 awg is my sub wire from amp. Gonna be like 8" long. Link to comment Share on other sites More sharing options...
im45pl Posted July 16, 2015 Report Share Posted July 16, 2015 just read through this, nice work on the box... the rf logo in black is a good touch. have you crossed over the tweeters at all? TEAM DC AUSTRALIA My_Build_Log Link to comment Share on other sites More sharing options...
bcbrassard Posted July 17, 2015 Author Report Share Posted July 17, 2015 just read through this, nice work on the box... the rf logo in black is a good touch. have you crossed over the tweeters at all? Thanks, i have white logo's and thought the ghost look would be cool but there was no contrast between the white colors. I believe they are crossed over at the HU or elsewhere. No sound quality issues. Sounds like they are only playing highs to me. I hope to get some power ran and amps mounted this weekend with door speakers changed out next weekend. Link to comment Share on other sites More sharing options...
bcbrassard Posted July 19, 2015 Author Report Share Posted July 19, 2015 Good progress today. I got about 6 hrs of work in today. Amps And LC7 mounted. A couple decals i had lying around. Everything turned out pretty good i think. Dinner and break time. I like the factory wiring job but hate the battery terminals and will change them out when i order and get a XS battery for it. I told the wife it was 3 yrs old and getting to be time for a new one. Even though this battery is resting and 13.5 volts. I made it to where the stock cover went back on. I was able to get all power ran and left side speaker and signal wire. Plus amps mounted so i think it was a good day. If i can get right side wires done and some grounds and power hooked up tomorrow i would be happy. And following weekend mids in the doors and tuning of system. I am in no hurry and not going to kill myself to get it done. Takes the fun out of it. Thanks for staying tuned in. Link to comment Share on other sites More sharing options...
vetkilr01 Posted July 19, 2015 Report Share Posted July 19, 2015 Nice work on that Malibu. Love to see what others have done to theirs. Link to comment Share on other sites More sharing options...
firebirdude Posted July 19, 2015 Report Share Posted July 19, 2015 Looks nice. But mounting the amps to the box and running half the wires took you 6 hrs?! Link to comment Share on other sites More sharing options...
bcbrassard Posted July 19, 2015 Author Report Share Posted July 19, 2015 Nice work on that Malibu. Love to see what others have done to theirs. Thank you, some really nice Malibu builds on SMD. This was a small build for the wife. Link to comment Share on other sites More sharing options...


Recommended Posts
Archived
This topic is now archived and is closed to further replies.