oldsoundguy Posted May 8, 2020 Report Share Posted May 8, 2020 I have been reading along for a little while. Its going to be a nice build. You have researched, asked questions, tested, rebuilt ect. You have put in the time so I am sure it will sound outstanding. 80prs Arc Audio Xdi 1200.6 (using active crossovers) Freaking awesome amplifier Incriminator IA 10.1 Focal PS 130v 5.25 (doors) 4" Faital pro Neo (kick panels) 3" Faital pro Neo and focal tweets( dash) DC Audio level 3 12" custom box designed by joex built by me AGM front, XS 750SE batteries rear DC 180 alt 99 Toyota Tacoma extra cab http://www.stevemeadedesigns.com/board/topic/179476-my-small-build-turned-into-the-ongoing-build/ Link to comment Share on other sites More sharing options...
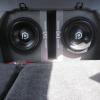
bcbrassard Posted May 14, 2020 Author Report Share Posted May 14, 2020 Finished filling holes and sanding the enclosure. Drilled the holes for 0 gauge grommets to install for ground runs off frame. Prepped battery tray for paint. Painted underneath to protect the wood. Top of battery tray, With this done i can work on sound proofing the spare tire well before i install it. I was able to get the enclosure painted today too. It needs one more coat in the port but pretty happy with how it turned out. Simple steps but a few things where holding me up so i can go back to some wiring and install battery and tray. I am back home with the wife, returned last Friday and very happy to be home. Progress will be slow, should start work next week. Maybe ? not sure, i can pull my retirement next august 14th. Link to comment Share on other sites More sharing options...
bcbrassard Posted May 14, 2020 Author Report Share Posted May 14, 2020 Looks good in there. Grommets for grounds. Another look at it. Now to figure out positive runs to battery. Port needs one more coat after this one drys. Another coat here and i will be ready for.... To finish deadening the wire to the sub and mount the SMD terminal into the enclosure. I am going to keep chipping away at these small tasks just to feel like i am still making progress at something. Link to comment Share on other sites More sharing options...
bcbrassard Posted May 18, 2020 Author Report Share Posted May 18, 2020 Finally found my Goof Off to clean the decal residue off. It had been bugging for a few months now. Feel much better having it clean. I started playing with the LED tail lights. They seem nice. Bench tested the with the Malibu's old battery. Damn bright. A little long and doesn't replace the factory harness like i thought, Stupid me... So you end up with a mess this long. I need to find some factory tail light plugs and do some rewiring. While figuring out the LED's i pulled all the lights outs to tint. Having to take trunk panel off to get this far, i feel it would be stupid to not deaden the trunk lid now instead of later. I did clean up behind the tail lights and the back of the tail lights themselves. Now to some sound deadening, all i have is Soundskins and i would like to put some Secondskin down first. Link to comment Share on other sites More sharing options...
bsneon98 Posted May 18, 2020 Report Share Posted May 18, 2020 nice man. what did you paint the enclosure with? Looks factory! I glassed one corner of the beaters trunk for a box this weekend. Not sure what volume it is yet but well see what happens lol. I need more chop mat. Almost 3am here and cant sleep so nice seeing someone make progress! what are you tinting tails with? if you go the VHT nightshades route, wetsand the crap out of the stock lenses before paint. Build Log: http://www.stevemeadedesigns.com/board/topic/152954-1998-plymouth-neon-updates/ Link to comment Share on other sites More sharing options...
bcbrassard Posted May 18, 2020 Author Report Share Posted May 18, 2020 9 hours ago, bsneon98 said: nice man. what did you paint the enclosure with? Looks factory! I glassed one corner of the beaters trunk for a box this weekend. Not sure what volume it is yet but well see what happens lol. I need more chop mat. Almost 3am here and cant sleep so nice seeing someone make progress! what are you tinting tails with? if you go the VHT nightshades route, wetsand the crap out of the stock lenses before paint. I rolled & brushed Krylon indoor/outdoor Flat Black paint. I am going for a simplistic clean look when the back seats are down for bass. The trunk will have some flash and LED's in a clean layout. Post pics of your progress i would like to see what you have. Always small progress, the wife said i should start driving the Malibu soon.... I laughed and told her it was now where ready to drive. I said my heart wasn't in it since we where separated, she laughed and said the marriage wrecker project? lol it wasn't the car but the isolation i was doing in the garage. Back home now and things are good. When she first bought the car i had the windows tinted and then i night shaded the lenses with them on the car. I masked everything off because i wasn't about to take anything apart on her new car. LOL look at me now!!! I didn't think about wet sanding the lenses to make it stay and last longer. Thanks for the tip. I tinted them originally in 2012 and they still have some color left so first round lasted a long time for being a outside car. Link to comment Share on other sites More sharing options...
bsneon98 Posted May 19, 2020 Report Share Posted May 19, 2020 18 hours ago, bcbrassard said: I rolled & brushed Krylon indoor/outdoor Flat Black paint. I am going for a simplistic clean look when the back seats are down for bass. The trunk will have some flash and LED's in a clean layout. Post pics of your progress i would like to see what you have. Always small progress, the wife said i should start driving the Malibu soon.... I laughed and told her it was now where ready to drive. I said my heart wasn't in it since we where separated, she laughed and said the marriage wrecker project? lol it wasn't the car but the isolation i was doing in the garage. Back home now and things are good. When she first bought the car i had the windows tinted and then i night shaded the lenses with them on the car. I masked everything off because i wasn't about to take anything apart on her new car. LOL look at me now!!! I didn't think about wet sanding the lenses to make it stay and last longer. Thanks for the tip. I tinted them originally in 2012 and they still have some color left so first round lasted a long time for being a outside car. awesome man, glad to hear things are shaping up at home. i know i gotta update my log one day, really havent done much but like you said progress is progress. rear struts will be here thursday so once those are in I can fix some rust holes in trunk and the leaky tail light gaskets. thats a pretty good long time for some rattle can stuff. but like my favorite saying "if its worth doing its worth over doing" so im with ya man! lol I love the vht stuff products need to stock up for when I repaint the new motor for the 1gn. so many projects so little time. Build Log: http://www.stevemeadedesigns.com/board/topic/152954-1998-plymouth-neon-updates/ Link to comment Share on other sites More sharing options...
bcbrassard Posted May 31, 2020 Author Report Share Posted May 31, 2020 Second week of work so progress is slowing down. The wife's birthday was last Friday so we rented a 22' motor home to drive up to Chena Hot Springs. Awesome place, rented 4 wheeler s, mountain bikes, paddle boat and a lot of soaking in the springs. Working on trunk lid still. All cleaned up and ready for sound treatment. Just getting started. Another view, little areas can be a pain in the ass. I ran out of product, ordered another box of secondskins. Should be here next week. The plan is to use Secondskin acoustic foam to fill these holes up before the lid gets covered in Soundskin. Oh the layers.... This came in Friday.... It wasn't easy to find one that would fit. But this fits perfect!!! At 6 7/8" i couldn't be happier with it. I took a lot of searching and then praying it would work. I was going to build this out of wood and paint it but there is always a better way, it just takes time and thought. Now i can use threaded inserts and a long bolt that will look nice, Maybe even a metal sleeve around the bolts. We will see when i get there. Link to comment Share on other sites More sharing options...
Ron36 Posted May 31, 2020 Report Share Posted May 31, 2020 Advance Auto has these that’s what I used I know U don’t need the hold down but the threaded rod worked great and it’s 6 bucks. 2022 Ford Maverick on 22’s Skar SK1500.1 on 4 Skar VD-8’s Mids Sundown Super tweeters, Skar TX 6.5 components on Skar SKM400.4 LC2 for audio control , XS Power D680 XS Series Extra Battery Link to comment Share on other sites More sharing options...
bcbrassard Posted May 31, 2020 Author Report Share Posted May 31, 2020 Thanks for the suggestion, I already have the threaded inserts so it's just a matter of getting a couple 3" bolts. Link to comment Share on other sites More sharing options...


Recommended Posts
Archived
This topic is now archived and is closed to further replies.