immageek Posted July 26, 2015 Report Share Posted July 26, 2015 What do you have to do to get the door panels off? Remove 4 screws, 1 bolt, and be careful. It is just one of the easier panels i have done. Just curious, where did you bring the wire into the door at? I have a Malibu that I did the front doors on and it was a P.I.T.A. I ended up drilling a hole through the proprietary door connector and sneaking a wire in there. Did you just drill new holes under the factory spots or what? Link to comment Share on other sites More sharing options...
bcbrassard Posted July 27, 2015 Author Report Share Posted July 27, 2015 What do you have to do to get the door panels off? Remove 4 screws, 1 bolt, and be careful. It is just one of the easier panels i have done. Just curious, where did you bring the wire into the door at? I have a Malibu that I did the front doors on and it was a P.I.T.A. I ended up drilling a hole through the proprietary door connector and sneaking a wire in there. Did you just drill new holes under the factory spots or what? I Drilled 2 holes thru the molex connection for the 18 awg signal wire to the LC7 and another hole for the 16 awg from the amp to the T3's. Sorry i didnt't take any pics because i was in a hurry. All weekend consumed with the build. But its up and running. Link to comment Share on other sites More sharing options...
bcbrassard Posted July 27, 2015 Author Report Share Posted July 27, 2015 What do you have to do to get the door panels off? So here's is a step by step on panel removal. Sail panel pulls out but not off, hinged onto panel. Door handle cover inside. Use screw driver to pop out plastic cover to get to bolt. Handle cover part 2. Remove to get to screws and remove screws. 2 of the stupid button plugs. Push center in about a 1/8 of an inch and then pull the hole thing out. Thats what they look like out. Remove control panel to get to these screws. Start on the bottom of the panel by the map pocket and pull it out, use a panel removal tool if you have one. once it's all free you have to pull up to free it from window seal. This is a plug in you will want to unplug. Plug on panel side. Door latch cable. Removes from here. And that about it. Link to comment Share on other sites More sharing options...
bcbrassard Posted July 27, 2015 Author Report Share Posted July 27, 2015 Ok, Now on to the build. After church i packed up everything in the Malibu and headed to my brothers to get this done out of the rain. I was able to get about 6 hours on it and and its up and running. Here is the drivers side. Looks different from the passenger side, why you ask... Well funny story, when i finished the passenger side last night and tested out the window movement it went ALMOST all the way down. It was hitting the magnet on the T3's. So this spacer was my fix on the drivers side. Ya i knew the stock speaker was shallower but i thought the T3 would work since it has neo magnets. Live and learn. I am no a pro but cant find a solution to problems quickly. Link to comment Share on other sites More sharing options...
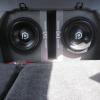
bcbrassard Posted July 27, 2015 Author Report Share Posted July 27, 2015 So i have another spacer made for the passenger side that i will do next weekend. Here's how the wiring looks as of now. I will clean it up some more next weekend. So My DD-1 battery was weak and had to to it by ear until i get a new battery and set everything next weekend. I set the gains low so she would have tunes for the week. I tested it out for her and she didn't really care, she was sick this weekend and we weren't getting along great so at least its mostly done. Now my review is that i am really surprised how good the T3's sound on 75 rms in those doors. And the RF Punch tweeters in the pillars on HU power keep up with everything really well. Rear deck speaker have fill but don't over power the system. The sub is banging away nicely but GM's trunk is a rattling piece of shit IMO. I thought it was going to be an issue when i was sound deadening it. My 03 Lancer is way way more solid than this car. Oh well, she wont be wanging to hard on it unless it becomes her thing. Link to comment Share on other sites More sharing options...
bcbrassard Posted July 27, 2015 Author Report Share Posted July 27, 2015 So with one solution for the T3's it made an issue on the driver door where the trunk release button is. So i had to turn an recessed button into a external button for the clearance needed. Like this.... Link to comment Share on other sites More sharing options...
vetkilr01 Posted July 27, 2015 Report Share Posted July 27, 2015 I am still trying to figure out what to do with my button...I just have in hanging out. Thanks for the play by play for the door panels man. Link to comment Share on other sites More sharing options...
bcbrassard Posted July 28, 2015 Author Report Share Posted July 28, 2015 I am still trying to figure out what to do with my button...I just have in hanging out. Thanks for the play by play for the door panels man. Thats what i had going in too, until the wife flipped out so that was my short term solution. I was going to take the heat gun to soften the plastic up to deflect the button some to miss the speaker spacer. Link to comment Share on other sites More sharing options...
Wood Posted July 28, 2015 Report Share Posted July 28, 2015 SUPER Clean install!! 2011 Nissan Altima aka Red Ruby HEADUNIT: Pioneer AVH X2700BS ELECTRICAL: -Singer 230a -Northstar gr34 -(2) Northstar SMS220 w/ Custom Terminals from 12V Metalworkz -100% Welding Cable FRONT STAGE:-(2 Sets) Hertz HSK165 -Hertz HSK130 -Ampere Audio 125.4 SUB STAGE: -(3) Sundown Audio SA REV2 12's -Ampere Audio 3800.1 V2 MISC (NON AUDIO RELATED): -Interior & Exterior Lights LED -Gloss Black Roof (PAINTED) -15% Front, 5% Rear Tint -Roof Spoiler -20" TSW Snettertons (20x8.5 front, 20x10 rear) -Custom Projector Retrofit (FX-R 3.0, 6.5k HID, Morimoto Mini H1 (faux projector), Quad Starry Night Halos) ----- COMING SOON!! -Aftermarket Fog Lights -Custom Painted Engine Covers My Build Log: http://www.stevemeadedesigns.com/board/topic/169869-woods-2011-altima-aka-red-ruby-new-video-more-updates/page-109 Retrofit Build Log: http://www.stevemeadedesigns.com/board/topic/185787-hid-projector-retrofitting-diy-by-wood/#entry2765346 Link to comment Share on other sites More sharing options...
bcbrassard Posted July 28, 2015 Author Report Share Posted July 28, 2015 SUPER Clean install!! Thanks man, i appreciate it coming from you. I just came in from listening to it and it sounds good now, just wait until i DD-1 it, Should sound cleaner. and i will have peace of mind know everything is set properly. Link to comment Share on other sites More sharing options...


Recommended Posts
Archived
This topic is now archived and is closed to further replies.