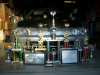
LSN2meBoom916 Posted January 14, 2007 Report Share Posted January 14, 2007 I'm finally done scanning in the eleventy billion pics of the full build of my car. I have had this car since 1997 when It rolled off the lot with 2.9miles on it. NO, it's not a GSR, it's an LS, & AUTO. I'm not into racing. I was 16 when I got it and didn't have time with highschool & lady friend to build it myself so the very first setup was shop installed. Deck: Alpine cda-7832 Front mids:MB Quart QM 130TX2 5 1/4" Component set w/ MUSICOMP X-overs mounted in front doors/stock locations. Soundstream Reference 604 (75x4rms) 2 chann to front mids, 2 chann bridged to subs 2-Kicker compVR 15's (sealed 3cf each in custom box) Lightning Audio 1200ca Blue top battery Later added Phoenix Gold Qx 6 1/2" coax rears (stock location). This setup did a consistant 142db on an Audio Control AC-160...and a "freak accidental" 146db same mic in DB drag for 3rd place. Amp under driver seat. So I rolled that setup until the summer of 2003. I actually built 2 setups for this car, side by side. Identical-just diff box/subs. One was a fiberglassed front & spare tire-well fiberglassed for 2 CVR 15's which is now a giant paperweight (*For sale*). It is affectionately referred to as "The Buttbox" by most who know it, as it resembles 2 giant ass cheeks from a couple diff angles. I'll post the rest of the finished shots of that after the build pics so yoall can see what a pain it was in the R&D phase. The tear down:Step 1-Get 'er nekkid. Step 2-Make 'er quiet. "Dynamatted" with 3 Bulk paks of Cascade V-Block (VB2 I think) Floorboards Stripped and cleaned both doors. And seled/deadened em up. Same with the ass end...cuz no ones likes a noisey ass. The funny colored matting in between is 1/2" foam. The blue is more acoustic/wave catching material. All the black stuff is Cascade VB-2 http://i9.photobucket.com/albums/a68/CasperDaBoi/My%20build%20log/interior3.jpg http://i9.photobucket.com/albums/a68/CasperDaBoi/My%20build%20log/interior2.jpg Gotta love that Honda-styled 3 piece interior http://i9.photobucket.com/albums/a68/CasperDaBoi/My%20build%20log/interior1.jpg So then it was time to get crackin on the spare tire TUB. 1st the frame. http://i9.photobucket.com/albums/a68/CasperDaBoi/My%20build%20log/Box0001.jpg The the seal/masking off of the tire well. http://i9.photobucket.com/albums/a68/CasperDaBoi/My%20build%20log/Box0002.jpg I should mention here-SOMEHOW in my giddyness to git' er done, I only took pics of making the TUB for the Buttbox/15's, but i assure yall they were the same shit so better this way than post duplicates. Only diff was I used foil on my current box and seran wrap on the Buttbox. I prefer the foil method. http://i9.photobucket.com/albums/a68/CasperDaBoi/My%20build%20log/Box0003.jpg http://i9.photobucket.com/albums/a68/CasperDaBoi/My%20build%20log/Box0004.jpg Start layin the foundation/glasswork http://i9.photobucket.com/albums/a68/CasperDaBoi/My%20build%20log/Box0005.jpg http://i9.photobucket.com/albums/a68/CasperDaBoi/My%20build%20log/Box0006.jpg So amidst working on it I was having bass withdrawels, so i had to hook up a temporary/daily setup. Sounded surprisingly good for one lil ol 12". http://i9.photobucket.com/albums/a68/CasperDaBoi/My%20build%20log/Box0007.jpg Tub needs some bracing. http://i9.photobucket.com/albums/a68/CasperDaBoi/My%20build%20log/Box0008.jpg http://i9.photobucket.com/albums/a68/CasperDaBoi/My%20build%20log/Box0009.jpg The top peice to the "L"-shaped brace is MDF and the back side is plexi. Why? http://i9.photobucket.com/albums/a68/CasperDaBoi/My%20build%20log/Box00091.jpg So the light can get around inside the box. http://i9.photobucket.com/albums/a68/CasperDaBoi/My%20build%20log/Box00092.jpg A lil bondo/milkshake to seal up the back end after glassin it. http://i9.photobucket.com/albums/a68/CasperDaBoi/My%20build%20log/Box00093.jpg Secured the brace-predrilled screws thru the bottom of the tub,that hit the cross-sectional center race. http://i9.photobucket.com/albums/a68/CasperDaBoi/My%20build%20log/Box00094.jpg I jumped up and down on it quite a few times to make sure it would not budge. Solid as she goes, but ugly as hell, so i shot it w/ some gray primer just so i could stand to look at it...and prep for paint. :watsup: http://i9.photobucket.com/albums/a68/CasperDaBoi/My%20build%20log/Box00095.jpg http://i9.photobucket.com/albums/a68/CasperDaBoi/My%20build%20log/Box00096.jpg So with the TUB all built and lookin decent I started on the top 1/2 of the box for the 12's. (Keeping in mind I was still throwin hands on the Buttbox every other day or so) Once I had the tub built I filled it with styrofoam packing peanuts and packed em in lightly. The I transferred those to a carboard box that I could measure to get the airspace of the TUB alone, and subtract that from my total airspace for the 4-12's so i'd know how big the top 1/2 of the box would need to be. I find this to be a pretty accurate method. These are the sides to the top 1/2 of my box. http://i9.photobucket.com/albums/a68/CasperDaBoi/My%20build%20log/Box00097.jpg The little blue panels are 1/4" clear Plexi, they just have the protecticve coating paper on em so not to get scratched. The panels were recessed (1/4") into the interior side of the box sides so they sat flush, and then sealed in w/ resin/bondo/kitty hair and sanded smooth. Then primered & ready for paint. The panels are not THICK plexi, but it's ok since the pressure generated inside the box will have small surface area to act/push on and since they are mounted FROM the INSIDE, the pressure would have to be enough to break mdf b4 they would ever budge. Not likely. Test fit them plexi panels. http://i9.photobucket.com/albums/a68/CasperDaBoi/My%20build%20log/Box00098.jpg ***************SPLIT FOR FIREFOX USERS*********** COOGLE SAID:"bro thats how we got where we are... buy making messes ...... i still learn all the time you just gota be willing to ruck up some shit" "In order to attain the impossible, one must attempt the absurd." ~ Miguel de Unamuno"One machine can do the work of fifty ordinary men, but no machine can do the work of one extraordinary man" -Elbert Hubbard"A proud man can learn humility...but he will be proud of that too" ~I forget who.I'm far from perfect and I know it better than anyone, but I hope to be good at what I do, when I do it...Installs I've done:My Integra: http://www.stevemeadedesigns.com/board/ind...?showtopic=3161The Lexus : http://www.stevemeadedesigns.com/board/ind...?showtopic=1535Law's Maxima: http://www.stevemeadedesigns.com/board/ind...ic=5568&hl=Jeff's 2500HD: http://www.stevemeadedesigns.com/board/ind...ic=5382&hl=Acura RSX-S: http://www.stevemeadedesigns.com/board/ind...?showtopic=3142Z-32 300zx: http://www.stevemeadedesigns.com/board/ind...?showtopic=34602004 Civic 4dr: http://www.stevemeadedesigns.com/board/ind...?showtopic=8190Trunk/Corner Box: http://www.stevemeadedesigns.com/board/ind...c=16036&hl=1969 Chevy C-10: http://www.stevemeadedesigns.com/board/ind...c=20319&hl=Seat-Back AMP-RACK How-to: http://www.stevemeadedesigns.com/board/ind...ic=9428&hl=Bunch of subs still for salehttp://www.stevemeadedesigns.com/board/ind...l=lsn2meboom916"It's game night...we're playin......sex."~Quagmire"When disneyland started it was powered completely by orphan children running on treadmills to generate e-lectrissty…and today, them children are New York Yankees". ~Dale Gribble"Fill it with ice...then pour it up to the top of the ice...& Shut da Fu** up!" ~Urs truly. Link to comment Share on other sites More sharing options...
dmanson Posted January 14, 2007 Report Share Posted January 14, 2007 very nice install bro. i need to get me some plexiglass. maybe next year when i get a chance to set still and not travel so much with the military i'll get a chance to redo my enclosures 2-DC 15XLM2 D.7s 1-DC 5K amp (1) XS Power D6500(UNDERHOOD) and (1) XS3000(REAR) 3 runs 1/0ga for power and 2 runs of 1/0ga for negative. (2)-RFT165s components, ...... 4 separate 1 inch tweetersRF T600-2(fronts) Punch 450.4(rear) Audiocontrol 3.1. DC power 260amp alternator w/MLA Module Link to comment Share on other sites More sharing options...
Amalan Posted January 14, 2007 Report Share Posted January 14, 2007 yet again very beautiful install. what does it hit on the tl? btw can you break up the pics next time into different posts? firefox users cant see all the pics. it works fine for ie users tho i counted 60 pics that i could see then it stopped so i guess break up inbtwn two posts 50 pics to be on the safe side Link to comment Share on other sites More sharing options...
D_Bass Posted January 14, 2007 Report Share Posted January 14, 2007 bad ass stuff you got. keep them hittin To Slide Sideways Or Not To Slide Sideways? Head unit: Pioneer AVH-5000DVDSpeakers: 4 Pionner TS-G6842R Amplifier: Alpine MRD-300Subwoofers: 10" JL Link to comment Share on other sites More sharing options...
AI James Posted January 14, 2007 Report Share Posted January 14, 2007 yet again very beautiful install. what does it hit on the tl? btw can you break up the pics next time into different posts? firefox users cant see all the pics. it works fine for ie users tho i counted 60 pics that i could see then it stopped so i guess break up inbtwn two posts 50 pics to be on the safe side same here thanks for the sharing though, looks like a labor of love Link to comment Share on other sites More sharing options...
LSN2meBoom916 Posted January 15, 2007 Author Report Share Posted January 15, 2007 *******CONTINUED FROM SPLIT*********** OUT IN THE TUFF SHED I BOUGHT/BUILT TO HOUSE MY PROJECTS: OK-Skip ahead a bit-No pics of the wood comin together for the top of the box but in this pic you can see it UP on-end in the middle. This pic is also DEFINITIVE proof I was building both setups side by side-the buttbox 1/2 primered/sanded in the background, one TUB drying in front of that, the top of the box for the 12's in the center on-end, the other TUB up against the side in front/left, and the 1st amp rack I built sitting on top of that. Still mucho work to do. So after building the top 1/2 of the box, it got attatched/sealed onto the "mounting plate" that consisted of and mdf sheet w/ a large section removed, and the bottom end plexi piece (3/4") that the bottom 2 subs mount to, replacing that chunk. then it was all sealed with kitty hair/bondo, and resanded smooth again. Came out fairly seamless from mdf-to plexi-and back to mdf. The Square cutouts are so ALL 4 subs will share airspace. Here's a "test fit" shot of how the 2 halves will come together. But first.... Before I want to join the toghether forever, I wanna do some "prettying work" on the inside of the tub while it's still open and easy to work on. After I threw the white on the interior of the tub, I used the ACOUSTIC TEXTURING spray they use inside houses on the cieling to difract sound. Pretty cool lil cans w/ the nozzle pointing straight up for ease of applying above your head. So in my case I just suspended the tub upside down on a couple of ladder rungs and sprayed away. I went backover in white a few times just to make sure it was uniform color. Whites are kinda tuff to match sometimes. Here you can see the protective tape on the plexi in the bottom of the box is off just before I joined the 2 halves. A couple more test fits/angle shots. In this shot you can see how the "base board" to the top half of the box allowed me to secure the whole top to the bottom/tub by screwing it together via the 2" overlap/flange around the squares. then It all got more bondo/resin/milkshake sealer. After it was all togehter and sealed up like a mofo, I resprayed/touched up the interior white a few times. Checkin how it sat in the trunk Then pulled it back out to spray the front of the box in gray primer. I did this to make sure the parts that were plexi that I dint want you to see thru were well covered and the interior/exterior views would "line up" The backside of the box with the LEDGE for the amp rack to sit on. Wiring time. 2 runs of 12ga per sub. Overkill at these power levels but better overkill than underkill. http://i9.photobucket.com/albums/a68/CasperDaBoi/My%20build%20log/Box00099991.jpg http://i9.photobucket.com/albums/a68/CasperDaBoi/My%20build%20log/Box00099992.jpg Next is to make the outside look like the inside to some degree. Face panel is a copy of the top-half-box front but with squares instead of circles and THAT gets wrapped in white vinyl to compliment the box interior. http://i9.photobucket.com/albums/a68/CasperDaBoi/My%20build%20log/Box00099993.jpg And hides the primer nicely http://i9.photobucket.com/albums/a68/CasperDaBoi/My%20build%20log/Box00099994.jpg http://i9.photobucket.com/albums/a68/CasperDaBoi/My%20build%20log/Box00099995.jpg http://i9.photobucket.com/albums/a68/CasperDaBoi/My%20build%20log/Box00099996.jpg http://i9.photobucket.com/albums/a68/CasperDaBoi/My%20build%20log/Box00099997.jpg Test fitting the subs http://i9.photobucket.com/albums/a68/CasperDaBoi/My%20build%20log/Box00099998.jpg And gettin started on the trim/beauty panels http://i9.photobucket.com/albums/a68/CasperDaBoi/My%20build%20log/Box00099999.jpg If you look close in this pic, the tops of the 2 bottom woofers wouldnt allow the top trim pieces to sit flush so i had to grind out some lil semi circles. After that the sub rings actually help hold the trim piece in which is also screwed together and tensioned in place by the cars interior panels= VERY TIGHT FIT. No shakes or rattles there @ all. http://i9.photobucket.com/albums/a68/CasperDaBoi/My%20build%20log/Box000999990.jpg http://i9.photobucket.com/albums/a68/CasperDaBoi/My%20build%20log/Box000999991.jpg Rear deck clearence check: Perfecto. http://i9.photobucket.com/albums/a68/CasperDaBoi/My%20build%20log/Box000999992.jpg Here's the temp jig i had to rig up to get that double angle cut on the trim panels that come up against the bottom 2 sub rings. http://i9.photobucket.com/albums/a68/CasperDaBoi/My%20build%20log/zJigg1.jpg http://i9.photobucket.com/albums/a68/CasperDaBoi/My%20build%20log/zjigg2.jpg FINALLY! ALL vinyled up and sexy. http://i9.photobucket.com/albums/a68/CasperDaBoi/My%20build%20log/Box000999993.jpg I think I took this one down at Infineon Raceway (was Sear's Point b4) where I got my 1st trophy w/ the setup. 3rd place Db drag street 3-4, 146.#db A/C mic. http://i9.photobucket.com/albums/a68/CasperDaBoi/My%20build%20log/Box000999994.jpg Steve was there with the civic and killed me. If you look close (far left) My elbow and my car's headlight are in there HAHAHA. CAMEO FTW! http://i9.photobucket.com/albums/a68/CasperDaBoi/My%20build%20log/239025_146_full.jpg Nicer/newer pix from when my buddy and I did a lil photo shoot w/ his nice camera. http://i9.photobucket.com/albums/a68/CasperDaBoi/My%20build%20log/2053366_7.jpg Lights http://i9.photobucket.com/albums/a68/CasperDaBoi/My%20build%20log/2053366_8.jpg http://i9.photobucket.com/albums/a68/CasperDaBoi/My%20build%20log/2053366_9.jpg And then the new subs went in most recently http://i9.photobucket.com/albums/a68/CasperDaBoi/My%20build%20log/2053366_37_full-1.jpg http://i9.photobucket.com/albums/a68/CasperDaBoi/My%20build%20log/2053366_36_full-1.jpg http://i9.photobucket.com/albums/a68/CasperDaBoi/My%20build%20log/good-1.jpg http://i9.photobucket.com/albums/a68/CasperDaBoi/My%20build%20log/EPV0012.jpg Thats it for a lil while. I got another assload of pics I'll add in a bit. Amp rack, pods, wiring, lights. --------------------------------------------------------- Here's the rundown in case anyone wants it: Entire car (minus roof) sound deadened using Vblock extreme by Cascade (vinyl dynamat) Stinger Audio SP1000 battery under hood Big 3 Alpine CDA 9856 cd deck Audio Control Epic-160 indash bass enhancement w/ built in 160db mic Same front mids but in .25cft sealed kickpods same rear mids (stock location) Phoenix Gold Tantrum T1200.1 monoblock (benched at 1521rms @2ohm) Phoenix Gold Tantrum T600.4 (75x4rms) fronts/rears 4-'05 Kicker CompVR 12's in custom fiberglass/plexi box built by me, neon lit and glow in the dark box interior. Audiobahn 1.0F cap w/ digital readout. I think thats it. Does a 150db now on an Audio control mic...maybe 145ish peak on a TL. 150's are coming. I have 4 new 12's for a rebuild and 2 other builds for "loudness only"rather than the "daily setups" I've been considering/running. Pics. http://www.sounddomain.com/ride/2053366 COOGLE SAID:"bro thats how we got where we are... buy making messes ...... i still learn all the time you just gota be willing to ruck up some shit" "In order to attain the impossible, one must attempt the absurd." ~ Miguel de Unamuno"One machine can do the work of fifty ordinary men, but no machine can do the work of one extraordinary man" -Elbert Hubbard"A proud man can learn humility...but he will be proud of that too" ~I forget who.I'm far from perfect and I know it better than anyone, but I hope to be good at what I do, when I do it...Installs I've done:My Integra: http://www.stevemeadedesigns.com/board/ind...?showtopic=3161The Lexus : http://www.stevemeadedesigns.com/board/ind...?showtopic=1535Law's Maxima: http://www.stevemeadedesigns.com/board/ind...ic=5568&hl=Jeff's 2500HD: http://www.stevemeadedesigns.com/board/ind...ic=5382&hl=Acura RSX-S: http://www.stevemeadedesigns.com/board/ind...?showtopic=3142Z-32 300zx: http://www.stevemeadedesigns.com/board/ind...?showtopic=34602004 Civic 4dr: http://www.stevemeadedesigns.com/board/ind...?showtopic=8190Trunk/Corner Box: http://www.stevemeadedesigns.com/board/ind...c=16036&hl=1969 Chevy C-10: http://www.stevemeadedesigns.com/board/ind...c=20319&hl=Seat-Back AMP-RACK How-to: http://www.stevemeadedesigns.com/board/ind...ic=9428&hl=Bunch of subs still for salehttp://www.stevemeadedesigns.com/board/ind...l=lsn2meboom916"It's game night...we're playin......sex."~Quagmire"When disneyland started it was powered completely by orphan children running on treadmills to generate e-lectrissty…and today, them children are New York Yankees". ~Dale Gribble"Fill it with ice...then pour it up to the top of the ice...& Shut da Fu** up!" ~Urs truly. Link to comment Share on other sites More sharing options...
ChevyBoy Posted January 15, 2007 Report Share Posted January 15, 2007 nice man. i like the plexi touch. Link to comment Share on other sites More sharing options...
LSN2meBoom916 Posted January 15, 2007 Author Report Share Posted January 15, 2007 DID THAT HELP? I hope so. I still got an assload of pics on this one. I was kinda tryin to keep it all bunched so you could jsut view em all in a row as I built it but i guess the breaks in between is the only way since I dunno how Steve fixed it on his post of Chickens towers? (anyone?) Lots More to come. Stay tuned. :watsup: COOGLE SAID:"bro thats how we got where we are... buy making messes ...... i still learn all the time you just gota be willing to ruck up some shit" "In order to attain the impossible, one must attempt the absurd." ~ Miguel de Unamuno"One machine can do the work of fifty ordinary men, but no machine can do the work of one extraordinary man" -Elbert Hubbard"A proud man can learn humility...but he will be proud of that too" ~I forget who.I'm far from perfect and I know it better than anyone, but I hope to be good at what I do, when I do it...Installs I've done:My Integra: http://www.stevemeadedesigns.com/board/ind...?showtopic=3161The Lexus : http://www.stevemeadedesigns.com/board/ind...?showtopic=1535Law's Maxima: http://www.stevemeadedesigns.com/board/ind...ic=5568&hl=Jeff's 2500HD: http://www.stevemeadedesigns.com/board/ind...ic=5382&hl=Acura RSX-S: http://www.stevemeadedesigns.com/board/ind...?showtopic=3142Z-32 300zx: http://www.stevemeadedesigns.com/board/ind...?showtopic=34602004 Civic 4dr: http://www.stevemeadedesigns.com/board/ind...?showtopic=8190Trunk/Corner Box: http://www.stevemeadedesigns.com/board/ind...c=16036&hl=1969 Chevy C-10: http://www.stevemeadedesigns.com/board/ind...c=20319&hl=Seat-Back AMP-RACK How-to: http://www.stevemeadedesigns.com/board/ind...ic=9428&hl=Bunch of subs still for salehttp://www.stevemeadedesigns.com/board/ind...l=lsn2meboom916"It's game night...we're playin......sex."~Quagmire"When disneyland started it was powered completely by orphan children running on treadmills to generate e-lectrissty…and today, them children are New York Yankees". ~Dale Gribble"Fill it with ice...then pour it up to the top of the ice...& Shut da Fu** up!" ~Urs truly. Link to comment Share on other sites More sharing options...
LSN2meBoom916 Posted January 15, 2007 Author Report Share Posted January 15, 2007 *********Update*******more pics******** Ok so here's the buildup of my amp rack. I kinda rushed the first one cuz I had a feeling the amps i wanted to run (Soundstream Reference 500 & Reference 604) had ISSUES. so I just threw it together, pretty much expecting to build another one but here it goes. Once the cover/trim was on, the GROSS areas in the vinyl were not all that visible but I was still figuring things out and like I said pretty rushed on this one so i didn't go back and fix the lil stuff on this rack. But as I figured...the amps were TRIPPIN....Time to UPGRADE. Enter 2-Phoenix Gold Tantrum 600.4 4 channels. (one bridged 2 cahnn, 2ohm stereo on each pair of subs, the other 4ohm stereo/4chann to the front/rear mids) And the new rack which I spent quite a bit more time on this time. I decided to go a lil fancier this time tho too. I traced & cut out an exact Acura logo And as soon as I did it, i realized it'd be impossible to vinyl, and much better/blingyier w/ a real logo there. So as planned the 1/8" plexi went behind it, but i drilled some holes for the logo to mount in. Here's the guts of the setup w/ the 2-600.4s wired up. I used brass Battery terminals mounted to 1/2" dowels for "distribution blocks" for the 4 subs.(bottom left of rack) The back part of the rack is 1/4"mdf wrapped in black fleece. Then another layer of 1/4" mdf was wrapped in white fleece so the ends terminated on the back of that piece, and then the 2 were glued/sandwiched together to make the back of the rack 1/2" thick. Here's some lame pics (too much/not enough light) Lil bit better. http://i9.photobucket.com/albums/a68/CasperDaBoi/My%20build%20log/lookslikeurebumpin.jpg More to come.... COOGLE SAID:"bro thats how we got where we are... buy making messes ...... i still learn all the time you just gota be willing to ruck up some shit" "In order to attain the impossible, one must attempt the absurd." ~ Miguel de Unamuno"One machine can do the work of fifty ordinary men, but no machine can do the work of one extraordinary man" -Elbert Hubbard"A proud man can learn humility...but he will be proud of that too" ~I forget who.I'm far from perfect and I know it better than anyone, but I hope to be good at what I do, when I do it...Installs I've done:My Integra: http://www.stevemeadedesigns.com/board/ind...?showtopic=3161The Lexus : http://www.stevemeadedesigns.com/board/ind...?showtopic=1535Law's Maxima: http://www.stevemeadedesigns.com/board/ind...ic=5568&hl=Jeff's 2500HD: http://www.stevemeadedesigns.com/board/ind...ic=5382&hl=Acura RSX-S: http://www.stevemeadedesigns.com/board/ind...?showtopic=3142Z-32 300zx: http://www.stevemeadedesigns.com/board/ind...?showtopic=34602004 Civic 4dr: http://www.stevemeadedesigns.com/board/ind...?showtopic=8190Trunk/Corner Box: http://www.stevemeadedesigns.com/board/ind...c=16036&hl=1969 Chevy C-10: http://www.stevemeadedesigns.com/board/ind...c=20319&hl=Seat-Back AMP-RACK How-to: http://www.stevemeadedesigns.com/board/ind...ic=9428&hl=Bunch of subs still for salehttp://www.stevemeadedesigns.com/board/ind...l=lsn2meboom916"It's game night...we're playin......sex."~Quagmire"When disneyland started it was powered completely by orphan children running on treadmills to generate e-lectrissty…and today, them children are New York Yankees". ~Dale Gribble"Fill it with ice...then pour it up to the top of the ice...& Shut da Fu** up!" ~Urs truly. Link to comment Share on other sites More sharing options...
ChevyBoy Posted January 15, 2007 Report Share Posted January 15, 2007 steve did what you just did. he split them between his posts. Link to comment Share on other sites More sharing options...


Recommended Posts
Archived
This topic is now archived and is closed to further replies.