

Leboy23
-
Posts
286 -
Joined
-
Last visited
Content Type
Profiles
Forums
Events
Media Demo
Store
Collections
Videos
Posts posted by Leboy23
-
-
$180 shipped lower 48How much for the unopened T2 comps?
-
Brand new DC lvl3 18 with a lvl4 coil. Dual 1.4's $250 firm shipped lower 48
 Never opened set of Rockford T2 comps. The speakers are from ones I had open. $180 firm shipped lower 48
 -
Make it 15" tall 34" wide and 20" deep. Port will be 13.5" tall 4" wide and 38" long. That should give you about 2.73 cubic foot net and tuned right at 34hz. 54 square inches of port and 19.78 port per foot
-
I think im going to try this out. It looks pretty good. Thanks for your time. I've been going crazy the last few days trying to figure something out with this box. Trying to get it built before the sub shows up next week so I can just throw it in.Here is a suggestion, let me know if you need anything changed:
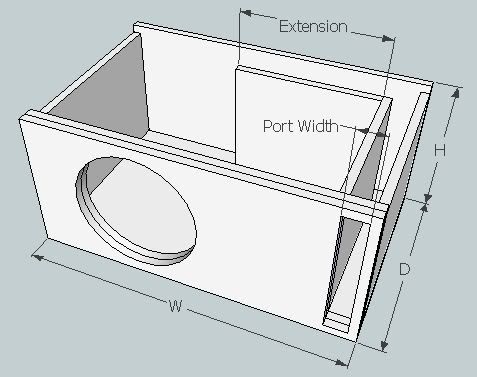
Enclosure Specifications:
Fb = 34 Hz
Vb = 1.75 ft^3
External Height = 15 in
External Width = 23.75 in
External Depth = 16 in
Port Width = 2 in
Cut Sheet List:
* All Dimensions in Inches.
* Wood Thickness is 3/4 for all Parts.
External Enclosure Parts:
2 x Front & Back (3 parts) = 23 3/4 x 15
Left & Right Sides = 13 3/4 x 13 1/2
Top & Bottom = 23 3/4 x 13 3/4
L Port Internal Assembly Parts:
Front to Back = 11 3/4 x 13 1/2
Extension = 13 1/2 x 13 1/2
Generic dimensions assembly guide:
-
I didn't at first. I had to edit itmy bad guys. It is a 12" thought i put that
you did. people just can't read properly.
where?
-
by no means am I a box designer but I thought it should have around 30 to 35" of port area. I cold be wrong though. That is where I was having my problem at. I would get enough port area but way to much port area per foot. Thanks John for your help. I'm gonna mess around some more also and see what I can come up with. May just have to start building boxes and see what sounds best
-
my bad guys. It is a 12" thought i put that
-
DC 1.2k at 1 ohm
-
Ive got a single DC lvl 3 12" m2 going in a 2012 nissan altima. Max diminsion are 15 high, 28 long, and 17 deep. trying to get the tuning around 37herts. Any help would be very much appreciated. I've had a hard time trying to figure out the size for a port. Rusty said the sub works best in a 1.5 net enclosure before sub displacement.
-
-
-
-
Ive got a lvl 3 18 Dc BNIB if your interested.
-
Can I borrow your "sex toys" I won't abuse them.
-
Had mine under the hood for a year so far. I live in texas a well. Don't have any issues with it.
-
What kind of budget do you have to spend on a setup? Maybe just need a ported box made to specs for the p3's and a amp the will give them some power. Also get rid of the other twelve.
-
You have 2 different amps powering your subs?
-
I would put another 3100 in the back also. Better to have to much than not enough.
-
For most paint restoring projects I usually go in these steps.
Products:
Dewalt variable speed buffer (a must have)
3M white foam pad (compound)
3M black foam pad (polish/glaze)
3M clay ball
3M compound
3M machine glaze
Wizards hand glaze
1. Wash and rinse car thoroughly (repeat)
2. Use fresh soap and water and clay ball complete car
3. Wash car again
4. Dry car completely (use air hose on all molding and jams)
5. Tape off all chrome and plastic
6. Go panel to panel with compound
7. Repeat till shine is deep
8. Go panel to panel with machine glaze
9. Repeat
10. Wash car again ( yes again)
11. Dry completely (use air gun)
12. Go over complete car with hand glaze (repeat if desired)
13. Use detailing brushes to get in all hard to reach places and finesse cleaning.
After all this you should have the shine and depth of a "like new" paint job!
I hope this helps, but I assure you, this is a full days job, but if executed properly, your finished product will certainly be worth it!
This guy knows what hes talking about
Need to be careful with a buffer. Can burn the paint real quick if your not careful. Not a good idea to use the buffer all the time on the car either because each use takes off paint. But that is the correct way to detail a car and make it nice. Just my two cents.
-
-
Nice. I need one of them also.
-
-
Thanks guys. My girl wasn't up for the bikini top pics. Sry guys
-
a box of dildos?
Oh yea.....wait.... no but close. I could make a bikini top for my girl though with these.

 Never opened set of Rockford T2 comps. The speakers are from ones I had open. $180 firm shipped lower 48


DC LVL3 18, Rockford T2 6.5 Comps For Sale
in For Sale: Car audio related equipment only
Posted