
tahoexfixssd
-
Posts
717 -
Joined
-
Last visited
Content Type
Profiles
Forums
Events
Media Demo
Store
Collections
Videos
Posts posted by tahoexfixssd
-
-
for sale is a Stetsom 14k2d modded with 7 extra caps.
amp is in 10/10 cosmetic (it was in my truck if that tells you how it was taken care of)
mechanical is 10/10 also
it IS the 18v version but it has never seen 18 volts. clamped out around 8k at 11.2 volts.
the only issue with this amp is the RCA input jack... when i first put it in i was working on the headliner and broke the jack. i have SOLDERED a female rca onto the board. it works fine and has no noise issues or problems.
1250 shipped obo. comes with original box and manual

-
up for sale is 2 AQ HDC3 18's dual 1....
9/10 cosmetic because of greenish tint of surround. no scuffs not even a year old. bought in may 2011
copper coils i believe.. whatever comes standard (i wasnt original owner)
coils still read 1 ohm.
255 shipped each obo
500 for pair shipped.
-
figured this was a good old vid that i found in my youtube that kinda got lost in time
not sure i ever posted a build log of it. didnt take to many pics
-
to get the appropriate length... if the length of the port doesnt exceed the depth of the box, then it doesnt have to bend, but make sure its the same width off the back wall as the width of the port itself
-
now you can do your carpet. leave some extra carpet around the outer edges as well and when you test fit trim off what you need. you can sometimes use this carpet to hold it in with the weatherstrip instead of the fleece. but make sure your glue is strong enough to hold.
all said and done should look like this
-
once you have it in the weatherstripping you need to staple it to the wooden shape you cut for the trim panel. this process may take awhile to get it perfect with not stretch marks. once it is stapled in that area then do you amp trim ring.
the very bottom of the truck had a rocker panel that was split and would look alright if i held the fleece down this way
its also important to tape off the weather strip to prvent resin from gettin gon it
lay on your resin. this takes alot of resin. its very important that you soak it very well EVERYWHERE. you have to get resin as close to the weatherstrip as possible.... after you do this, add fiberglass matt. you want this tub to be sturdy and not crack or bend.
NOTE: after it dries leave it in the truck for a few days... this is to ensure that it does not shrink or sag.. i have had this happen before and it ruins your whole project.
once it is dried take it out and knock down all rough edges and do your body work liek your normally would on fiberglass. make sure to install it back in the truck every now and them to ensure it fits and hasnt sagged.
one thing that you must do so that it will fit is cut off the fleece but leave about an inch of un soaked fleece so that the weatherstrip will hold it in. keep doing test fits while doignthis. you want the weatherstrip to hold it, but you dont want your fleece coming out the other side or else you will have leaks.
this is a test fit of the other side after some work was done. you can see the extra fleece
-
Ok i have been wanting to post this for awhile but havent had time. had alot of questions about this truck and "how the hell did you do that" from alot of locals and what nnot. most with any experience have a general idea of how its done but dont know every step. i will show you...
this technique could also be used in trunks as well or even on you b pillars
Materials/tools:
1 gal fiberglass resin
24oz fiberglass matt (or chopper gun but this is before i had one)
chip brushes
body filler of your choice (i prefer rage gold for ease of sanding)
painters tape
paper (to mask areas off)
fleece (i would use something relativley thin)
staple gun
drill
sander
die grinder
sand paper
ok here we go....
this is the area where amps will go that we will be trimming off.
start by taping everything off where the fiberglass wil be near. remember resin will drain downward so its very imporant you put plenty of tape and paper on the floor and on the interior panels the fleece will be held under
taping off the metal edge where the weatherstrip is is not important as the figerglass should not reach that far.
now make the shape where the amp will go.
you want to hold it up where it needs to sit to clear the amp. i used 1.125" mdf scraps and screwed them together in a way that it can be removed from inside the ring. THIS IS VERY IMPORTANT... unless you never wanna take the tub out.
next you wanna take a template of the outer edge of your trim panel around your wall. i would suggest making it 1/8-3/16 smaller so that when carpet/fleece there it will not be bigger than the acual panel.
once you have that, tranfer it to wood. this piece will then be screwed to the trim panel FROM THE OUTSIDE. now if you dont want to screw thru your panel, this will be very difficult. i have tried double stick tape and it usually comes off when the fleece is stretched.
once everything is taped off and you feel comfortable that your not gonna ruin your carpet, take fleece and lay it on the area USING THE WEATHER STRIPPING TO HOLD IT UP.
this step is the trickiest part. may need 2 ppl to do it. it has to be straight and even for it to work right. also make sure that the weatherstip is on tight. i sometimes use duct tape to hold it onto the vehicle while im stretching
-
-
looking good man, any of you DTF guys gonna be at the meca show in hammond on sunday?
very doubtful. meca state finals is in mattoon on sunday. the guys with us that run meca will be there. i think me and rob are prolly done for the season as he has blown ass woofers and i have no woofers lol
-
you know thats wierd, it just says posted image just for that picture on my computer, i knew i put it on here hmmm
-
That is one bad ass garage
lol you cant really see it in the picture?
-
my cat takes after his daddy lol
-
alright its wall build month at my house. finished the honda up last week and hes waiting on his woofers, so heres the next build...
Ford F350 with camper shell
2 RE SX 18's
2 US amps MD1D amps
US amps MD 42 4 channel
Duralast batteries (dont hate)
6th order bandpass thru the back window.
and a bottle of everclear to aid in the late night builds lol
might get fancy on the window
start with a clean garage
gettin steve the tint man to take the window out
im working right now so pics will come as i get more don e
-
this is the first wall i have built inside a car, so the top kinda worried me not being screwed into wood... so on top of the 1/8" steel angle and PL Premium advanced i layer the top with 6 pieces for added stiffnes with the scraps i had left over... they go almsot to the back
more bracing.. again never built one in a car so i had to make it sturdy regardless of the small amount of power... i also will only beable to single later the baffle... which isnt a problem considering 4 screws from each woofer will be in a brace...
woofers will come later
-
well i have to put the yukon aside for a bit and get some work done for a team mate...
woofers will be 4 IA lethal injection 15's
amp is a db a7 2000.1 for now
box is 15 cubes after displacement
tuned at 35.
9 ply birch.
this is what he had before
now...
(and dont get excited thinking your gonna see a bunch of fancy shit on this one cuz this is just a basic wall .. just need to get him louder! haha since hes the only one on the team thats not in the 50's
spent an hour scraping off the old tint
new tint....its called Rustoleum Premium Enamel haha
-
box is 13.5 cubes..... and im not sure what he has for an alt i think DC
-
-
-
-
We dont have the woofers for this build yet, but we decided to get the build outta the way.
i will also be making a tutorial on how to do the fiberglass tubs..
-
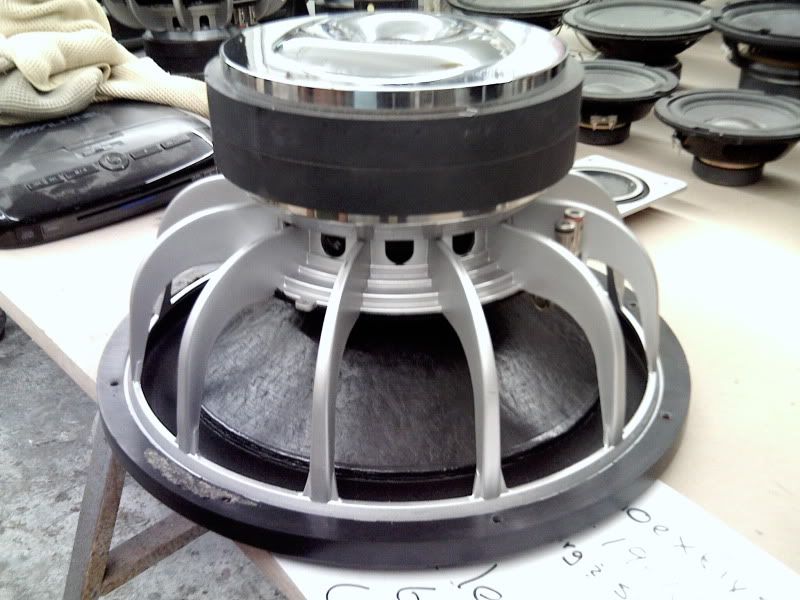
i have 2 woofers that i had bought from Brian Owens off of CA.com that wer crossfire motors with a fi basket & BTL softparts. i had an issue with one of them before and emailed FI and got a fast reply and they fixed it and got it back to me within a week. well i have since torn the spiders on these woofers and contacted to get them reconed several months ago but got no reply. i just let it go and they have been sitting for awhile. well i sold 2 of the motors and ordered BTL recones to do it myself as i have done for other production BTL's before. well im not sure if i ordered the kits for the wrong series of BTL's or what but i did one and messed it up somehow the coils are off and i just gave up before i wasted anymore money on the other one. i sent an email into FI about a week ago and still have got no reply from both email adresses i sent to about sending them in. can anyone on here help me ? it would be greatly appriciated.
picture of the woofers.
-
lookin like around 75 competitors so far
-
Got a few things for sale, paypal echeck only for cash
Rockford Fosgate T800.4, works perfectly, a few dings here and there on the outside. Reason for selling is because it is too big for my car, so I am looking for something smaller but still puts out good Rockford Fosgate power: $225 shipped.
paypal only, $225 shipped if bought before the first week of October because after that, I will have to hang on to it due to a comp, i need the money to buy the new T600.4 since its much smaller
hopefully my comp
bump! -
for sale is a missing link audio module for gm square plug alts. ( most 88-94 and some 95-98) easiest way to tell is to just look at the alt. it was only used for 6 months. allows you to charge at 14.7 daily and 15.3 at the flip of a switch if you need some extra power. pics were taken when it was still in the car but its out cleaned up now. $110 shipped.
}


FS 4 pairs of TREO RSX 20t tweeters
in For Sale: Car audio related equipment only
Posted
for sale is 4 pairs of TREO RSX20t tweeters
3 sets are used with no crossovers
1 set BNIB with crossovers.
75 watts rms.
$13 shipped per pair for used ones. $25 shipped for BNIB