
Pioneer~Saturn
-
Posts
782 -
Joined
-
Last visited
Content Type
Profiles
Forums
Events
Media Demo
Store
Collections
Videos
Everything posted by Pioneer~Saturn
-
 Thanks, guys. And flashlight, this wont be my enclosure...it is for a customer's girlfriend so it'd be upto him to get pics and vids loaded As for the clamps, yea...definitely lol...that wasnt even half of my clamps.... lol... And I dont think I will go through a day of work finishing this but will probably lay down a clearcoat before shipping then wrapping the whole thing in painter's tape nice and thick before packaging it for shipping to protect the paint.
 -
Thinking about a clearcoat over it and the whole box now but not sure.
-
Thanks, guys
-
Joo can haz fo moneyz
-
Thanks, guys And I just like to make enclosures beefy and rock-solid for people. He wanted the woofer countersunk and also wanted to mount the amp to the enclosure so I doubled-up on the top and back sides to accommodate and the 45's are there to beef stuff up a bit more
-
Thanks, guys And it's a 3/4" radius roundover used there Gotta start off the evening right...priming/painting, reading a Cheaper Than Dirt catalog, and a brewskie for between coats .... Paint, biyash...
-
Alright, this will be for his girl and will be finished with a flower hand-painted on the side...let's get started An amp will be mounted on the back so I double layered it... Primed... More when it happens...
-
Thanks, guys
-
Finally done Perfect fit for the D3100's next to it ...(the box next to it is the exact size of a D3100...can't really tell, but there's like 1/16" of clearance, perfect). Schwing!
-
Random pic of the interior flares...
-
Alright, Steve (BassikInstincts) drove out today to get measurements, help get the birch to the shop, and the aeros squared away. This will be for his 15" Crossfire XS V2 on a SAZ4500 in his Malibu. The whole enclosure will be double-layered and finished off with a radius on all of the exterior corners (minus the bottom). Specs come to: -3.65 cubes net -36.5Hz tuning -(3) 4" aero ports Got started and all of the vertical/side panels doubled-up but no pics of that for right now Alright, got started on these ports a little while ago...not exactly the simplest of tasks to do perfectly but they're coming along (had to make them very tightly packed to fit the sub next to them...you'll see) The planning took a little while but got it done... First aero's outer flare cut... 2nd aero outer flare cut... Got rid of the excess material around the inner ring on the inside flares... Inside flares...and a warsteiner to help the building along today.
-
Thanks guys
-
Carpeted Installed pics later and possibly a vid or two...
-
This enclosure's specs come to: -2.875 cubes net -32hz tuning -46.375 sq inches of port area Lets get started Added 45s and a support to the port wall... Top on an cleaned up: Will be finished with black carpet and possibly installed pics tomorrow
-
I got a little bit done today...only one pic though More as it happens..
-
Thanks, guys. More pics tonight
-
Getting the port put together.. More as it happens..
-
Alright, this enclosure wasnt designed by me so I cant post specs for certain and im too lazy right now to sit down and do the math...so here it is Most of the pieces cut and the large pieces arent in the picture.. Devider for between the ports.. Center devider is double layered... Port pieces... Rounding over...
-
Thanks guys. And this enclosure is for sale, contact me if interested but will be a good chunk of money to ship though...has to be shipped by freight (190 pounds)
-
Got the other side done... This is enclosure is now up for sale
-
Top layers on and all cleaned up.. Carpet time...definitely wasnt the easiest thing to be rolling around The port..needs cleaned up a bit more and probably will touch up the paint but mostly done... A look at the terminal cup...
-
Other side put together... 45's cut.. Back corner's in.. Front, outer corners in... Center 45's in and primed up... Painted... Port pieces in... Rest of the 45's in...
-
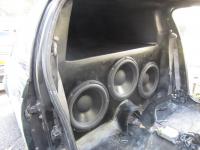
Hey guys, I havent really been on here in a good while so how about a shotty enclosure build..?... Specs come to: -3.8 cubes net per sub -31hz tuning -59.25 sq inches of port area per sub A look at the design: And getting started...back panel on... Most of the pieces cut... Port pieces rounded over... Other port pieces rounded over... Terminal cups will be countersunk and outer-layer rounded over... Side panels get rabbeted for carpeting later..
-
Thanks guys. And I dont have anymore pics..? lol