Purplehaze Posted October 22, 2011 Author Report Share Posted October 22, 2011 Okay well I got the front components all installed, and the rear view monitor. Then I ran the wires back to their "spot", and got it all buttoned back up. Now I'm ready to wire up the crossovers and amps! I'm getting REALLY close now! Front component wires The wires are all ready! It's getting there! The Breaker Panel, or the "inside" of the "breaker box" The rear view monitor. This thing is cool! It is also hooked to the reverse camera. Next step, wiring crossovers! Kickin' Cruiser Seller Feedback Stage 3 Dash, Door Panels,4th Order wall 4 - 15'son a DC 5.0K 2 DC 5.0K'sSolo X 15 (v.2) Sub Build Link to comment Share on other sites More sharing options...
Purplehaze Posted October 22, 2011 Author Report Share Posted October 22, 2011 Got the crossovers mounted, and the holes drilled in the rt places on Friday evening. Then I spent the rest of the evening deciding how I wanted to mount the amps. And you KNOW I had to open them up! So Saturday morning, I got up bright and early to solder spade terminals for the crossovers, and try to get the wires all ran to the amp rack. Here is a little video, and some more pics And the crossover wires all finished! More wires anyone? Kickin' Cruiser Seller Feedback Stage 3 Dash, Door Panels,4th Order wall 4 - 15'son a DC 5.0K 2 DC 5.0K'sSolo X 15 (v.2) Sub Build Link to comment Share on other sites More sharing options...
Purplehaze Posted October 22, 2011 Author Report Share Posted October 22, 2011 Cutting up the amp rack. I would hate to have had to do this w/o my Dremel. Wiring the amps! Workin Late! Amps r wired! Remember, this is temporary, I still have another sub! The "Breaker Box" Underneath shot Kickin' Cruiser Seller Feedback Stage 3 Dash, Door Panels,4th Order wall 4 - 15'son a DC 5.0K 2 DC 5.0K'sSolo X 15 (v.2) Sub Build Link to comment Share on other sites More sharing options...
Purplehaze Posted October 22, 2011 Author Report Share Posted October 22, 2011 Next up, volt meter. Gotta have them. This is one of two. Also Got one of my new emblems in the mail today. I think it looks WAY better than the old factory "Touring Edition" crap. And then me and my son Shane HAD to install new axles! Click pop click .... eff that! Kickin' Cruiser Seller Feedback Stage 3 Dash, Door Panels,4th Order wall 4 - 15'son a DC 5.0K 2 DC 5.0K'sSolo X 15 (v.2) Sub Build Link to comment Share on other sites More sharing options...
Purplehaze Posted October 22, 2011 Author Report Share Posted October 22, 2011 Well, yesterday was one of the best days I have ever had. Which may sound crazy since I worked on the Cruiser for over 12 hours! It all started yesterday morning, when I went to get my son, Shane, up for school. He moaned and complained of how sick he was, so I told him to go back to bed. But a couple of hrs later, as I was leaving to work on my car, Shane was "all better", so I told him he could either go on to school, or go w/ me to work on my car, but he was NOT gonna stay home and party all day! Needless to say, he chose work over school! (Good thing this was only his second missed day of school!) So, my 12 year old son got his hands dirty yesterday for the first time, and I must say, I am totally impressed! He jumped rt in there, wasn't scared AT ALL! We got a lot of stuff done, and really had fun doing it! 3 extra meals = $20 1 day of missed school = extra homework Quality Father and Son time = priceless. I just feel truly blessed to get to spend the day with both my father and my son! Life is good! So, here are a few pics of me and Shane "doin work"! Also changed tranny fluid and filter (yep that's me) Shane was doing perverted stuff to the tire! Hahaha kids! Kickin' Cruiser Seller Feedback Stage 3 Dash, Door Panels,4th Order wall 4 - 15'son a DC 5.0K 2 DC 5.0K'sSolo X 15 (v.2) Sub Build Link to comment Share on other sites More sharing options...
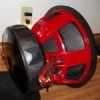
Purplehaze Posted October 22, 2011 Author Report Share Posted October 22, 2011 So now to go from one sub to two! This rt here is where I messed up! Should have let the paint cure! Anxiously awaiting! The Kicker box. Notice the Areoport. Kickin' Cruiser Seller Feedback Stage 3 Dash, Door Panels,4th Order wall 4 - 15'son a DC 5.0K 2 DC 5.0K'sSolo X 15 (v.2) Sub Build Link to comment Share on other sites More sharing options...
Purplehaze Posted October 22, 2011 Author Report Share Posted October 22, 2011 Kickin' Cruiser Seller Feedback Stage 3 Dash, Door Panels,4th Order wall 4 - 15'son a DC 5.0K 2 DC 5.0K'sSolo X 15 (v.2) Sub Build Link to comment Share on other sites More sharing options...
Purplehaze Posted October 22, 2011 Author Report Share Posted October 22, 2011 I started with the airbag cover, b/c (a) it's small and it's important. For those that don't know, in stage 1, I installed a monitor in the airbag cover, but had to remove the airbag for safety. So now I'm gonna glass up the cover front and back, and put a hinge on the top, and put the airbag back in. In my opinion, it will be very safe. But just in case you still think it will hit the passenger in the face, watch this video: So here we go, getting all set-up, ready to work! Got it wrapped after about a half hour struggle - till I finally used the glue. Then it was easy. After the first coat of just resin, let it dry. First layer of FG Getting the back side ready for three layers. Here is a little video Then came the rain and washed me back inside! But a little rain aint gonna stop me! I just moved this operation inside! And after sanding the second coat on the front, time for some kitty-hair! (I see now why it's called that!) And that is when I called it a night! So today, I am kinda lazy, but not completely! So here is where I'm at rt now. Sanding. Next is regular body filler. But my sweetheart brought me this, so this is what I'm doing as I type! Kickin' Cruiser Seller Feedback Stage 3 Dash, Door Panels,4th Order wall 4 - 15'son a DC 5.0K 2 DC 5.0K'sSolo X 15 (v.2) Sub Build Link to comment Share on other sites More sharing options...
Purplehaze Posted October 22, 2011 Author Report Share Posted October 22, 2011 First thing I had to do was come up w/ something to sand those curves. Paint brush handle works! Getting ready to spread some filler! Kickin' Cruiser Seller Feedback Stage 3 Dash, Door Panels,4th Order wall 4 - 15'son a DC 5.0K 2 DC 5.0K'sSolo X 15 (v.2) Sub Build Link to comment Share on other sites More sharing options...
Purplehaze Posted October 22, 2011 Author Report Share Posted October 22, 2011 I forgot to take a picture of the hinge, but I put a door hinge on the top of the cover so it has to fold up. But here is the "Play Station deck" I also put in. Had the brand new PS2 layin around, so I figured I'd put it to use! So here it is installed. It's not 100% perfect, but I am not a natural at body work, and I tried hard. I'm happy with it. I still gotta get some carpet for the inside. Kickin' Cruiser Seller Feedback Stage 3 Dash, Door Panels,4th Order wall 4 - 15'son a DC 5.0K 2 DC 5.0K'sSolo X 15 (v.2) Sub Build Link to comment Share on other sites More sharing options...


Recommended Posts
Archived
This topic is now archived and is closed to further replies.