SterTheDer Posted November 30, 2013 Report Posted November 30, 2013 Name: Toyota Camry (1997) Date Added: ÚTE_ADDED% Owner: SterTheDer Short Description: A renovated old rice burner who just wont die :)Purchased for 00 and 218k miles, in poor condition (dirty, collage student didnt care for her), she is now better than ever View Vehicle
SterTheDer Posted November 30, 2013 Author Report Posted November 30, 2013 Well.. here goes nothing!(I am new here, and am unsure as to where to start a build log... so.. i guess i shall start here?? If there is a better place please let me know (NOTE! This build is COMPLETE, i did this all over the summer, but was too damn lazy/busy to make a log!)
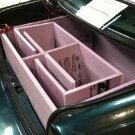
SterTheDer Posted November 30, 2013 Author Report Posted November 30, 2013 05/31/13 I hope this pix is acceptable. I began my build by removing the entire interior of my car, starting with the back end.I removed all rear pannels, speakers, everything. I removed my carpet, front seats, rear seats, headliner, door pannels, everything that was bolted down.Then i cleaned every inch of my car.I drover her up to the car wash, unbolted the seats, and pressure-washed the interior to remove all the freaking dust and crap. i then hand-wiped her down, removed all the crap left over.
SterTheDer Posted November 30, 2013 Author Report Posted November 30, 2013 Some pix of the sound deadening that i did on the lower half of my car This was in June.
SterTheDer Posted November 30, 2013 Author Report Posted November 30, 2013 Now, i had a leak in my car, but i could not tell what it was.. It was odorless, taste-less, felt like oil, brown, it was the weirdest thing!Turns out it was antifreeze leaking from a cracked HeaterCore! :/
SterTheDer Posted November 30, 2013 Author Report Posted November 30, 2013 Once i got everything all deadened up, i began mocking up my door pannels! I decided to back it with alumium foil just in case i wanted to return to stock panels any time, but ultimately that failed and i fiberglassed over everything (after removing the unsighly foil)
SterTheDer Posted November 30, 2013 Author Report Posted November 30, 2013 So i wrapped the form in Fleece, and had my buddy Ryan help me staple the fleece down to the pannel.
SterTheDer Posted November 30, 2013 Author Report Posted November 30, 2013 There i am , posing with my door pannels happy as a lark XD Doing some fit-testing to be sure nothing will interfere with the operation of the car. once again, there i am !
SterTheDer Posted November 30, 2013 Author Report Posted November 30, 2013 my friend Ryan, who is super-exited that his RE-audio RFX series subs (180rms) have the same motor structure as my JL 12-W3v3 (500rms)
SterTheDer Posted November 30, 2013 Author Report Posted November 30, 2013 doin the actuall fiberglassing! Doing it right, with butt-loads of resin! I decided to put in a little "wall" of fiberglass to separate the 6.5"s from the 8" sub... it doesnt do much but it makes me feel better XD
















Recommended Posts
Archived
This topic is now archived and is closed to further replies.