cc_audio Posted July 3, 2010 Report Share Posted July 3, 2010 Looks good, never thought to literally glass over a media device for a docking station, that would be the best fit I suppose. I learnded from this build. Looks good, still watching this. It's all gone! The Celica Build Feedback If I buy something from you, DO NOT USE FEDEX! Link to comment Share on other sites More sharing options...
Joeskey Posted July 3, 2010 Report Share Posted July 3, 2010 Just read through the whole thread... i gotta say ur doing some pretty impressive work. -Would u get a long sleeve shirt already! or go and get a work hoodie! that way ur a$$ wont be so itchy and whatnot from the fiberglass - That port is sweet! It looks like u put alotta work into it! - Very nice build pics! and also very imformative Nice center console, its very creative lol "never drive faster then your guardian angel flies... good think my guardian angel drives a twin turbo ed beast" "its time has come for those who are different to stand united" Link to comment Share on other sites More sharing options...
DVBin916 Posted July 4, 2010 Author Report Share Posted July 4, 2010 Thanks all for tuning in and checking out my build! i will be posting more build pics and when we get through all of the build pics i will post up a vid 0r 3. - Link to comment Share on other sites More sharing options...
DVBin916 Posted July 6, 2010 Author Report Share Posted July 6, 2010 Looks good, never thought to literally glass over a media device for a docking station, that would be the best fit I suppose. I learnded from this build. Looks good, still watching this. Im glad i can help people to learn but wanted to tell u I did not glass over the media device it was the hard case with out the device in it! i would never risk the resion getting through the tape and ruining the device. - Link to comment Share on other sites More sharing options...
DVBin916 Posted July 6, 2010 Author Report Share Posted July 6, 2010 Ok now that the center console is complete and the X-Over in place it was time to start running wires. I had to tear appart the dashboard, pull out all the seats and take out the carpet to relocate the Epacenter knob and all the wires for the I-Pods, T.V., X-Over and the front sets of mids and highs. also while i had the carpet out I took full advantage and scrubed and steam cleaned it befor putting it back in. once the front was all back together I checked to make sure I had everything wired up correctly and all power was comming on to all the componets up front. I high lighted the new location of the Epecenter knob. - Link to comment Share on other sites More sharing options...
DVBin916 Posted July 6, 2010 Author Report Share Posted July 6, 2010 now that the front was all wired it was time to get the wall buttoned up with the speaker pods that sorround the the woofers. this time arround I decided to do the pods with glass and speaker rings on stilts and glass everything in polly fleace verses the way i did it last time and let me tell u it was way quicker this way! check it out.. I cut all the rings needed for the mids and highs. Then I covered everything in plastic, tape and foiled for the glassing of the back of the pods. The Passanger side The drivers side then the glass pullint the hardened molds out - Link to comment Share on other sites More sharing options...
DVBin916 Posted July 6, 2010 Author Report Share Posted July 6, 2010 now that the pod molds were hard I could put the side pieces in place and speaker rings in place> I used a lazer pointer to figure out my imaging. that is what the holes in the middle of each speaker ring is for. Tape the lazer pointer in the center and u can determin where the sound is going to travel. The passanger side all mounted and ready for wrapping in poly fleece. The drivers side all together Now out and getting wrapped. And a test fit befor glassing After the glassing. With my Oldest boy onhand helping out. once they hardened I could cut out the centers for the speakers. So with the pods all sanded and bondoed I did a final test fit for the speakers befor wraping them in Valour. - Link to comment Share on other sites More sharing options...
El1T3Bass Posted July 6, 2010 Report Share Posted July 6, 2010 looks bombin man, keep this shit up!!! wow now this just shows that smd isnt just any forum. We are a brother hood. here let me put it in retard-onix for u aareehhhh duuuurrrrr ehhh got it now? Sweet baby jesus the amount of quoting the quote above the quote in a quote is epic Link to comment Share on other sites More sharing options...
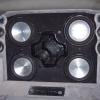
DVBin916 Posted July 6, 2010 Author Report Share Posted July 6, 2010 Okay and hrer are the pods all wrapped in Valour and in with speakers for a test fit befor the woofers are loaded into the wall. That will be it for me tonight! gota get up at 4am for work. I will get some more pics up tommrow night.. - Link to comment Share on other sites More sharing options...
Vilim12 Posted July 6, 2010 Report Share Posted July 6, 2010 Crazy ass build man, I wish I had the funds and knowledge to do something extreme audio wise to my truck! '08 Nissan Titan Pro-4X CC LWB 1.5 Inch leveling kit DDM 55w HIDs Interior LEDs 2 RE10D4s in tech12 ported enclosure, US AMPS 800.2 Link to comment Share on other sites More sharing options...


Recommended Posts
Archived
This topic is now archived and is closed to further replies.