DVBin916 Posted June 21, 2009 Report Share Posted June 21, 2009 Well Im gona start this topic off with the fact that you can check out my old System and the all the events that lead me up to the point of ripping my system out in the following topics. or just skip it all and get to the new stuff. This project is still Work In Process (W.I.P.). I have a long way to go still but wanted to start to get all u up to date as to where I'm at. Now keep in mind I am working a new Job dealing with familey issues and working on my truck on the weekends only. So end is not a close as i would like it to be. so here we go. OG 97Shocker haters distruction new equip And now the the start of the NEW 97Shocker. I will start it off with some pic's of the bodywork and fresh paint. SomeOne side swiped my truck in the HD parking lot and left mt truck all scratched up here are pic's of it in the shop and after. The passanger front door. The passanger rear door. The back door from when the haters tried to getme. The passanger side after the body work and paint. The back door after body work and paint. - Link to comment Share on other sites More sharing options...
DVBin916 Posted June 21, 2009 Author Report Share Posted June 21, 2009 Here is what is going in the new WALL!! they are T2's 15" - Link to comment Share on other sites More sharing options...
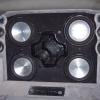
DVBin916 Posted June 21, 2009 Author Report Share Posted June 21, 2009 You know I was looking through the pic's on this build log a relized that I totaly forgot to put pic's in here of the amps for the Mids and Highs So here is all of them together. For the highs is a RFT4004 For the mids is a RFT8004 And of course the subs a T2000bd for now! The power for the subs for now. There will be a scecond one going in after the build is all comp. This build will include the space with mounting and wireing for the 2nd amp to be easly installed at a later date. T20001 Here is all of them together and the Alternator you see at the top of the amps is a 270amp Irragi in addition to a 140amp alt to make some power for the power - Link to comment Share on other sites More sharing options...
Kasey Posted June 21, 2009 Report Share Posted June 21, 2009 RF... FTMFW "Audio is not a hobby it's a lifestyle" _____________________________Refs_1_Refs_2_____________________________ Link to comment Share on other sites More sharing options...
DVBin916 Posted June 21, 2009 Author Report Share Posted June 21, 2009 Moving the Wall as far forward as possable so all the renforcments needed to be moved includding the roof suport. Also in the roof piece I extended the rear roof A/C vents to the rear of the box where all the electronics and batterys are located. the side piece (both sides were done) The roof piece Roof front Roof Rear - Link to comment Share on other sites More sharing options...
DVBin916 Posted June 21, 2009 Author Report Share Posted June 21, 2009 I'M going with a 3 piece 3/4" MDF Front and Back Baffel. what the F*** is this going to be? How about a custom port. Sure why not. - Link to comment Share on other sites More sharing options...
sactownstang Posted June 21, 2009 Report Share Posted June 21, 2009 Hey the back door got fixed too!! Nice, keep us updated!! Link to comment Share on other sites More sharing options...
DVBin916 Posted June 21, 2009 Author Report Share Posted June 21, 2009 So here is the Port build up. Let me tell you I am regreting going like this with the port. Glassing this thing was a B****. I'm still sanding on this thing so I can get it painted. - Link to comment Share on other sites More sharing options...
DVBin916 Posted June 21, 2009 Author Report Share Posted June 21, 2009 Hey the back door got fixed too!! Nice, keep us updated!! YES it Did. I worked with the body shop and had the materials worked into the insurance Quote. So I ended up paying like $80 outa pocket to get the back door"s body work done. - Link to comment Share on other sites More sharing options...
Forevrbumpn Posted June 21, 2009 Report Share Posted June 21, 2009 lookin good dawg, glad to see you getting back in to things I have a ritual called "terminator". I crouch in the shower in the "naked terminator" pose. With eyes closed I crouch for a minute and visualize either Arnie or the guy from the 2nd movie. I then start to hum the T2 theme. Slowly I rise to a standing position and open my eyes. It helps me get through my day. The only problem is if the shower curtain sticks to my terminator leg. It sorta ruins the fantasy. Link to comment Share on other sites More sharing options...


Recommended Posts
Archived
This topic is now archived and is closed to further replies.