neuspeedescort Posted October 17, 2009 Report Posted October 17, 2009 well i spend more time in other peoples cars then my own. either under the hood or in the back. so my car always comes 2nd at best. more like never. so i finally set out to finish it all up. so this build is about a year in the making but nothing extreme just never the time. specs are simple panisonic headunit zapco ag150 for my components zapco ag200 for my sub blaupunkt 6.5" components jl w6 10 4ga sosche amp kit vented box tuned 30hz fiberglass door pods i will post pics as i get time to upload. NEUMAN
neuspeedescort Posted October 17, 2009 Author Report Posted October 17, 2009 100% stock marking where to cut panel cut the dominos nerd never looked so smart since i have non-power windows and had to cover the stock speaker hole i couldn't get the materials to thick. both pods ready for resin. my tweeters are up on the dash. NEUMAN
neuspeedescort Posted October 17, 2009 Author Report Posted October 17, 2009 passenger pod finished and i cut it to breath into the door passenger side completed you can see here where my window roller conflicts a little but it all clears and operates perfect finished up cabin shot. trunk floor is up next. NEUMAN
lukaQ Posted October 17, 2009 Report Posted October 17, 2009 last photo is great! Got carbon fiber dust cap???
neuspeedescort Posted October 17, 2009 Author Report Posted October 17, 2009 thanks its just a simple wide angle lens that casts a nice fish eye when not zoomed out. where my amps where mounted for way to long! everything out and ready no better template then the stock carpet! 75% of the floor cut out floor cut and mapping out the amp rack location NEUMAN
neuspeedescort Posted October 17, 2009 Author Report Posted October 17, 2009 what are these for? keep looking down. pencil marks are at 1/4". so i spaced the mdf strips in 1/4" to allow my flush cover to rest on them. closer up picture bottom picture of just the top layer of spacers two 3/4" plus the 1/2" osb make it the perfect depth for my amps to be flush. the misc scrap peices are to space the floor up the 1/2" i need to run all the wiring under it with out rubbing anything. little grinding i had to do to make it clear the spare tire well since i wanted it all centered. NEUMAN
neuspeedescort Posted October 17, 2009 Author Report Posted October 17, 2009 amp rack all done on the floor. amps retest fitted carpet almost done amp rack carpet cut out but not finished i used my soon to be flush mount peice as a way of pushing the carpet down tight. little blue tape helps avoid snagging. floor carpet finished NEUMAN
neuspeedescort Posted October 17, 2009 Author Report Posted October 17, 2009 flush mount frame amps in and wired up floor finished! had to remove all the rear interior panels to get it to slip in place. yeah i use RE's site! just over a half sheet of mdf. it'll get the job done. NEUMAN
neuspeedescort Posted October 17, 2009 Author Report Posted October 17, 2009 are panels cut and mocked up all laid out and ready to glue up screw pattern mapped out about 1/2 way done vent lighting all assembled NEUMAN
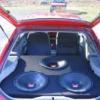
neuspeedescort Posted October 17, 2009 Author Report Posted October 17, 2009 bondo'd over the countersunk screws trim panels to flush it out mounted all wrapped all trimmed up and ready to rock. NEUMAN















Recommended Posts
Archived
This topic is now archived and is closed to further replies.