79 cutty Posted January 20, 2010 Author Report Share Posted January 20, 2010 Now that the frame is completely wrapped....I started working on some of the fiberglass for the interior: Firm believer in letting my cars do my talking! You can't rush quality, it doesn't happen overnight. Quality takes time and dedication, but the end results more than pay for it. "Black Pearl" Build Thread http://www.stevemeadedesigns.com/board/topic/67183-1985-buick-regal-limited-build-log/page-1 Link to comment Share on other sites More sharing options...
79 cutty Posted January 20, 2010 Author Report Share Posted January 20, 2010 Firm believer in letting my cars do my talking! You can't rush quality, it doesn't happen overnight. Quality takes time and dedication, but the end results more than pay for it. "Black Pearl" Build Thread http://www.stevemeadedesigns.com/board/topic/67183-1985-buick-regal-limited-build-log/page-1 Link to comment Share on other sites More sharing options...
79 cutty Posted January 20, 2010 Author Report Share Posted January 20, 2010 Some more pics from throughout the build as well as some more of the goods: Custom Machined Buick Door locks Dakota Digital Dash Firm believer in letting my cars do my talking! You can't rush quality, it doesn't happen overnight. Quality takes time and dedication, but the end results more than pay for it. "Black Pearl" Build Thread http://www.stevemeadedesigns.com/board/topic/67183-1985-buick-regal-limited-build-log/page-1 Link to comment Share on other sites More sharing options...
79 cutty Posted January 20, 2010 Author Report Share Posted January 20, 2010 Firm believer in letting my cars do my talking! You can't rush quality, it doesn't happen overnight. Quality takes time and dedication, but the end results more than pay for it. "Black Pearl" Build Thread http://www.stevemeadedesigns.com/board/topic/67183-1985-buick-regal-limited-build-log/page-1 Link to comment Share on other sites More sharing options...
79 cutty Posted January 20, 2010 Author Report Share Posted January 20, 2010 Knocked down the first coat of "milkshake" on the front and rear decks lids, as well as finished up sanding down the glazing putty on the kick panels: Next step will be hitting the deck lids with some glazing putty in a couple spots, and then off to high build primer for those pieces! Dropped down the gas tank as well to make sure the chrome one I am getting matches it: Visor Monitors Firm believer in letting my cars do my talking! You can't rush quality, it doesn't happen overnight. Quality takes time and dedication, but the end results more than pay for it. "Black Pearl" Build Thread http://www.stevemeadedesigns.com/board/topic/67183-1985-buick-regal-limited-build-log/page-1 Link to comment Share on other sites More sharing options...
79 cutty Posted January 20, 2010 Author Report Share Posted January 20, 2010 Cut down the 60/40 bench seats to make bucket seats...to make room for my caddilac center consol: Dropped another layer of "milkshake" on the front and rear decks. I was originally just going to spot putty the couple spots, but there was a couple places I wanted to build up a little more: Also began work on the door panels. Took out the carpet on the door panel, which actually came out super easy because the glue was so hot from sitting in the garage in this heat: Made the wood template that will be getting bolted to the door: The wood insert will be done in suede and the rest of the door panel will be getting painted. Firm believer in letting my cars do my talking! You can't rush quality, it doesn't happen overnight. Quality takes time and dedication, but the end results more than pay for it. "Black Pearl" Build Thread http://www.stevemeadedesigns.com/board/topic/67183-1985-buick-regal-limited-build-log/page-1 Link to comment Share on other sites More sharing options...
79 cutty Posted January 20, 2010 Author Report Share Posted January 20, 2010 Firm believer in letting my cars do my talking! You can't rush quality, it doesn't happen overnight. Quality takes time and dedication, but the end results more than pay for it. "Black Pearl" Build Thread http://www.stevemeadedesigns.com/board/topic/67183-1985-buick-regal-limited-build-log/page-1 Link to comment Share on other sites More sharing options...
79 cutty Posted January 20, 2010 Author Report Share Posted January 20, 2010 Interior progress Firm believer in letting my cars do my talking! You can't rush quality, it doesn't happen overnight. Quality takes time and dedication, but the end results more than pay for it. "Black Pearl" Build Thread http://www.stevemeadedesigns.com/board/topic/67183-1985-buick-regal-limited-build-log/page-1 Link to comment Share on other sites More sharing options...
79 cutty Posted January 20, 2010 Author Report Share Posted January 20, 2010 Finished making/routing the door inserts where it is carpeted from the factory, didn't get a chance to take a finished picture of them, but this is where I was glassing in the bolts to mount them with: Sanding down all the interior panels. I sanded off the raised part around the rear windows: The finished pile of parts: And after that was done I worked on cutting out some 1/4" MDF to begin molding the dash with: Firm believer in letting my cars do my talking! You can't rush quality, it doesn't happen overnight. Quality takes time and dedication, but the end results more than pay for it. "Black Pearl" Build Thread http://www.stevemeadedesigns.com/board/topic/67183-1985-buick-regal-limited-build-log/page-1 Link to comment Share on other sites More sharing options...
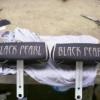
79 cutty Posted January 20, 2010 Author Report Share Posted January 20, 2010 Gas tank cover Door inserts covered in suede: Began work on the pain in the a$$ dash. glued the fleece to it: And then laid down the resin. That beast soaked up the resin like crazy....eneded up using about a 1/2 gallon on that alone! Firm believer in letting my cars do my talking! You can't rush quality, it doesn't happen overnight. Quality takes time and dedication, but the end results more than pay for it. "Black Pearl" Build Thread http://www.stevemeadedesigns.com/board/topic/67183-1985-buick-regal-limited-build-log/page-1 Link to comment Share on other sites More sharing options...


Recommended Posts
Archived
This topic is now archived and is closed to further replies.