79 cutty Posted January 20, 2010 Author Report Share Posted January 20, 2010 At that point in time I began molding the frame: Firm believer in letting my cars do my talking! You can't rush quality, it doesn't happen overnight. Quality takes time and dedication, but the end results more than pay for it. "Black Pearl" Build Thread http://www.stevemeadedesigns.com/board/topic/67183-1985-buick-regal-limited-build-log/page-1 Link to comment Share on other sites More sharing options...
79 cutty Posted January 20, 2010 Author Report Share Posted January 20, 2010 Continued working on the frame and molding it: Replacement rocker panel from classic to current customs: And I also knocked down the first coat of fiberglass on the dash and test fitted everything to make sure it all still fit: electric fan new radiator Firm believer in letting my cars do my talking! You can't rush quality, it doesn't happen overnight. Quality takes time and dedication, but the end results more than pay for it. "Black Pearl" Build Thread http://www.stevemeadedesigns.com/board/topic/67183-1985-buick-regal-limited-build-log/page-1 Link to comment Share on other sites More sharing options...
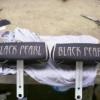
79 cutty Posted January 20, 2010 Author Report Share Posted January 20, 2010 Aluminum fan shroud that will be polished out: and a little bit of paint for the patterns that will be laid: Firm believer in letting my cars do my talking! You can't rush quality, it doesn't happen overnight. Quality takes time and dedication, but the end results more than pay for it. "Black Pearl" Build Thread http://www.stevemeadedesigns.com/board/topic/67183-1985-buick-regal-limited-build-log/page-1 Link to comment Share on other sites More sharing options...
79 cutty Posted January 20, 2010 Author Report Share Posted January 20, 2010 Dash work continued, first stage was to get a solid frame for the enclosure so I glued the MDF sides to the dash....3M super 77 glued the fleece down to the inside of the dash and then went to town with the glass: Then I had a blast figureing out how to get this piece in and sucured. With the top of the dash in the way I couldn't just nail it in: I then went ahead and began building structure and tested the fit: With fitment done I went ahead and fleeced/glassed up the other side of the enclosure: And with the dash/glassing materials out I went ahead and hit some areas that needed more stregth on the front of the dash: That is all the farther I managed to get....but it is getting there. Hard to tell from the pics but I also 45d the inner corners of the box for strength. Going to be ported and .94 cu. ft. after displacement! Firm believer in letting my cars do my talking! You can't rush quality, it doesn't happen overnight. Quality takes time and dedication, but the end results more than pay for it. "Black Pearl" Build Thread http://www.stevemeadedesigns.com/board/topic/67183-1985-buick-regal-limited-build-log/page-1 Link to comment Share on other sites More sharing options...
79 cutty Posted January 20, 2010 Author Report Share Posted January 20, 2010 Taking care of odds and ends I soldered and heat shrink for the wiring harness for the deck: Laid down 6 layers of chop mat inside the enclosure, almost ready for the top plate: And I also got the first coat of resin on the guage cluster trim piece: Making room for the deck Firm believer in letting my cars do my talking! You can't rush quality, it doesn't happen overnight. Quality takes time and dedication, but the end results more than pay for it. "Black Pearl" Build Thread http://www.stevemeadedesigns.com/board/topic/67183-1985-buick-regal-limited-build-log/page-1 Link to comment Share on other sites More sharing options...
79 cutty Posted January 20, 2010 Author Report Share Posted January 20, 2010 Got the top side of the frame completely ground down, and then went back and spot welded it. After all the spot welding was done it was back to the grinding to smooth it out. Didn't take a ton of pics because they all start looking the same. But you get the idea: Today I worked on the enclosure. I 45'd the rest of the inside of the enclosure: I decided to just make my own aero port: The finished product: Then I wrapped the sub mounting ring/port with fleece: How the sub sits inside the car/last test fitting: Glassing the fleece: And the "finished" product: Ok...not really the finished product, I will need to go back and lay down 6-10 layers of chop matt to make it strong, and then fill it, but that was enough for me for the day! Firm believer in letting my cars do my talking! You can't rush quality, it doesn't happen overnight. Quality takes time and dedication, but the end results more than pay for it. "Black Pearl" Build Thread http://www.stevemeadedesigns.com/board/topic/67183-1985-buick-regal-limited-build-log/page-1 Link to comment Share on other sites More sharing options...
79 cutty Posted January 20, 2010 Author Report Share Posted January 20, 2010 Laid down the first coat of chop: During the process of the first couple coats (I had just poured a little resin on the enclosure before I snapped the pic, that is why it looks so bad in that pic) Cleaned those coats up Firm believer in letting my cars do my talking! You can't rush quality, it doesn't happen overnight. Quality takes time and dedication, but the end results more than pay for it. "Black Pearl" Build Thread http://www.stevemeadedesigns.com/board/topic/67183-1985-buick-regal-limited-build-log/page-1 Link to comment Share on other sites More sharing options...
79 cutty Posted January 20, 2010 Author Report Share Posted January 20, 2010 finish glassing the box: I ended up with 9 layers on there, so it should be good and extra solid! And I started working on fitment of panels: Firm believer in letting my cars do my talking! You can't rush quality, it doesn't happen overnight. Quality takes time and dedication, but the end results more than pay for it. "Black Pearl" Build Thread http://www.stevemeadedesigns.com/board/topic/67183-1985-buick-regal-limited-build-log/page-1 Link to comment Share on other sites More sharing options...
79 cutty Posted January 20, 2010 Author Report Share Posted January 20, 2010 Work on the dash continued Firm believer in letting my cars do my talking! You can't rush quality, it doesn't happen overnight. Quality takes time and dedication, but the end results more than pay for it. "Black Pearl" Build Thread http://www.stevemeadedesigns.com/board/topic/67183-1985-buick-regal-limited-build-log/page-1 Link to comment Share on other sites More sharing options...
79 cutty Posted January 20, 2010 Author Report Share Posted January 20, 2010 Even got it to the point that I laid down some glaze: Fully finish the top and sides of the frame, even went back and spot welded for a second time to fully ensure there were no small pinholes: Firm believer in letting my cars do my talking! You can't rush quality, it doesn't happen overnight. Quality takes time and dedication, but the end results more than pay for it. "Black Pearl" Build Thread http://www.stevemeadedesigns.com/board/topic/67183-1985-buick-regal-limited-build-log/page-1 Link to comment Share on other sites More sharing options...


Recommended Posts
Archived
This topic is now archived and is closed to further replies.