Purplehaze Posted November 10, 2011 Author Report Share Posted November 10, 2011 Okay, so I was at it bright and early this morning ready to get my box and base all coated with resin. First was to line them up and drill out the holes for joining them together. Then I got a good first coat on the base and the bottom of the box Then the clouds started to roll in, and fast! FML!!! So I said effit and put it all away, and made another trip to Lows and Wal-Mart And here I am, waiting out the rain. I have talked my Dad into letting me clean out his building and use it this winter to do my door panels, but I think he may let me clean it tomorrow instead so I can get this box finished! Oh and btw, the materials I bought tonight to finish were 1 - gallon 3M fiberglass resin (already used the first gal) 7 - cans of paint (Black Night Metallic) 6 - cans of flat black cheap paint 2 - cans of primer 2 - cans of gloss clear paint rollers sandpaper gloves extra hardener for resin (I like to use a lot) Acetone (for clean-up) I spent $100 tonight, and when it's all said and done, I will have around $200 in my box, not including labor. Which IMO is WELL worth it! Anyway, stay tuned for some finished pics in the next few days. And thanks for checking this out! Please leave comments here. Kickin' Cruiser Seller Feedback Stage 3 Dash, Door Panels,4th Order wall 4 - 15'son a DC 5.0K 2 DC 5.0K'sSolo X 15 (v.2) Sub Build Link to comment Share on other sites More sharing options...
Purplehaze Posted November 11, 2011 Author Report Share Posted November 11, 2011 Okay, so yesterday I started out setting up plastic and cardboard so I could resin up the box inside the building, where it's warm! Then I filled in the holes where I had placed the terminals temporarily Then I laid down the first coat Then, after it dried real good, I laid down a second coat Then, while it was drying, I took the router w 3/4" round-over bit to the base. Should look good when finished And made it look like this. After this pic, I coated it w resin, then the whole board got another coat. Then, after she dried, I sanded all the flat parts w 120 and smoothed it pretty good, to prep it for the final coat of resin. Then I added the third coat. Here I am actually in the process And there she sets, 3 full coats of resin! And here is a little video update Next is sanding, filler, sanding, more filler, more sanding, primer, more sanding, and then hopefully, she will be ready for some color! Stay tuned for more! Please leave comments here. Kickin' Cruiser Seller Feedback Stage 3 Dash, Door Panels,4th Order wall 4 - 15'son a DC 5.0K 2 DC 5.0K'sSolo X 15 (v.2) Sub Build Link to comment Share on other sites More sharing options...
Purplehaze Posted November 15, 2011 Author Report Share Posted November 15, 2011 What's up guys and girls? I got more done, here are some pics! First, on Saturday I got my son to help me sand Then as you can see here, I sanded too much, and had to go back for a lil more resin And here is a little progress update video And check out these curves... SEXY! So then, after more sanding, I finally got them both in primer And here is an important part. I changed my mind on the paint and color choice. There was just no way I was gonna get the finish I wanted with the other paint, so I followed some good advice, and went with fleckstone Base done Me in action! And here is how she looks at this moment. Here is another video update, but for some reason, the sound quits??? So tomorrow I should get it all back in and playing. Stay tuned for more coming soon! Please leave comments here. Kickin' Cruiser Seller Feedback Stage 3 Dash, Door Panels,4th Order wall 4 - 15'son a DC 5.0K 2 DC 5.0K'sSolo X 15 (v.2) Sub Build Link to comment Share on other sites More sharing options...
Purplehaze Posted November 16, 2011 Author Report Share Posted November 16, 2011 So, anyway I got some more done today. Got the box in the car, subs in, and playing. Now I just gotta wait till this weekend to get the 5K in, and make these babies happy! So first, I had to get my base mounted. A lil rain aint gonna slow me down Next I installed a few little pieces I painted to match Base is in and mounted to the car. Pay no attn to the area not painted, you will see why in a min Here is a close-up showing the color Check out the curves, and the way the flat ends meet up with them. SEXY! Next step was to put on the gaskets, or "weather strips", for mounting inverted No wood screws to mount the subs here. Try 1/4" bolts and t-nuts First one in Then first one out so I could put the other two in Money shot Oh, and this is my ohm reading. I'm wired @1.34ohm. When I mounted them regular, it w/ rise to 2.8ohm. I love inverted mounting! I made a little video, but it was too dark and the sound cuts out about half way through, so I PROMISE I'll get some good videos tomorrow. All in all, I am VERY happy with the way this has turned out. Now for some powar! Please leave comments here. Kickin' Cruiser Seller Feedback Stage 3 Dash, Door Panels,4th Order wall 4 - 15'son a DC 5.0K 2 DC 5.0K'sSolo X 15 (v.2) Sub Build Link to comment Share on other sites More sharing options...
Purplehaze Posted November 17, 2011 Author Report Share Posted November 17, 2011 As promised. The camera SUCK ASS, I hope to get a good one soon. Sorry More to come soon! Please leave comments here. Kickin' Cruiser Seller Feedback Stage 3 Dash, Door Panels,4th Order wall 4 - 15'son a DC 5.0K 2 DC 5.0K'sSolo X 15 (v.2) Sub Build Link to comment Share on other sites More sharing options...
Purplehaze Posted November 18, 2011 Author Report Share Posted November 18, 2011 Got a little something today. Well, it's not exactly little... This is the firs bass knob I have ever had that goes counter-clockwise. Pretty cool, but I'll have to get used to it Yeah it's on now! More to come... Kickin' Cruiser Seller Feedback Stage 3 Dash, Door Panels,4th Order wall 4 - 15'son a DC 5.0K 2 DC 5.0K'sSolo X 15 (v.2) Sub Build Link to comment Share on other sites More sharing options...
meade916 Posted November 18, 2011 Report Share Posted November 18, 2011 nice setup so far......but how did this get into SOTM if its not done yet? let us know when it is. All SMD products + MORE available at my store here! https://wccaraudio.com/ Subscribe to My Youtube Channel! Over 1,000,000 subscribers strong! Turn on your notifications! http://www.youtube.com/meade916 Follow My Instagram! Daily live feeds from the shop, exclusive content way before it hits my Youtube channel...and little squares with photo's in them http://www.instagram.com/meade916 The Official SMD Facebook fan Page https://www.facebook.com/SteveMeadeDesigns/ Follow my Tweet (Twitter) http://www.Twitter.com/meade916 Link to comment Share on other sites More sharing options...
Purplehaze Posted November 19, 2011 Author Report Share Posted November 19, 2011 Okay so I got more done today. Check it out. First I compared the 5K to my ZX1000.1 and ZX250.2 Then it's time to get this baby in there! So I started by adding the second hot wire from the alt to the rear battery, and getting all my wires ready around the amp rack. Then a little soldering. I need a big hydraulic crimper. Now to mount "Tha Beast" into it's new home All lined up and ready! A little while later... Got it all hooked up! Lookin sexy huh? Also got my subs flipped back to normal mount. Glad I did too cause she was rubbing! Wired to 1.34Ohm - check! Now to set the gains. Man this tool sure does make it quick and easy! Thanks Tony and Steve! And there you have it! Man, I can't even describe how proud of this car I am. I took a video, here it is. But the damn cameras sound quit working about half way through. You can still tell when it's playing Also, I'll add several more videos to this thread tomorrow when it's daylight, and you can see better, along with a complete walk-thru. So I guess that will conclude Stage 2 of the Kickin' Cruiser build. All in all I have had a lot of fun building this car and system, as well as sharing as much of it as possible. Thanks again for everyone who has helped me along the way, if it wasn't for you none of this would have happened. My plans are to just enjoy it the way it is now for a while, at least till next spring. Then it will be on to Stage 3, which will be "Becoming the DC Cruiser". But like I say, for now I'm just gonna set back and enjoy what I have. Thanks again for those who followed and complimented my work. You guys keep it fun! Please leave comments here. Kickin' Cruiser Seller Feedback Stage 3 Dash, Door Panels,4th Order wall 4 - 15'son a DC 5.0K 2 DC 5.0K'sSolo X 15 (v.2) Sub Build Link to comment Share on other sites More sharing options...
Purplehaze Posted November 19, 2011 Author Report Share Posted November 19, 2011 Okay as promised, a better video Kickin' Cruiser Seller Feedback Stage 3 Dash, Door Panels,4th Order wall 4 - 15'son a DC 5.0K 2 DC 5.0K'sSolo X 15 (v.2) Sub Build Link to comment Share on other sites More sharing options...
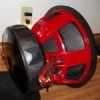
Purplehaze Posted November 20, 2011 Author Report Share Posted November 20, 2011 Hey guys , here are the pics of the ground I added to my alternator yesterday, along with a second run of 1/0 positive to the rear battery. Boring, but I wanted to make sure they were in there. Also got my bass knob in, and some of the wires straightened up A shot of the subs. I just hope they make it till spring! The 4ch under the seat Again, a big thank you to everyone on this site for the help, inspiration, and motivation that makes it all happen! So now Stage 2 "The Kickin' Cruiser" is officially 100% COMPLETE! Please post comments here. Thank you. Kickin' Cruiser Seller Feedback Stage 3 Dash, Door Panels,4th Order wall 4 - 15'son a DC 5.0K 2 DC 5.0K'sSolo X 15 (v.2) Sub Build Link to comment Share on other sites More sharing options...


Recommended Posts
Archived
This topic is now archived and is closed to further replies.