Deeznutz Posted April 19, 2014 Report Share Posted April 19, 2014 This is where I went wrong with my pods. They sound great, but man do they stick out. I can rest my left knee on it as I drive. lol. -Frank Link to comment Share on other sites More sharing options...
SMZ2 Posted April 19, 2014 Author Report Share Posted April 19, 2014 At the risk of coming off bad, I think you should know for future reference, that panel is done wrong and should be scrapped. The rings should have had rabbet grooves in them to staple the material into and ithe material should have been pulled tighter all around. The staple the material just short of the curve down the panel to bodywork could blend better. The only way that panel could have warped would be from the resins being mixed too hot. The material was not pulled tight enough to warp the panel. Is it still somewhat fix able? I really don't want to just scrap them. I think I understand what you are saying though. After doing them for the first time I know what I would do different next time. Also I ask because the passenger door is for the most part done. My Build Log!http://www.stevemead...nissan-xterror/ Check the Youtube Channel for Updates!http://www.youtube....ser/Xterror2002And Seller Feedbackhttp://www.stevemeadedesigns.com/board/topic/163179-bought-from-smz2/#entry2363713 Link to comment Share on other sites More sharing options...
SMZ2 Posted April 19, 2014 Author Report Share Posted April 19, 2014 if you are a rookie to glassing nothing beats sunflash. no warping.I will definitely admit I am a rookie. This was my first big glass job. My Build Log!http://www.stevemead...nissan-xterror/ Check the Youtube Channel for Updates!http://www.youtube....ser/Xterror2002And Seller Feedbackhttp://www.stevemeadedesigns.com/board/topic/163179-bought-from-smz2/#entry2363713 Link to comment Share on other sites More sharing options...
Deeznutz Posted April 19, 2014 Report Share Posted April 19, 2014 At the risk of coming off bad, I think you should know for future reference, that panel is done wrong and should be scrapped. The rings should have had rabbet grooves in them to staple the material into and ithe material should have been pulled tighter all around. The staple the material just short of the curve down the panel to bodywork could blend better. The only way that panel could have warped would be from the resins being mixed too hot. The material was not pulled tight enough to warp the panel. Is it still somewhat fix able? I really don't want to just scrap them. I think I understand what you are saying though. After doing them for the first time I know what I would do different next time. Also I ask because the passenger door is for the most part done. That's how you learn man! Don't feel bad. The thing is you at least tried it. Many people would not go through the trouble. The only logical solution would be to bolt it to the door after getting rid of the bad section that is making it warp. Now, once it's on you can build it back up with some cardboard or similar structure and lightly layer it back up. One thing though, since you are putting 4 mids along a stretch of fiberglass, I can tell you that the thickness of the glass will need to increase substantially or the panel will resonate badly. AKA sound like shit. Again, a learning curve! Case in point, My pods are alittle thin from the woofer to the door edge. This happens to be the longest section. With certain songs this stretch of pod section vibrate a tiny bit. In contrast, the short side of the pod (towards the dashboard/footwell) is of the same thickness and due to it's height is stiff as hell. This tells me the long run of fiberglass is too thin for that long a run (woofer to door edge). So exponentially speaking, the thickness needs to increase "X" amount every few inches to be consistently rigid. Make sense? Since you're asking for advice, you're going to have to do them over to get it done right. You're actually better off a panel of hardboard and fiberglass the panel onto the door panel. Run to your local pawn shop and pick up a cheap router. Make a circle maker and re-do it. -Frank Link to comment Share on other sites More sharing options...
Deeznutz Posted April 19, 2014 Report Share Posted April 19, 2014 Here is a simpliest way of avoiding a complete fiberglass set up. This guy is covering the 2 door pockets with this wood panel. Looks like he cut into the panel for the magnet clearance than did a long stretch of board. I, on the other hand, built on top of my panel which is why they stick out so much. I can get my 4" back if I cut into the panel like this guy did! Which is what I am going to do during the summer. So I learned on this trial. You can do the same thing with hardwood or birch wood. Than add some rings and fiberglass to get that flush mount/raised look you are trying to do with the current warp panel you have. He recessed his, added a ring and glassed it for raised look. Honestly, be proud of what you did.....NOW REDO IT. lol. You have to cut your loss and start again. I would get (new) used door panels from the scrap yard. I would use hardwood or birch panel and cut out the holes for the woofers. Than place the wood panel, place it where you want it on the used panel and glass it in. Than use a dremel to cut out the panel for magnet clearance only. More panel is better than less panel as a foundation standpoint. Dude you lost alot of panel! That thing will not be strong since it has no structural integrity and heavy due to the nature of fiberglass,body filler, and than add the woofer weight. Remember the wood will not resonate, will not flex, and is rigid, which solves a big problem with mutli woofers and thin fiberglass! -Frank Link to comment Share on other sites More sharing options...
SMZ2 Posted April 19, 2014 Author Report Share Posted April 19, 2014 Yeah I shredded my door panels to get it how I wanted. I will try and find some replacement ones and start over. Any pictures of a wood panel before Glassing? The back ones were a difficult fit. magnet clearance was not there that is why I initially cut the panels. My Build Log!http://www.stevemead...nissan-xterror/ Check the Youtube Channel for Updates!http://www.youtube....ser/Xterror2002And Seller Feedbackhttp://www.stevemeadedesigns.com/board/topic/163179-bought-from-smz2/#entry2363713 Link to comment Share on other sites More sharing options...
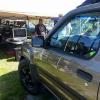
SMZ2 Posted April 19, 2014 Author Report Share Posted April 19, 2014 My passenger panel. Does it look bad too? My Build Log!http://www.stevemead...nissan-xterror/ Check the Youtube Channel for Updates!http://www.youtube....ser/Xterror2002And Seller Feedbackhttp://www.stevemeadedesigns.com/board/topic/163179-bought-from-smz2/#entry2363713 Link to comment Share on other sites More sharing options...
durangogo Posted April 20, 2014 Report Share Posted April 20, 2014 I think the passenger looks great :-) If you remove all the FG on the other one and redo it like this one, you're all set ! Then comes the fun of HOURS of sanding and Bondo ! I hope my first major glassing will come out as good as that. I did a lot of over the panel pods, but I'm doing my first door panels as well, Good Luck ! Link to comment Share on other sites More sharing options...
SMZ2 Posted April 20, 2014 Author Report Share Posted April 20, 2014 I think the passenger looks great :-) If you remove all the FG on the other one and redo it like this one, you're all set ! Then comes the fun of HOURS of sanding and Bondo ! I hope my first major glassing will come out as good as that. I did a lot of over the panel pods, but I'm doing my first door panels as well, Good Luck ! Thanks man. That is the thing my driver side has only got a single layer of glass on the back side. There is no glass on the front yet just a coat of resin. The passenger has about 2 layers of glass on the back on 2 layers on the front. My Build Log!http://www.stevemead...nissan-xterror/ Check the Youtube Channel for Updates!http://www.youtube....ser/Xterror2002And Seller Feedbackhttp://www.stevemeadedesigns.com/board/topic/163179-bought-from-smz2/#entry2363713 Link to comment Share on other sites More sharing options...
Deeznutz Posted April 20, 2014 Report Share Posted April 20, 2014 The design is nice, but man that 4th one, being higher, what is the point of it if it butts up to the side of the seat? I don't think there's an advantage in having it there IMO. With the next set, just use 3 mids. Get the new panels and start over. http://www.ebay.com/itm/01-04-Nissan-Frontier-Pickup-Xterra-Right-Passenger-Side-Manual-Door-Trim-Panel-/400687168384?pt=Motors_Car_Truck_Parts_Accessories&fits=Model%3AXterra&hash=item5d4ad0fb80&vxp=mtr Here is the idea. Do what I did. Lay down 3 layers of glass to follow the mold of the panels. Now when I do go to do it over I will change things up a bit. Like before, all 3 payers of think matting as a base. than add small wood bolts with recessed threaded inserts to screw to the panel later. Make the birch or hardwood speaker tray. Than bolt it to the FG backing. and glass on to the backing. Install the speakers and making clearance for the magnets as needed. Like I said, the integrity of the OEM panel is intact, and only magnet holes are cut into the panel. This pic of the ready made panel is exactly what I have in mind to do. Alot of planning and fixing goes into making these things a reality. I'm glad I learned from my mistakes. http://caraudiosecurity.com/media/shop/var/variation_image/thumbs/24783_tw270_th270.jpg?v=1384076760 -Frank Link to comment Share on other sites More sharing options...


Recommended Posts
Archived
This topic is now archived and is closed to further replies.