rckstar Posted March 23, 2010 Report Share Posted March 23, 2010 Hey Members, This is my 1st build log, I initially got the design spec from the guys at kicker , with respect to tuning and air space for a slot port box. I had drawn it up on Cad, and it looked a bit ordinary, so I hit up Foreverbumpin for ideas on how to turn a good box into a great box. He recommended adding flares to the entrance and exits of the port. Thank you Foreverbumping for your input. (You should be given MOD status for your contributions to this forum) Heres my box design after numerous changes I purchased the timber from our local guy, ( Im from South Africa) , Decided to go with plywood as its light, and I drive a vw polo hatch I then plotted out the design with dimensions and so on ( metric units) I then marked out the box walls and the port on the base and the top. All worked out well there with the wood being cut right. I had to visit my uncle reggie thereafter as he had a table saw , which made life much easier, when cutting the kerfed parts, and has skill with kerfs. The first roadblock I came across was the plywood grain was parallel to the kerf bend, meaning it would snap along the grain. We then decided to go with MDF for the kerfed parts. It bent easily with i bit of wetting on the face. The following are pics of asssembly after cutting the kerfs. my motto: hit it, quit it, never admit it Link to comment Share on other sites More sharing options...
rckstar Posted March 23, 2010 Author Report Share Posted March 23, 2010 In the following Pic you'll notice the bend forma which we clamped screwed and glued the kerf to , to maintain the radius. I added some additional bracing to the kerf as shown The inner baffle :-) and the Big Boy The double baffle in place The enclosure about 70% done My version of 45 s using strips of masonite board lol, I wasnt to concerned about rigidity as I was going to glass the inside of the box. my motto: hit it, quit it, never admit it Link to comment Share on other sites More sharing options...
rckstar Posted March 23, 2010 Author Report Share Posted March 23, 2010 Bracing added for good measure Wood filler over the 45s and gaps I used UPVc pipe to create the inner port flare . I added ply wood forma to the back of it to provide support and prevent flex, Test fit , All Good Almost there, with sanding and filling , Shew! hard work for my limited skill and tools lol Staring down the port, My hand couldnt fit down there , but I tried to do the best I could wrt sanding. my motto: hit it, quit it, never admit it Link to comment Share on other sites More sharing options...
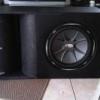
rckstar Posted March 23, 2010 Author Report Share Posted March 23, 2010 My first time glassing, and it wasnt very pleasant lol I resined the outside of the port to strengthen it. Test fit :-)just some sanding to go there after The Bass is nothing close to what I expected, The gains on this box is awesome and is worth the extra effort, Im really impressed to say the least. It picks up a wide range of notes and is not sloppy, hits nice and hard. That 15 really comes alive in this box . I ll be planning on two tone leather to neaten up the box, but im still not sure on finishes. will keep you guys updated, It took me 4 weekends to get this far as well as some weekdays lol. Thanks for looking my motto: hit it, quit it, never admit it Link to comment Share on other sites More sharing options...
rival904 Posted March 23, 2010 Report Share Posted March 23, 2010 wow, looks like a job well done. 2004 Yellow F150 STX 4x4 Single Cab 2 Yellow DC Power 270SP's Alts 4(and counting) XS Power 6500's 4 DD3515s Supercharged 53cu.ft 4th order blowthrough 8 DD M1b's 6 Selenium 8's 2 Selenium ST350s 154.1 @ 41hz Legal Burp Build Log Link to comment Share on other sites More sharing options...
Forevrbumpn Posted March 23, 2010 Report Share Posted March 23, 2010 very good work man, leather or vinyl would look very sexy with that box I have a ritual called "terminator". I crouch in the shower in the "naked terminator" pose. With eyes closed I crouch for a minute and visualize either Arnie or the guy from the 2nd movie. I then start to hum the T2 theme. Slowly I rise to a standing position and open my eyes. It helps me get through my day. The only problem is if the shower curtain sticks to my terminator leg. It sorta ruins the fantasy. Link to comment Share on other sites More sharing options...
Sanitarium Posted March 23, 2010 Report Share Posted March 23, 2010 Loveing the port, only thing I would change would be how you done the inner corners of it. Outward cuves add bracing but roughen up the air flow. Shoulda done concave bracing there and not convex. Anywho, AWESOME work, can't wait to see it covered and see some videos! Link to comment Share on other sites More sharing options...
splzx3 Posted March 23, 2010 Report Share Posted March 23, 2010 nice lookin box bro and ur glassing is not as bad as mine lol ________________________________________________________________________ deepsilencer, on 22 Aug 2011 - 17:32, said: splzx3, on 22 Aug 2011 - 17:27, said: i had my fun on one of his videos...till he blocked me then i got my mother into it lol after her he closed the comments xD lol your mom is a G! WTF, I never thought I'd have a conversation about cross dressers and trans-genders on a car audio forum. Link to comment Share on other sites More sharing options...
rckstar Posted March 23, 2010 Author Report Share Posted March 23, 2010 Thanks guys, Appreciate the feedback, Hey Glassing is messed up, especially when you run out of gloves lol, @ Sanitarium , Thanks for the input, ah i get you , I was getting lazy for those one s although i think i can fix it by filling up the gap between and making them flatter. I ll do a vid of the flex soon :-) my motto: hit it, quit it, never admit it Link to comment Share on other sites More sharing options...
rckstar Posted March 29, 2010 Author Report Share Posted March 29, 2010 Just a quick update, I just got done re doing the big 3 in my car with 1/0 guage knuknoceptz cable, and started cleaning up the box Sanding... Sanding... And more Sanding... Surface is Good enough for primer and flexstone on the Port my motto: hit it, quit it, never admit it Link to comment Share on other sites More sharing options...


Recommended Posts
Archived
This topic is now archived and is closed to further replies.