03 Xtreme Fosgate Posted December 1, 2013 Author Report Share Posted December 1, 2013 They said they might have online dealers Haven't heard that,just got told there wouldn't be any but either way I don't expect them to be reasonably priced.. BUILD LOG-http://www.stevemeadedesigns.com/board/topic/179004-03-s10-xtreme-ext-cab-rf-build/ PHOTOBUCKET- http://s1354.beta.photobucket.com/user/03XtremeFosgate/library/truck%20audio%20rebuild Link to comment Share on other sites More sharing options...
03 Xtreme Fosgate Posted December 1, 2013 Author Report Share Posted December 1, 2013 So now I got started on the T2652's in the doors. You already saw them in the pics above but I'll post them again just because.. I cut the factory speaker grill off because I'll be putting another set of 6.5 comps and 6.5 midbass drivers and fiberglassing them. I wish I would've tried to find some door panels in a junk yard or something first instead of cutting these up in case I have to put them back in so now I'm trying to find some extras that are same color to keep in storage.. Here's the passenger side Here's the driver side.. I wish I would have took more pics of the whole process but as most of you already know once you get involved in the install sometimes you just forget to take pics as I did. BUILD LOG-http://www.stevemeadedesigns.com/board/topic/179004-03-s10-xtreme-ext-cab-rf-build/ PHOTOBUCKET- http://s1354.beta.photobucket.com/user/03XtremeFosgate/library/truck%20audio%20rebuild Link to comment Share on other sites More sharing options...
03 Xtreme Fosgate Posted December 1, 2013 Author Report Share Posted December 1, 2013 Then I got the Stinger volt meter installed and the fairly new HU I got out of my moms camaro when it got totaled and she got a ddin in her TB for a rear view camera. This is where I chose to install it,drilled a small just big enough for wires through the front of panel then made a larger one on the back side just for ease of wire installation.. I got some of the Stanley 90* brackets from Home Depot in multiple sizes for some other projects as well. This is how it turned out.. I have a SMD VM-1 that is going to replace this one here for the amp voltage and the Stinger is going up on the dash for truck battery voltage. Or I might put the VM-1 up on dash and leave the stinger there,either way once I get the stinger voltage calibrated I'm going to glue or tape it in place so hopefully it won't move anymore. BUILD LOG-http://www.stevemeadedesigns.com/board/topic/179004-03-s10-xtreme-ext-cab-rf-build/ PHOTOBUCKET- http://s1354.beta.photobucket.com/user/03XtremeFosgate/library/truck%20audio%20rebuild Link to comment Share on other sites More sharing options...
03 Xtreme Fosgate Posted December 2, 2013 Author Report Share Posted December 2, 2013 I must have got sidetracked earlier and forgot to post the hu pic I had the faceplate off since we working in the truck,figured I'd be better safe than sorry. That's the 360.3 knob below it,I had some double sided tape to secure it but once I slid it in I realized I didn't really need anything else,it was a snug fit. BUILD LOG-http://www.stevemeadedesigns.com/board/topic/179004-03-s10-xtreme-ext-cab-rf-build/ PHOTOBUCKET- http://s1354.beta.photobucket.com/user/03XtremeFosgate/library/truck%20audio%20rebuild Link to comment Share on other sites More sharing options...
03 Xtreme Fosgate Posted December 2, 2013 Author Report Share Posted December 2, 2013 I just went out and got a pic of it with the face on. BUILD LOG-http://www.stevemeadedesigns.com/board/topic/179004-03-s10-xtreme-ext-cab-rf-build/ PHOTOBUCKET- http://s1354.beta.photobucket.com/user/03XtremeFosgate/library/truck%20audio%20rebuild Link to comment Share on other sites More sharing options...
03 Xtreme Fosgate Posted December 2, 2013 Author Report Share Posted December 2, 2013 Then I put the box back in and started on the wiring for the amp rack but had to figure out the design first so I got a 2' x 4' piece of 3/4" mdf from the HD,we took it inside and started laying it out different ways to pick what I was going with... I had more layout pics than this but I can't find them for some reason so we ended up going with this because it seemed like it was going to be the most functional BUILD LOG-http://www.stevemeadedesigns.com/board/topic/179004-03-s10-xtreme-ext-cab-rf-build/ PHOTOBUCKET- http://s1354.beta.photobucket.com/user/03XtremeFosgate/library/truck%20audio%20rebuild Link to comment Share on other sites More sharing options...
03 Xtreme Fosgate Posted December 2, 2013 Author Report Share Posted December 2, 2013 So that we had that figured out it was time for the wiring which was a rats nest while doing but we threw the box in and got to wiring. The 2 middle fuse holders are for the mids/highs amps and the 1/0 on the left is for the T2500.. The 2 black boxes under neath those are PAC & NVX remote turn on relays,one was for the fans I decided to use behind the amps and the other one goes to the T2500 and 360.3 which turns on the other 3 amps. The wires on the right side are the 360 power/ground/remote wires BUILD LOG-http://www.stevemeadedesigns.com/board/topic/179004-03-s10-xtreme-ext-cab-rf-build/ PHOTOBUCKET- http://s1354.beta.photobucket.com/user/03XtremeFosgate/library/truck%20audio%20rebuild Link to comment Share on other sites More sharing options...
03 Xtreme Fosgate Posted December 2, 2013 Author Report Share Posted December 2, 2013 Came up with idea of cutting squares out the amp rack for the fans to squeeze into,I cut extra holes for more air flow behind it and in case I decided to get more fans for it.. I used metal strapping for ac duct/plumbing pipe to hold the fans in place and even. ended up getting a pair of bottom fed Project DB dual inputs for the T2500,$20 was a good deal to me. Then carpeted the rack. BUILD LOG-http://www.stevemeadedesigns.com/board/topic/179004-03-s10-xtreme-ext-cab-rf-build/ PHOTOBUCKET- http://s1354.beta.photobucket.com/user/03XtremeFosgate/library/truck%20audio%20rebuild Link to comment Share on other sites More sharing options...
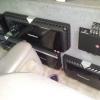
03 Xtreme Fosgate Posted December 2, 2013 Author Report Share Posted December 2, 2013 This is the rack with amps mounted but no wiring yet,I had to get a 1/2" piece of mdf because that little bit of difference took away more leg room.. We had amps mounted while doing the wiring so I laid out towels on the 3/4" mdf board then laid it down very carefully.Now this is where the nest is,this was original layout before I decided to run duals to T2500. All the excess rca's are rolled up and fastened with screw down tie wraps along with the power/grounds for fans and the 1/0 is mounted with some stinger dual & single 1/0 cable straps. I routed the power ground wires like this to try to keep from getting feedback through the system. this was for the dual wire setup No those clear things are not wire nuts on the fan wires,they're crimp caps and I taped them up anyways.. BUILD LOG-http://www.stevemeadedesigns.com/board/topic/179004-03-s10-xtreme-ext-cab-rf-build/ PHOTOBUCKET- http://s1354.beta.photobucket.com/user/03XtremeFosgate/library/truck%20audio%20rebuild Link to comment Share on other sites More sharing options...
03 Xtreme Fosgate Posted December 2, 2013 Author Report Share Posted December 2, 2013 Had my old BA 5.25's from the doors laying around and decided I wanted something for some rear fill so I threw some boxes together out of some scrap pieces of 1/4" plywood. I know they're ugly but they serve their purpose for now and will be coming out.. I do want some rear fill so I'll probably try to glass them in the back somewhere or get something else for the rear. Maybe put the 4x6's back there if I pull them out of the dash? BUILD LOG-http://www.stevemeadedesigns.com/board/topic/179004-03-s10-xtreme-ext-cab-rf-build/ PHOTOBUCKET- http://s1354.beta.photobucket.com/user/03XtremeFosgate/library/truck%20audio%20rebuild Link to comment Share on other sites More sharing options...


Recommended Posts
Archived
This topic is now archived and is closed to further replies.