79 cutty Posted September 12, 2012 Report Share Posted September 12, 2012 Ok....so not your typical build log. But it has glassing, wiring, and some paint work. Hopefully it goes over well. If not I understand if moderators move or delete the topic. Well the story goes something like this......as a kid the one thing I always wanted but never was lucky enough to get was a power wheels. My son's 3rd birthday is this September 14th and I was determined to give him what I always felt I missed out on! That being said I was playing around with the floor models at the store and was thoroughly unimpressed.....so the build begins! First thing I did was rip out the cheesy FM radio that comes with it and runs off 3 C batteries. This was replaced with a Pioneer deck I had sitting around. Pioneer DEH 1300MP (The kid loves pushing buttons so I figured this was a perfect fit push buttons and turn the volume knob without being over the top.) Put in a master switch (also has an LED on it so I can quickly see everything is turned off when we put it away at night.) Mounted up the PPI Sedona series tweeters to the front dash as well: From there I decided it was time to tackle where the mids would be mounted. I originally was just going to build a MDF box to slide into the package tray, but just couldn't get it to look right. So I scrapped that and onto the glassing! Started laying the glass and getting an idea of how I wanted things to turn out. (In this pic you can see a little sneak peak of what's to follow too.) Unmolded the "bucket" for the enclosure: Firm believer in letting my cars do my talking! You can't rush quality, it doesn't happen overnight. Quality takes time and dedication, but the end results more than pay for it. "Black Pearl" Build Thread http://www.stevemeadedesigns.com/board/topic/67183-1985-buick-regal-limited-build-log/page-1 Link to comment Share on other sites More sharing options...
n8ball2013 Posted September 12, 2012 Report Share Posted September 12, 2012 i was like thats the cheapest 2012 dash ive ever seen then realize it was a powerwheel lol THERE IS NO BUILD LOG! 1998 Chevy Silverado ext cab Alpine CDA-9887 4 Team Fi 15s 2 Ampere Audio TFE 8.0 2 Ampere Audio 150.4 3 Digital Designs CS6.5 component sets Dual Mechman 370XP Elite alternators inbound! 8 XS Power d3400 6 XS power d680 Second Skin Stinger Tsunami Wiring Sky High A Real Voltmeter not a piece of shit stinger. Link to comment Share on other sites More sharing options...
79 cutty Posted September 12, 2012 Author Report Share Posted September 12, 2012 From there it was onto making the trim rings for the mids: Was going through options and decided to see if I liked the idea of no grille on the speakers and using a trim ring: (The MDF insert over the screw mounts was used as a template for the aluminum.) I new the factory grilles the speakers come with looked terrible so I quick used the insert template to route out a sample aluminum ring to see how I liked it. (Keep in mind really quick/rough insert) I liked that much better so I went on to Machining some trim rings for the speakers....and decided the deck looked like it was missing something, so I made one for that too. Now it was onto letting the glass fly. I cut out a flat piece of MDF to use as the base on the fiberglass mold and secured it to the mold with some long strand kitty hair: Firm believer in letting my cars do my talking! You can't rush quality, it doesn't happen overnight. Quality takes time and dedication, but the end results more than pay for it. "Black Pearl" Build Thread http://www.stevemeadedesigns.com/board/topic/67183-1985-buick-regal-limited-build-log/page-1 Link to comment Share on other sites More sharing options...
79 cutty Posted September 12, 2012 Author Report Share Posted September 12, 2012 From there I stretched the ponte and laid down the resin: Routed out the extra material: Rough idea of what finished will look like: I didn't snap any pics of it, but reinforced the enclosure with 6 layers of chop matte on the inside of it. Then it was onto filler: Guide coat (I only had blue!) Some rough ideas of finished product: From that point it was pretty much buttoned up so it was onto paint. We scuffed all the plastic for good adhesion: From there it was onto high build primer: And knocking that down: That is pretty much where it is to date. We are painting it kandy oriental blue with blue flake, silver, grey, and gunmetal patterns with pearls and different effects. Will also be silver leafed and pinstriped. Firm believer in letting my cars do my talking! You can't rush quality, it doesn't happen overnight. Quality takes time and dedication, but the end results more than pay for it. "Black Pearl" Build Thread http://www.stevemeadedesigns.com/board/topic/67183-1985-buick-regal-limited-build-log/page-1 Link to comment Share on other sites More sharing options...
79 cutty Posted September 12, 2012 Author Report Share Posted September 12, 2012 I think I forgot to put up finished dash pics. Since I ended up machining out the aluminum trim ring on the deck it was ever so slightly too big so I did a little glassing to flush mount that in as well: It isn't the most elaborate project. But I travel a TON for work, and have very little spare time....so trying to bust this out in the small windows of opportunity I have. I also am trying to keep in mind every little thing doesn't have to be exactly perfect as this is going to be a kids toy that gets beat up! Firm believer in letting my cars do my talking! You can't rush quality, it doesn't happen overnight. Quality takes time and dedication, but the end results more than pay for it. "Black Pearl" Build Thread http://www.stevemeadedesigns.com/board/topic/67183-1985-buick-regal-limited-build-log/page-1 Link to comment Share on other sites More sharing options...
79 cutty Posted September 12, 2012 Author Report Share Posted September 12, 2012 Well it was hotter than blazes this weekend, but we were able to get the power wheels into base coat! I wasn't able to snap any "action" shots of shooting the 2 coats of sealer, or the 2 coats of HOK orion silver because there was such a haze in the garage from shooting it. But here is the one "action" shot I was able to get while shooting the 2 full coats, and 1 mist coat of HOK candy oriental blue: Some finishing shots: And now for the good stuff! Some pics of the paint out in the sun! Unfortunately the pics don't really do justice to the depth of the paint....can kind of see it in this one, which happens to also be my favorite shot from this weekend! Shot 2 coats of inner coat clear over that...going to give it a week or so and then we will go back and start shooting the patterns on it! Firm believer in letting my cars do my talking! You can't rush quality, it doesn't happen overnight. Quality takes time and dedication, but the end results more than pay for it. "Black Pearl" Build Thread http://www.stevemeadedesigns.com/board/topic/67183-1985-buick-regal-limited-build-log/page-1 Link to comment Share on other sites More sharing options...
79 cutty Posted September 12, 2012 Author Report Share Posted September 12, 2012 Well work continues as the deadline to finish this for my son's birthday gets closer. Was able to shoot the metallic sealer, followed by 2 coats of HOK Orion Silver: Then the fun really starts. The beginning of taping off patterns: From there it was onto shooting the HOK Kandy Oriental Blue (3 coats and 1 mist coat): Then it was onto the unmasking: Next will be shooting some more patterns. Either a gunmetal, or dark silver color for accents, as well as some more blue with very heavy royal blue flake in it! Then clear, buff and assemble! Firm believer in letting my cars do my talking! You can't rush quality, it doesn't happen overnight. Quality takes time and dedication, but the end results more than pay for it. "Black Pearl" Build Thread http://www.stevemeadedesigns.com/board/topic/67183-1985-buick-regal-limited-build-log/page-1 Link to comment Share on other sites More sharing options...
79 cutty Posted September 12, 2012 Author Report Share Posted September 12, 2012 Alright....was able to get all the patterns shot, color sanded, and buffed this weekend! Just need to get it to my brother for pinstriping, and final assembly for the little mans birthday! Weekend went a little something like this: Taping off the silver to do the fades Finished fades: Then it was on to taping off the hood for the "fingerprint patterns:" Shooting the gunmetal grey on the fingerprint patterns: Next stage was taping off for the heavy flake: Close up of flake: Finished flake: Then we shot candy blue over the hood patterns: After that it was shooting clear: From there it was a long boring day of color sanding, and buffing.....but the "semi" finished product more than makes up for the boredom! Firm believer in letting my cars do my talking! You can't rush quality, it doesn't happen overnight. Quality takes time and dedication, but the end results more than pay for it. "Black Pearl" Build Thread http://www.stevemeadedesigns.com/board/topic/67183-1985-buick-regal-limited-build-log/page-1 Link to comment Share on other sites More sharing options...
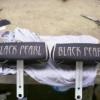
79 cutty Posted September 12, 2012 Author Report Share Posted September 12, 2012 A little sneak preview of the pin striping. There is a bunch more done on it....but was going to wait until the power wheels is finished up to post them all. Here is a shot of the hood. And a good shot of the flaked patterns: Firm believer in letting my cars do my talking! You can't rush quality, it doesn't happen overnight. Quality takes time and dedication, but the end results more than pay for it. "Black Pearl" Build Thread http://www.stevemeadedesigns.com/board/topic/67183-1985-buick-regal-limited-build-log/page-1 Link to comment Share on other sites More sharing options...
79 cutty Posted September 12, 2012 Author Report Share Posted September 12, 2012 A little more of the stiping work. Should be picking it up tonight and final assembly this Friday.....just in time for my little man's birthday party this Sunday! Firm believer in letting my cars do my talking! You can't rush quality, it doesn't happen overnight. Quality takes time and dedication, but the end results more than pay for it. "Black Pearl" Build Thread http://www.stevemeadedesigns.com/board/topic/67183-1985-buick-regal-limited-build-log/page-1 Link to comment Share on other sites More sharing options...


Recommended Posts
Archived
This topic is now archived and is closed to further replies.