kryptonite Posted November 27, 2013 Report Share Posted November 27, 2013 I miss having a true ext. cab truck, regret doing my walk through lol. Build is lookin good so far, attention to detail is great! DC SOUND LAB NUT HUGGERCurrently Own 4 - 18" lvl 6s (m3) w/full Carbon Fiber option 2 - DC 5k lvl 4 motor lvl 2 motor On 8/2/2013 at 8:13 PM, n8ball2013 said: this is much worse. Its old n8 without the time or patience to hold fucking hands. I'm supposed to be doing school work but yet here i am making sure jr fuck fuck isn't trying to poke the other kids with a stick. Link to comment Share on other sites More sharing options...
03 Xtreme Fosgate Posted November 27, 2013 Author Report Share Posted November 27, 2013 I miss having a true ext. cab truck, regret doing my walk through lol. Build is lookin good so far, attention to detail is great! Thanks man... I don't know about a walk through but I would definitely like to get a real nice fiberglass camper shell take the rear window out and do a blow through with 6 12's in back. But this is my daily,that's going to cost a lot to do that and I can't afford that right now so that dream will have to wait. What did you have on your walk through build? Those quotes in your sig got me LOLing for real,especially N8's comment.. BUILD LOG-http://www.stevemeadedesigns.com/board/topic/179004-03-s10-xtreme-ext-cab-rf-build/ PHOTOBUCKET- http://s1354.beta.photobucket.com/user/03XtremeFosgate/library/truck%20audio%20rebuild Link to comment Share on other sites More sharing options...
03 Xtreme Fosgate Posted November 27, 2013 Author Report Share Posted November 27, 2013 So this is where I did another frame/body ground,used the bottom bolt hole for the jump seat,sanded all the paint off around both sides,bought some 2.5" stainless steel bolts, put the ground on it and carried it on to the frame under the cab. This is the bottom side of that,I used a couple fender washers, 3 lock washers and 3 nuts to hold it. this is where it ran down the frame to an open spot where I could get to both sides. this is where it bolted to the frame,fastened same as on the bottom of cab. . I put double techflex,heat shrinked the ends,then double split loomed it and heat shrinked the ends again then wrapped it with some green 3M tape. I'd rather have too much protection than not enough for wiring under the vehicle. (I'm going to spray undercoating on both ends underneath to prevent any corrosion,rust,etc when I get back on the other part of the build). BUILD LOG-http://www.stevemeadedesigns.com/board/topic/179004-03-s10-xtreme-ext-cab-rf-build/ PHOTOBUCKET- http://s1354.beta.photobucket.com/user/03XtremeFosgate/library/truck%20audio%20rebuild Link to comment Share on other sites More sharing options...
03 Xtreme Fosgate Posted November 27, 2013 Author Report Share Posted November 27, 2013 ordered some LED taillights,LED front running lights,halo projector with pre-installed 8k HID's from Protuninglab.com and some LED high mount 3rd brake light bulbs from superbrightleds.com. Put them in to get ready for the XS D3400 to go in. If you're wondering what that black thing on the cab is that's the XM satelite antenna BUILD LOG-http://www.stevemeadedesigns.com/board/topic/179004-03-s10-xtreme-ext-cab-rf-build/ PHOTOBUCKET- http://s1354.beta.photobucket.com/user/03XtremeFosgate/library/truck%20audio%20rebuild Link to comment Share on other sites More sharing options...
03 Xtreme Fosgate Posted November 27, 2013 Author Report Share Posted November 27, 2013 Still had the Optima YT in at this point. this is just the halos on This is with HID's on too. BUILD LOG-http://www.stevemeadedesigns.com/board/topic/179004-03-s10-xtreme-ext-cab-rf-build/ PHOTOBUCKET- http://s1354.beta.photobucket.com/user/03XtremeFosgate/library/truck%20audio%20rebuild Link to comment Share on other sites More sharing options...
03 Xtreme Fosgate Posted November 27, 2013 Author Report Share Posted November 27, 2013 Also had ordered some new (Street Scene) side view mirrors to replace the OEM "Dumbo" mirrors BUILD LOG-http://www.stevemeadedesigns.com/board/topic/179004-03-s10-xtreme-ext-cab-rf-build/ PHOTOBUCKET- http://s1354.beta.photobucket.com/user/03XtremeFosgate/library/truck%20audio%20rebuild Link to comment Share on other sites More sharing options...
03 Xtreme Fosgate Posted November 28, 2013 Author Report Share Posted November 28, 2013 So this is when I started building the framework for the battery tray in the jump seat location and my cousin helped me carpet the pieces. Also carpeted some 2x4's for some box extensions that I needed for the amp rack to match the height of the box.. We used 3M 90 spray adhesive and stapled the edges just to be sure. BUILD LOG-http://www.stevemeadedesigns.com/board/topic/179004-03-s10-xtreme-ext-cab-rf-build/ PHOTOBUCKET- http://s1354.beta.photobucket.com/user/03XtremeFosgate/library/truck%20audio%20rebuild Link to comment Share on other sites More sharing options...
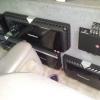
03 Xtreme Fosgate Posted November 28, 2013 Author Report Share Posted November 28, 2013 Here's all the finished pieces, The 4 pieces on the right are curved to form with the side panel and for the wires to go around,the one on the middle top has 2 holes so the factory seat mount studs could go through it. I didn't want to cut anything that would keep me from returning the truck to stock condition. BUILD LOG-http://www.stevemeadedesigns.com/board/topic/179004-03-s10-xtreme-ext-cab-rf-build/ PHOTOBUCKET- http://s1354.beta.photobucket.com/user/03XtremeFosgate/library/truck%20audio%20rebuild Link to comment Share on other sites More sharing options...
03 Xtreme Fosgate Posted November 28, 2013 Author Report Share Posted November 28, 2013 This was just a mock up of the battery placement before I had all the pieces carpeted. BUILD LOG-http://www.stevemeadedesigns.com/board/topic/179004-03-s10-xtreme-ext-cab-rf-build/ PHOTOBUCKET- http://s1354.beta.photobucket.com/user/03XtremeFosgate/library/truck%20audio%20rebuild Link to comment Share on other sites More sharing options...
03 Xtreme Fosgate Posted November 28, 2013 Author Report Share Posted November 28, 2013 Here is the billet aluminum tray I got for the D1200 and the mount assembled. I was just test fitting for final adjustments..Sorry but this 1st pic is blurry. BUILD LOG-http://www.stevemeadedesigns.com/board/topic/179004-03-s10-xtreme-ext-cab-rf-build/ PHOTOBUCKET- http://s1354.beta.photobucket.com/user/03XtremeFosgate/library/truck%20audio%20rebuild Link to comment Share on other sites More sharing options...


Recommended Posts
Archived
This topic is now archived and is closed to further replies.