The Performer Posted February 9, 2009 Report Share Posted February 9, 2009 I decided to make this it's own thread instead of just putting the whole hitch cover build inside my build cause maybe some of you guys would like to do something similar so here it is. The actual face sheet of lexan took about 3 tries to get it right. At first I tried white paint as the light diffusing element however that didn't work. At all. So then I tried another way with a diffuse clear coat, and the first time it screwed up the existing maroon paint. So it wasn't until the 3rd try when I put a gloss black coat behind the maroon before it worked right. So take this into consideration when you see the order of the pictures as some are from different tries, however they were the same process so just follow along and it will make sense. This step I'm lining up where I want the LED's mounted in the second lexan plate. A coat of that diffuse spray clear. Wiring the LED's. I used to scavenge for components as a kid. I had PLENTY of resistors. CERTIFIED BITCHES!!! Not being new at something doesn't mean anything. Just because a prostitute isn't new at what she does, doesn't change the fact that she still 'sucks' Click to see my build! Proud DC owner Link to comment Share on other sites More sharing options...
NoFearX18 Posted February 9, 2009 Report Share Posted February 9, 2009 can we see a pic of the final product in acton? looks good. i dont have the time or patience to do that.... even worse... i dont have a hitch nicely done! i want to see it lite up! My Videos AQ + AA/Fi FTMFW!!!!! Link to comment Share on other sites More sharing options...
The Performer Posted February 9, 2009 Author Report Share Posted February 9, 2009 Some more wiring. A quick 12v test. Works amazingly There's I believe 23 LED's, that's 7 set's of series of 3's, and 2 individual's if I remember correctly. So there were a few resister values to work with, but when you see this, all the calculating and design is worth it. Coat of black after the maroon to block any light bleed. Some white on the backside of the LED panel. Then black to block any bleed from behind (Not that it will matter). Did some sanding on the face of the LED panel to level the LED's with the lexan. Then did some more diffuse coats over the face, then a soft sand with 2000 grit wetsand to give it an opaque surface. This is going to be the diffuse sheets. Dad will have to be lid less for his clamp bucket for a lil while. 2 sheets of it looked better than 1. That same heavy gauge aluminum I used for my center caps. Gonna make the housing and back plate from it. The order of layers. Too anxious to see what it's gonna look like... These will be what I use to hold it all together. CERTIFIED BITCHES!!! Not being new at something doesn't mean anything. Just because a prostitute isn't new at what she does, doesn't change the fact that she still 'sucks' Click to see my build! Proud DC owner Link to comment Share on other sites More sharing options...
The Performer Posted February 9, 2009 Author Report Share Posted February 9, 2009 Haha, I was too tickled to see how it was turning out I went camera crazy. Side shot. Now attaching the mounting bracket that will slide into the receiver. Some more aluminum housing work and JB weld. Primer and paint. Some silicone for seal! Installed and already filthy from dirt. I didn't take any pics of the wiring I did under the truck actually, however it's pretty straightforward. It's connected in the same circuit as my interior blue lighting. So whenever I turn on the glow inside the truck, that's how this turns on so it's a constant thing. that whole circuit is tapped into the cigarette lighter acc. circuit protected by the stock 15amp fuse, as well as an additional 2amp fuse after that for LED protection. Believe it or not but I don't actually have a night shot of this yet on the truck... Maybe I'll snag one here tonight. So yeah, anyways, in the thread title it's supposed to say "made with christmas LED's (steve says is ghetto). Cause in some thread I mentioned that I did all of my instrument cluster lighting with LED's pulled from a blue LED christmas light strand I got from hobby lobby for like $6. Well this one was the same sorta except I got all these white LED's from home depot christmas light strand for like $8. Good deal for as many LED's are on those strands. Even if they're not super bright, they obviously did the trick for this application. So who's ghetto now mr. "Hoopty's roll pan still looks un painted" Haha, just kiddin with ya steve, but the roll pan on the hoopty does still look like just primer'ed to me... So that's it for the thread, all the pics except for a night shot. You guys posted between replies... I was workin on it, sorry I type slow. CERTIFIED BITCHES!!! Not being new at something doesn't mean anything. Just because a prostitute isn't new at what she does, doesn't change the fact that she still 'sucks' Click to see my build! Proud DC owner Link to comment Share on other sites More sharing options...
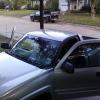
The Performer Posted February 9, 2009 Author Report Share Posted February 9, 2009 This is the best pic I can get right now with my phone. Just wait until I get the truck washed and looking good and I'll have lots of good quality pics. CERTIFIED BITCHES!!! Not being new at something doesn't mean anything. Just because a prostitute isn't new at what she does, doesn't change the fact that she still 'sucks' Click to see my build! Proud DC owner Link to comment Share on other sites More sharing options...
jarredondo1999 Posted February 10, 2009 Report Share Posted February 10, 2009 That's pretty cool and creative. Link to comment Share on other sites More sharing options...
The Performer Posted March 9, 2009 Author Report Share Posted March 9, 2009 Got some new pics. I backed into a pole at my school a few weeks ago and screwed up the aluminum case that it's in. So figured it was time to pull out the welder. For this small a project didn't need to use the mig. Added a resistor to the main run like I did with my LED DRL's to keep the voltage correct. Then a new coil wire to suck up the excess of wire back into the case after it's plugged in. This new one is strong as hell. I can use it as a step if I need. I'll try and get some night pics here in a little while. CERTIFIED BITCHES!!! Not being new at something doesn't mean anything. Just because a prostitute isn't new at what she does, doesn't change the fact that she still 'sucks' Click to see my build! Proud DC owner Link to comment Share on other sites More sharing options...
Shyne151 Posted March 19, 2009 Report Share Posted March 19, 2009 Now that's a damn cool idea, good job man. -Installer for Duke's Car Stereo 2000 Pontiac Grand Prix - Ported Eaton M90 S/C, 3.5" pulley, XS Power Headers, 1.9 Rockers, FWI, Poly Motor Mounts, Custom Tune. RF T1000-1bdCP and T400-4 Boston Acoustics SPG 555 Kenwood eXcelon 995 RF Punch 6.5" components and MB Quart Premium 6x9"s Powermaster Alternator, YellowTop D34, Vmax CT1000 Link to comment Share on other sites More sharing options...
smokeumtires Posted March 19, 2009 Report Share Posted March 19, 2009 now make me a blue RF one for 50 bucks Link to comment Share on other sites More sharing options...
The Performer Posted March 20, 2009 Author Report Share Posted March 20, 2009 now make me a blue RF one for 50 bucks Hah! CERTIFIED BITCHES!!! Not being new at something doesn't mean anything. Just because a prostitute isn't new at what she does, doesn't change the fact that she still 'sucks' Click to see my build! Proud DC owner Link to comment Share on other sites More sharing options...


Recommended Posts