slc123 Posted June 1, 2013 Author Report Share Posted June 1, 2013 did some soldering for the 8gauge wires for the subs My 03' sierra crew cab Here build in progress Link to comment Share on other sites More sharing options...
slc123 Posted June 1, 2013 Author Report Share Posted June 1, 2013 So got started on the amp rack for the the RF t2500.1bdcp and the 360.3. I also left a slot open for another 2500.1 Test fit can you guess what this is? I couldn't decide how to do the window's for the amps so I just took the diamond logo and expanded it Then I decided to do this!! after bout an hour of using the jigsaw I came up with this! Did a few adjustments and had to double check the fitment before I did anything else Was good to go so I started marking the panels to mount the magnets! Magnets glued in so I used a roundover bit along the edge, also covered up all the holes with bodyfiller and sanded it all down. My 03' sierra crew cab Here build in progress Link to comment Share on other sites More sharing options...
slc123 Posted June 1, 2013 Author Report Share Posted June 1, 2013 So I had to build my own center console. Reusing the factory cupholders though. I ended up having to do some surgury on this one because once I cut out the hole for the cup holders I realized they dont sit flat. The factory one is angled so when I put the cup holders in, I notced the drinks are slanted WAY back. So had to cut out the panel then angle it where the drinks would sit level......short version it's fixed! But these are pictures of the console before it was fixed. I Did use a roundover bit along all the edges My 03' sierra crew cab Here build in progress Link to comment Share on other sites More sharing options...
Smoove Posted June 1, 2013 Report Share Posted June 1, 2013 Nice, very nice work on the amp rack. 2 Team Fi 15's v1 2 DD M5's 970amps of Alt 6th order blowthroughThe truck Blowthrough build : http://www.stevemeadedesigns.com/board/topic/155555-smooves-1996-chevy-ext-cab-c1500-slow-build/The 350z build : http://www.stevemeadedesigns.com/board/topic/170694-smooves-2003-nissan-350z/ My FB page https://www.facebook.com/pages/Smooves-Car-Audio-and-performance/719746144805343 Team Fi Audio http://www.ficaraudio.com/ Link to comment Share on other sites More sharing options...
slc123 Posted June 1, 2013 Author Report Share Posted June 1, 2013 Thanks, got lot's to do tomorrow! This amp's going to look alot better once it's bed lined and painted(hence my profile pic). So expect more updates throughout this weekend My 03' sierra crew cab Here build in progress Link to comment Share on other sites More sharing options...
04murdalanche Posted June 1, 2013 Report Share Posted June 1, 2013 Will be doing close to the exact same thing with my custom center console, what degree of an angle roughly is the cup holder sitting at? Link to comment Share on other sites More sharing options...
slc123 Posted June 1, 2013 Author Report Share Posted June 1, 2013 Hmm I dunno, I have an angle finder so when I work on it tomorrow I'll check it and post it with a picture or something. I'll have to check out yours when your done My 03' sierra crew cab Here build in progress Link to comment Share on other sites More sharing options...
slc123 Posted June 3, 2013 Author Report Share Posted June 3, 2013 Got some new carpet for my truck the old stuff was dingy and had lots of soda stains. I bought it a long time ago from I don't know where, wish I did so I could warn people not to buy it because it was not oem replacement like it said. I had alot of trimming to do, and it does not lay how it should. In this pic you can see how much I had to cut off each side so it would fit. Lot's of leftover's, but you never know when you'r going to need some strips of carpet for padding so I held onto it. How about some 75lb batteries to mold that carpet into place! My 03' sierra crew cab Here build in progress Link to comment Share on other sites More sharing options...
slc123 Posted June 3, 2013 Author Report Share Posted June 3, 2013 Started bedlining some stuff for the truck, amp rack battery rack, and center console My 03' sierra crew cab Here build in progress Link to comment Share on other sites More sharing options...
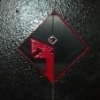
slc123 Posted June 3, 2013 Author Report Share Posted June 3, 2013 Decided to tape off the Rockford logo's and paint um' Fosgate red! Came out good but I needed to paint the insides black so that the contrast is better Did some sanding and painted the inside with just rattle can bedliner My 03' sierra crew cab Here build in progress Link to comment Share on other sites More sharing options...


Recommended Posts
Archived
This topic is now archived and is closed to further replies.