bcbrassard Posted February 1, 2017 Author Report Share Posted February 1, 2017 54 minutes ago, bsneon98 said: Is your lancer still your daily even prepping for paint? Ya its my daily...Its sits in the garage daily except for the Sidekick build. It's my off season, i only work from early spring to late fall, usually about 7 months of the year. Rest of the time is playing catch up on chores and projects. Link to comment Share on other sites More sharing options...
bcbrassard Posted February 1, 2017 Author Report Share Posted February 1, 2017 I also ordered new struts for the Lancer & spring compressors to do the swap out. What i really wanted was a bit better struts that supported the 1.5" lower and spring at the price i found them but couldn't get them shipped here thru amazon so i went with stock replacements. You lower 48'ers should feel very fortunate to live where almost everyone ships for free or next to nothing. With so many projects these days everything is budget driven and tires, axles, struts had to be replaced by spring. so the swap out will happen when i put it on jack stands to paint. Link to comment Share on other sites More sharing options...
bsneon98 Posted February 1, 2017 Report Share Posted February 1, 2017 9 minutes ago, bcbrassard said: Ya its my daily...Its sits in the garage daily except for the Sidekick build. It's my off season, i only work from early spring to late fall, usually about 7 months of the year. Rest of the time is playing catch up on chores and projects. Shit man that sounds nice. Kinda like a summer vacation for schools but in the winter. I could get used to that Build Log: http://www.stevemeadedesigns.com/board/topic/152954-1998-plymouth-neon-updates/ Link to comment Share on other sites More sharing options...
bcbrassard Posted February 1, 2017 Author Report Share Posted February 1, 2017 Quick update: Passenger side 4" done and installed. Deadened everything i could to add strength and mass to make the location solid. Cut down some 6.5" FAST RINGS to fit. Prepped the wire and mounted the speaker. Grille is part of the mounting so that went on next. Then added the acoustic foam baffle in the rear. I left some space intentionally, didn't want to seal the driver off completely. All foam is installed with 3M adhesive spray so it shouldn't be going anywhere. Quick shot of kick panel opening and crossover tucked up there. I still need a little something in the kick panel for acoustics. I wonder if the wife would miss some of the 3" foam matress topper we have on our bed? Hmmmm lol So i have driver side to deaden, foam and install speaker. Most everything is already made up so that should go a bit faster. Then address the kick panels and i think all the fabrication for the most part is done and i can start running wire, putting HU & dash back together, mount the amps and turn some shit on to DD-1. Another day & half to completion? Link to comment Share on other sites More sharing options...
BP1Fanatic Posted February 1, 2017 Report Share Posted February 1, 2017 Nice! 2000 Toyota Solara SEV6, 200 amp alternator, Jensen VX7020, Hifonics American Warrior Taurus X, Hifonics American Warrior Centurion X, JBL Club 6500C, Power Acoustik XP2K-4102, Coustic Power Logic HT-612 in a BP4. Link to comment Share on other sites More sharing options...
bcbrassard Posted February 1, 2017 Author Report Share Posted February 1, 2017 Thanks man, it's not perfect, taking long enough to get this much done. Perfect would take for EVERY!!!! lol But what i thought would be a 2/3 build looks more like 5. Oh well, Just hope it sounds good, i am doing every thing i know how to get all these speakers to perform they best they can, Link to comment Share on other sites More sharing options...
oldsoundguy Posted February 2, 2017 Report Share Posted February 2, 2017 Nice work and update. The 4" should sound as good as it can just because of the install and foam. 80prs Arc Audio Xdi 1200.6 (using active crossovers) Freaking awesome amplifier Incriminator IA 10.1 Focal PS 130v 5.25 (doors) 4" Faital pro Neo (kick panels) 3" Faital pro Neo and focal tweets( dash) DC Audio level 3 12" custom box designed by joex built by me AGM front, XS 750SE batteries rear DC 180 alt 99 Toyota Tacoma extra cab http://www.stevemeadedesigns.com/board/topic/179476-my-small-build-turned-into-the-ongoing-build/ Link to comment Share on other sites More sharing options...
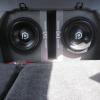
bcbrassard Posted February 2, 2017 Author Report Share Posted February 2, 2017 More of the same but drivers side. FAST RINGS. Tighter on driver side so it took a smaller piece of foam. Speaker and grille installed. Crossover above kick panel. THIS...... Because of THIS.... I Could see using a dab of glue to hold the knob on but i just don't see filling the knob full so it screws the next guy. It was his wife's car and probably fell off once and he got an ear full so said fuck it. And guys if any of your wives are as hard on shit is mine is i guess i would done the same. Something about women, not sure what it is but IMO they are hard on everything! Probably because they don't have to fix shit. I tell my house that shit and made from unitainum "The Core" Movie) everything has is limits and cycles before it fatigues and fails. Anyway i will show her how to use the jumper wire that will be accessible thru the glove box until the switch shows up to replace. Spring or fall no biggie. Winter she needs heat. Link to comment Share on other sites More sharing options...
bcbrassard Posted February 2, 2017 Author Report Share Posted February 2, 2017 I starting running wiring last night only to find out that previous own had had window broken or left open or something but when i pulled the carpet back on driver side the was standing water under it and padding was soaked. When we bought it i thought it was from putting the tires in the back seat and they had snow on them. It was wet then but i had no idea it was this bad. So i have had a fan running trying to dry driver side out. Passenger side is fine so i will do all the work on that side to give the driver side more time to dry. I might just go kick this guy in the balls for being an idiot. and then myself for not being able to check it out better. I should be able to get everything wired up and installed by tonight and will have to test and tune tomorrow morning. I cant get a lot done in the evenings but it has to be quiet work so i don't disturb the wife. I just added up my hrs into this build so far: 50.5 in 4 days, no wonder i am tired. Pics later today when i get something finished. Link to comment Share on other sites More sharing options...
bcbrassard Posted February 2, 2017 Author Report Share Posted February 2, 2017 Power under the hood complete. Had 3 nice large blank grommets on the fire wall to run 4 gauge thru, i used my reaming bit to get a tight fit on 2 of them. Pic of stock speakers from 94'. Back to the build! Link to comment Share on other sites More sharing options...


Recommended Posts
Archived
This topic is now archived and is closed to further replies.