knowledge Posted October 4, 2011 Report Share Posted October 4, 2011 ok so theres this t4000 i have and every time i turned the truck on it does thisPOP sound. the amp turns on fine and still works but when i took out the amp case to paint it i found this? now my question is this, i can solder this back together but i am unsure if is in good condition? how do i test it and when doing so what am i looking for when testing to see if its still functional? and most of the rest are in that condition also. Quote REFF'SMy linkEBAYhttp://feedback.ebay...ck&myworld=trueI love car audio so much because I will never be done. I can never win, and I will never get it finished or perfect. It always has me coming back for more, I can never get my fill of it, but I get what I need. Link to comment Share on other sites More sharing options...
knowledge Posted October 4, 2011 Author Report Share Posted October 4, 2011 bump i need to know some info quick Quote REFF'SMy linkEBAYhttp://feedback.ebay...ck&myworld=trueI love car audio so much because I will never be done. I can never win, and I will never get it finished or perfect. It always has me coming back for more, I can never get my fill of it, but I get what I need. Link to comment Share on other sites More sharing options...
knowledge Posted October 4, 2011 Author Report Share Posted October 4, 2011 anyone? Quote REFF'SMy linkEBAYhttp://feedback.ebay...ck&myworld=trueI love car audio so much because I will never be done. I can never win, and I will never get it finished or perfect. It always has me coming back for more, I can never get my fill of it, but I get what I need. Link to comment Share on other sites More sharing options...
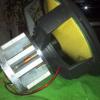
kickass audio Posted October 5, 2011 Report Share Posted October 5, 2011 (edited) You should not solder that cap back on the amp. Capacitors are not supposed to be swollen like that at all. When the top or bottom starts to balloon out that means it is either being overcharged or is near the end of its life. I will admit that i dont know much about amplifier repair but i would ask around on here to see if someone knows what cap you should get. I wouldnt go to radioshack and start soldering all their caps on the board to have a new capacitor circuit. But to test them some dmm's have settings on them to allow you to do so or you can do an even better test on my oscilloscope (tpi 440 plus). You need to drain the cap of ALL its power first (some people like to short out the leads but i just clamp my scopes leads around the cap on DCV and let it read the voltage till it drops to 0, it does take awhile for big caps so it is a pain to wait for) and then i set my scope to test the cap and it will show me an output graph to tell me what kind of cap it is, how many farads/micro farads it operates at, and what its voltage is. This will tell you if the cap is bad or not by the farad/microfarad rating that is on the side of the cap and what you actually read with your dmm/scope. Personally i would rather do it right and repair the amp the right way than have a car fire because caps are not always easy to clean up when they pop, trust me, i have cleaned out several computers from capacitors popping and the acid is a pain to get off of everything. Now you could have a bigger problem with the amp which caused the caps to overcharge and caused the caps to balloon like they did or it may just be that the caps are just old and lost their life either way it seems kinda odd that you have that many caps that are swollen on your amp. edit: here are the exact same brand, cap size, rating, etc for the ones in your amp now that are ballooning out: http://www.newark.com/jsp/search/productdetail.jsp?SKU=16M7227&CMP=AFC-GB100000001 Like i said i would ask some amp repair experts on here about what they suggest before you spend some money getting new caps and solder them all in and something else is bad on the amp. Edited October 5, 2011 by kickass audio Quote 2004 GMC Envoy1 XS power S3400 batt under the hood and 4 XS Power D3100's battery installed in the rear by the amps0 gauge power wire from front to backAlpine iva-w205 touchscreen dvd/cd/mp3/ipod/am/fm/gps headunitSundown Audio SAX-200.4 amp for my mids and highs8 gauge speaker wire from amp to woofer270 amp Mechman AltRockford Fosgate T1652-s component speakersRockford Fosgate 3Sixty.2 sound processorRca's from Rockford Fosgate and Monster Cable14 gauge speaker wire for the mids and highs1 18" Ascendant Audio SMD Dual 1 ohm with custom Black & Blue carbon fiber and hand signed dustcapBox: 5.66 cubic feet net volume box tuned to 30.13Hz with 1.5" wide wooden dowels and 1.5" thick baffle1 DC Audio 5.0k amp wired to .5 ohms nominal with an imp rise of 1.35 ohms for the single AA SMD 18"Future Vision 8000k 50w bi-xenon projector HID's with 4300k 35w fog lightsLink to my build: Buildupdates/progress Link to comment Share on other sites More sharing options...
CHEVY4X4BLAZER Posted October 5, 2011 Report Share Posted October 5, 2011 The one to the left seems to have some damage as well. It looks like vibration scuffing . Quote Link to comment Share on other sites More sharing options...
kickass audio Posted October 5, 2011 Report Share Posted October 5, 2011 It doesnt look like it rubbed just expanded. Caps are supposed to expand upward since thats where the vent marks are cut out at but sometimes the vents do not operate right and the side of the cap will expand when the cap fails. If it was rubbing then the metal side of the cap would have chaffing on it which it does not look like it does in the pic. Pretty much what happened here was the cap expanded while the black labels for the caps stayed the same size, when the cap got bigger in size the label stretched out until it ripped at the seams. Ive seen so many blown caps when ive worked on tv's, computers, and radios that its not uncommon for me to find one. And op, if you need to ask anyone at radioshack or anything (id just get the caps online if the amp repair guys say i would be fine to do just that) its a 160v cap rated at 1600 micro-farads (the symbol that looks like it says "uf" stands for micro farad) and it is a polarized cap (thats why there is the white stripe on the cap to indicate which lead is for the negative leg of the cap. When and if you replace the caps you MUST pay close attention to which way the caps are wired up. You want to ensure that the white side of the capacitor showing the "-" symbol is on the part of the board that has the extra white dot on it. Like if you look at your first pic where you show the board and cap, look at where the circle is drawn on the amps circuit board. See the part of the circle where it has a larger spot with the white mark on it? If not just follow the circle and look for the part of the circle where it has more white on it than the rest of the circle, this side is the negative side of the amps capacitor circuit. Quote 2004 GMC Envoy1 XS power S3400 batt under the hood and 4 XS Power D3100's battery installed in the rear by the amps0 gauge power wire from front to backAlpine iva-w205 touchscreen dvd/cd/mp3/ipod/am/fm/gps headunitSundown Audio SAX-200.4 amp for my mids and highs8 gauge speaker wire from amp to woofer270 amp Mechman AltRockford Fosgate T1652-s component speakersRockford Fosgate 3Sixty.2 sound processorRca's from Rockford Fosgate and Monster Cable14 gauge speaker wire for the mids and highs1 18" Ascendant Audio SMD Dual 1 ohm with custom Black & Blue carbon fiber and hand signed dustcapBox: 5.66 cubic feet net volume box tuned to 30.13Hz with 1.5" wide wooden dowels and 1.5" thick baffle1 DC Audio 5.0k amp wired to .5 ohms nominal with an imp rise of 1.35 ohms for the single AA SMD 18"Future Vision 8000k 50w bi-xenon projector HID's with 4300k 35w fog lightsLink to my build: Buildupdates/progress Link to comment Share on other sites More sharing options...
knowledge Posted October 5, 2011 Author Report Share Posted October 5, 2011 great info -kickass audio- i did not know all that u posted, i appreciate that especially the link. now my question is this, that amp still turns on and powers fine, the cap dont feel swollen just looks to be like if there was some kind of rubbing or so, how can i just test it with the dmm witch is the only thing i have access to. and the link u posted above can i just buy that exact one and solder it back on? Quote REFF'SMy linkEBAYhttp://feedback.ebay...ck&myworld=trueI love car audio so much because I will never be done. I can never win, and I will never get it finished or perfect. It always has me coming back for more, I can never get my fill of it, but I get what I need. Link to comment Share on other sites More sharing options...
kickass audio Posted October 5, 2011 Report Share Posted October 5, 2011 Here is the site you can use to help with finding if the caps you have are good or not: http://forum.allaboutcircuits.com/showthread.php?t=5326 NOTE: You HAVE to disconnect each cap from the circuit board to test them, you do not want to test capacitance with it connected to a circuit as it will energize other circuits in the process too. As for your pm you sent me, you can get as many as you wish from here: http://www.tedss.com/item.asp?id=2020031013 it will be $80 to get all 10. I would highly advise against doing just a few of the caps that are swollen or have torn labels as they are 100% malfunctioning. Just because the other ones that you have on your amp with the label ripped do not feel like they are bulged out doesnt mean that they dont bulge when the amp is being used. I have seen amps where when they are in use they get big but at rest they return back to normal. When this happens the label will stretch out and break apart because of the size change and when the cap cools down it will get smaller to its normal size but the label will still be torn since it changed its size. For your worry about the caps rubbing i highly doubt it is but if you want to test it you could try to take something like weather stripping for a door/window and put that on the side of the cap and see if it rubs on the case of the amp when you put it together. I highly doubt it is rubbing, just the caps expanding and even if the side of the cap touched the amps case as long as there is no friction or rubbing it will be fine. The outer part of the cap is not conductive trust me. My old 1 farad cap i got from rf had its label ripped off from be installing it so many times and it was touching the frame of my car and didnt do anything bad. Its too bad you cant use 1000 caps, lol. it would be a whole lot cheaper to do that than get the amount you need. lol. Quote 2004 GMC Envoy1 XS power S3400 batt under the hood and 4 XS Power D3100's battery installed in the rear by the amps0 gauge power wire from front to backAlpine iva-w205 touchscreen dvd/cd/mp3/ipod/am/fm/gps headunitSundown Audio SAX-200.4 amp for my mids and highs8 gauge speaker wire from amp to woofer270 amp Mechman AltRockford Fosgate T1652-s component speakersRockford Fosgate 3Sixty.2 sound processorRca's from Rockford Fosgate and Monster Cable14 gauge speaker wire for the mids and highs1 18" Ascendant Audio SMD Dual 1 ohm with custom Black & Blue carbon fiber and hand signed dustcapBox: 5.66 cubic feet net volume box tuned to 30.13Hz with 1.5" wide wooden dowels and 1.5" thick baffle1 DC Audio 5.0k amp wired to .5 ohms nominal with an imp rise of 1.35 ohms for the single AA SMD 18"Future Vision 8000k 50w bi-xenon projector HID's with 4300k 35w fog lightsLink to my build: Buildupdates/progress Link to comment Share on other sites More sharing options...
kickass audio Posted October 5, 2011 Report Share Posted October 5, 2011 Alright so heres how to test each and every cap on that area of your board to see if they are good or not. Take your DMM and set it to its highest DCV setting and quickly touch the cap with the black lead going to the side of the cap with the white stripe that has the "-" on it and the red lead to the opposite connector coming out of the cap. Look at your dmm when you do so to see if it has a voltage. If it does then you want to take the capacitor and get a piece of wire or a screw driver and touch both the leads together for a minute or two to short the cap out and make the voltage drop to almost 0 (it may spark but its not going to be like a car battery or anything) and then perform the first test with voltage again. When you know the voltage is near 0 then set your dmm to its highest ohm setting (usually like 2000k ohms) and connect the positive and negative leads off the dmm to the same connections on the cap. You should notice the resistance climb up the longer you hold the leads on the capacitor. If this happens look to see if its a fast increase or a slow one. If its fast then the cap is alright, if its a slow or doesnt increase at all then the cap is bad. let me know if you get stuck at all man. Quote 2004 GMC Envoy1 XS power S3400 batt under the hood and 4 XS Power D3100's battery installed in the rear by the amps0 gauge power wire from front to backAlpine iva-w205 touchscreen dvd/cd/mp3/ipod/am/fm/gps headunitSundown Audio SAX-200.4 amp for my mids and highs8 gauge speaker wire from amp to woofer270 amp Mechman AltRockford Fosgate T1652-s component speakersRockford Fosgate 3Sixty.2 sound processorRca's from Rockford Fosgate and Monster Cable14 gauge speaker wire for the mids and highs1 18" Ascendant Audio SMD Dual 1 ohm with custom Black & Blue carbon fiber and hand signed dustcapBox: 5.66 cubic feet net volume box tuned to 30.13Hz with 1.5" wide wooden dowels and 1.5" thick baffle1 DC Audio 5.0k amp wired to .5 ohms nominal with an imp rise of 1.35 ohms for the single AA SMD 18"Future Vision 8000k 50w bi-xenon projector HID's with 4300k 35w fog lightsLink to my build: Buildupdates/progress Link to comment Share on other sites More sharing options...
TeamHT Posted October 5, 2011 Report Share Posted October 5, 2011 Better off mailing it to RF, trust me. Quote Tell me...does this smell like chloroform to you? Link to comment Share on other sites More sharing options...

Recommended Posts
Join the conversation
You can post now and register later. If you have an account, sign in now to post with your account.