AA98hoe Posted January 20, 2012 Report Share Posted January 20, 2012 Its Friday get on over there after work an help billiam finish her up..... I would of been sleepin in the garage like a crackhesd at a crackhouse lol TEAM DC AUDIO VEHICLE:98 chevy tahoe 2wd 3-4 drop HEADUNIT:alpine 9886 PREAMP:arcaudio FRONT STAGE:4-6 1/2s selinium,DD component set and 4-selinium tweeters in each door KICKPANELS:jl audio 5 1/4 REAR DOORS: dd components 6 1/2s HIGHS AMPS:zapco 750.2 on front doors,zapco an another 750.2 on kicks and rear doors SUBS:4-ascendant audio 18s with 5 spiders in a custom box built by KINGSUV SUB AMP: 2-dc7.5s ALTERNATORS: 3-mechmans 1- 425comp, 1-smd spec350, 1-270 with adj voltage harness on custom dc bracket WIRE:10-runs 0g front to back BATTERIES:6-d1400s TL results:157.1 at 38hz and 156.8 at headrest score @37hz. STATE AND NATIONAL RECORD IN MECA S5. Link to comment Share on other sites More sharing options...
MarioB Posted January 20, 2012 Author Report Share Posted January 20, 2012 Its Friday get on over there after work an help billiam finish her up..... I would of been sleepin in the garage like a crackhesd at a crackhouse lol I dont get off work till about 630pm by the time I get up there it will be hell of late. if he was closer I would have been there everyday helping out. 12- DC Audio m2Lvl3 12's1- Hertz HSK3 way2- DC5K's2- ZX350.42- Stinger SP1500D batteries in rear3- runs of 1/0ga. to the rearTeam DC Audiodcsoundlab.com Quality is all in how you take pictures I have plenty of projects that look WAY better on camera then in person crazy to fit so many in so little. Reminds me of some of the porns I've seen? Link to comment Share on other sites More sharing options...
Bacy2k Posted January 20, 2012 Report Share Posted January 20, 2012 psh, 2 hour drive. youd be there at 9. thats not hella late lol Alpine CDA-9886Hertz Mille 3 ways active Hertz SPL Show 8's 2 Audison Voce Quattro's2 DC Audio M2 Level 5 12'sDC Audio 12.0KKnuKonceptz Wiring4 XS Power D3100'sDC Power 390XPSecond Skin Damplifier Pro and Dynamat Xtreme Link to comment Share on other sites More sharing options...
lilboom Posted January 20, 2012 Report Share Posted January 20, 2012 awwman SuperBass check out⊂ http://www.youtube.com/Bassknots 129.3 meca 136.8 db drag (60 hz peak) http://bassknotsstereo.blogspot.com/ comment/subscribe and stay tuned ,working on 150 db http://www.stevemead...r/page__st__380 Link to comment Share on other sites More sharing options...
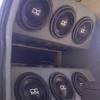
kingsuv Posted January 20, 2012 Report Share Posted January 20, 2012 i know the wiring from battery to amps is pro, but i cant follow all of whats going on in there lol. its just sooo much in such little space. wish i could see it in person to better understand it. thanks for the updates, looking good. The cliff notes version goes like this; Power side. 1 Run from the alt to a fuse block on the side of the box. Other side of the fuse block run to rear battery and 2 runs to the amp fuse block. Then from the rear batteries to amp fuse block is 2 runs. For a total of 4 runs from the rear battery to the amp fuse block. So the runs to the front are protected at the rear and the amp is fused. The grounds are run with 2 runs of the rear battery to the distro block and 2 runs from the alt to the distro block. then from the distro block to the amp will be 4 runs. There is also 2 loops to tie together the rear batteries. Next I get to do all that again on the other side Designing, building, and shipping boxes. Yahoo IM - kingsuv00If the listening level is too loud, please inform the driver, so he can promptly pull over, and let you out. not many cars can get me to pluggin my ears but this one.......damn. I mean the first minute is ok but that thing just really starts digging deeper and deeper in your earhole till you cant stand it no more. Seems like it does it with relative ease....16 12's on 8 amps.........gotta love it. Link to comment Share on other sites More sharing options...
kingsuv Posted January 20, 2012 Report Share Posted January 20, 2012 psh, 2 hour drive. youd be there at 9. thats not hella late lol 9 is about time for me to wrap it up in the shop and head on in. My old ass don't do well in the cold anymore Designing, building, and shipping boxes. Yahoo IM - kingsuv00If the listening level is too loud, please inform the driver, so he can promptly pull over, and let you out. not many cars can get me to pluggin my ears but this one.......damn. I mean the first minute is ok but that thing just really starts digging deeper and deeper in your earhole till you cant stand it no more. Seems like it does it with relative ease....16 12's on 8 amps.........gotta love it. Link to comment Share on other sites More sharing options...
OrionStang Posted January 20, 2012 Report Share Posted January 20, 2012 i know the wiring from battery to amps is pro, but i cant follow all of whats going on in there lol. its just sooo much in such little space. wish i could see it in person to better understand it. thanks for the updates, looking good. The cliff notes version goes like this; Power side. 1 Run from the alt to a fuse block on the side of the box. Other side of the fuse block run to rear battery and 2 runs to the amp fuse block. Then from the rear batteries to amp fuse block is 2 runs. For a total of 4 runs from the rear battery to the amp fuse block. So the runs to the front are protected at the rear and the amp is fused. The grounds are run with 2 runs of the rear battery to the distro block and 2 runs from the alt to the distro block. then from the distro block to the amp will be 4 runs. There is also 2 loops to tie together the rear batteries. Next I get to do all that again on the other side I fucking hate wiring. You want to clean up my rats nest, next? SMD Super Seller My Feedback Thread Link to comment Share on other sites More sharing options...
kingsuv Posted January 20, 2012 Report Share Posted January 20, 2012 i know the wiring from battery to amps is pro, but i cant follow all of whats going on in there lol. its just sooo much in such little space. wish i could see it in person to better understand it. thanks for the updates, looking good. The cliff notes version goes like this; Power side. 1 Run from the alt to a fuse block on the side of the box. Other side of the fuse block run to rear battery and 2 runs to the amp fuse block. Then from the rear batteries to amp fuse block is 2 runs. For a total of 4 runs from the rear battery to the amp fuse block. So the runs to the front are protected at the rear and the amp is fused. The grounds are run with 2 runs of the rear battery to the distro block and 2 runs from the alt to the distro block. then from the distro block to the amp will be 4 runs. There is also 2 loops to tie together the rear batteries. Next I get to do all that again on the other side I fucking hate wiring. You want to clean up my rats nest, next? Sure Designing, building, and shipping boxes. Yahoo IM - kingsuv00If the listening level is too loud, please inform the driver, so he can promptly pull over, and let you out. not many cars can get me to pluggin my ears but this one.......damn. I mean the first minute is ok but that thing just really starts digging deeper and deeper in your earhole till you cant stand it no more. Seems like it does it with relative ease....16 12's on 8 amps.........gotta love it. Link to comment Share on other sites More sharing options...
MarioB Posted January 20, 2012 Author Report Share Posted January 20, 2012 i know the wiring from battery to amps is pro, but i cant follow all of whats going on in there lol. its just sooo much in such little space. wish i could see it in person to better understand it. thanks for the updates, looking good. The cliff notes version goes like this; Power side. 1 Run from the alt to a fuse block on the side of the box. Other side of the fuse block run to rear battery and 2 runs to the amp fuse block. Then from the rear batteries to amp fuse block is 2 runs. For a total of 4 runs from the rear battery to the amp fuse block. So the runs to the front are protected at the rear and the amp is fused. The grounds are run with 2 runs of the rear battery to the distro block and 2 runs from the alt to the distro block. then from the distro block to the amp will be 4 runs. There is also 2 loops to tie together the rear batteries. Next I get to do all that again on the other side LOL..... let my co-worker read this he was tripping out, then read the last sentence and was like WOW that's only one side. 12- DC Audio m2Lvl3 12's1- Hertz HSK3 way2- DC5K's2- ZX350.42- Stinger SP1500D batteries in rear3- runs of 1/0ga. to the rearTeam DC Audiodcsoundlab.com Quality is all in how you take pictures I have plenty of projects that look WAY better on camera then in person crazy to fit so many in so little. Reminds me of some of the porns I've seen? Link to comment Share on other sites More sharing options...
kingsuv Posted January 21, 2012 Report Share Posted January 21, 2012 i know the wiring from battery to amps is pro, but i cant follow all of whats going on in there lol. its just sooo much in such little space. wish i could see it in person to better understand it. thanks for the updates, looking good. The cliff notes version goes like this; Power side. 1 Run from the alt to a fuse block on the side of the box. Other side of the fuse block run to rear battery and 2 runs to the amp fuse block. Then from the rear batteries to amp fuse block is 2 runs. For a total of 4 runs from the rear battery to the amp fuse block. So the runs to the front are protected at the rear and the amp is fused. The grounds are run with 2 runs of the rear battery to the distro block and 2 runs from the alt to the distro block. then from the distro block to the amp will be 4 runs. There is also 2 loops to tie together the rear batteries. Next I get to do all that again on the other side LOL..... let my co-worker read this he was tripping out, then read the last sentence and was like WOW that's only one side. I left out all the trips back and forth from the bench to the car to make sure all my lengths would work. Plus all the time to solder, and shrink all the ends. even the ends are soldered in the position they will meet up at the terms so there is no twist in the cable when hooking it up. no work on the car tonight. took mama out to dinner and drinks Gonna chill on the couch tonight and put a full day in tomorrow. Designing, building, and shipping boxes. Yahoo IM - kingsuv00If the listening level is too loud, please inform the driver, so he can promptly pull over, and let you out. not many cars can get me to pluggin my ears but this one.......damn. I mean the first minute is ok but that thing just really starts digging deeper and deeper in your earhole till you cant stand it no more. Seems like it does it with relative ease....16 12's on 8 amps.........gotta love it. Link to comment Share on other sites More sharing options...


Recommended Posts
Archived
This topic is now archived and is closed to further replies.