1point21gigawatts
-
Posts
3740 -
Joined
-
Last visited
-
Days Won
93
Content Type
Profiles
Forums
Events
Media Demo
Store
Collections
Videos
Everything posted by 1point21gigawatts
-
Remember that since you didn’t buy that gear from that shop, even if they retune it and hook it up, if it messes up, then they aren’t held accountable and won’t pay out anything or give you new gear. So it’s best to just buy a fuse there and buy a dd1 and wait for it and hook up your setup then. There is no such thing as cutting corners or being cheap when it comes to achieving a good or decent car audio setup.
-
And don’t half step in car audio. It would be best to buy a dd1 too or you are gonna wast more than the $189 that dd1 costs to buy new gear because of a clipped signal because of an amps gain being set incorrectly. And about that fuse, I said 150 amp fuse just in case you go bigger because that wire can pass more than 100 amps. Buying the biggest wire fuse is the smartest thing because you would never have to get another fuse unless you pop it making sparks or something. A bigger fuse doesn’t hurt nor change current draw. It just protects better.
-
Go to a car audio shop instead to get a fuse.
-
It could just be the fuse. but that picture you posted in that other thread you posted looked like you burnt something where that positive battery feed is at in that amp. But you need a new fuse anyways, buy a 150 amp fuse and see what happens.
-
You should of took the fuse out before connecting the amp. You probably touched some metal on the amp near that terminal when you were plugging that wire in to be secured while that wire was live and messed that amp up. A gain has nothing to do with rms output. It is how you tune your amp to match the rca signal of your head unit or line out converter if you are using a factory head unit. Buy a dd1 to tune your new amp you are gonna have to buy and then remember when you plug or unplug your amp, make sure the fuse is out so the wire isn’t live. Now if you want to be cheap and not tune your amp correctly then no matter the rms you are putting to any type of subwoofer, if the signal is distorted then your subwoofer would stop working and you would have to buy another subwoofer. So honestly, a distortion detector pays for itself and then saves you money on your future car audio builds. https://www.wccaraudio.com/smd-distortion-detector-dd-36.html
-
Wasn’t faking. I was lazy and that’s real lol!
-
I didn’t read it either, I skimmed. But I remember Meade saying that middle tuning thing in a YouTube video I watched teaching about his meters. Who needs a dd1 manual when Meade can tell you via YouTube. A dd1 manual is nice to reference though. I use to like the books in school that had a movie to match so I wouldn’t have to read it lol! Sometimes I would middle tune in on that and just listen to one of them tapes who reads the book for me while I hold the book open and sort of follow along. Lol!
-
Set by rca pre outs. Play track 1 (40hz 0db tone) on your subwoofer preouts and then play track 2 (1khz 0db tone) on your front and rear pre outs. Then figure the clean volume point on each reading and if the reading are different, then tune your amps on the volume in the middle of said figures. It says that in the user manual. To be honest, I would buy a head unit that is clean even at full tilt. But if you have to settle, then tune on the middle volume. Meaning if your subwoofer preout is clean on a 0db 40hz tone up to volume 20 and your front and rear preouts are clean on a 0db 1khz tone up to volume 30, then tune each amp, subwoofer and speaker amp, at volume 25. That is your clipping point and you would be clean up to that volume.
-
Help with 10" sdr 4th order
1point21gigawatts replied to Jscales69's topic in SKAR AUDIO - (READ ONLY ARCHIVE)
Tuning a 4th order enclosures port has nothing to do with the bandwidth of that enclosure. Tuning is just where the enclosure peaks at. Bandwidth on a 4th order enclosure mainly has to do with the ratio. A 50hz peak would not affect the enclosures bandwidth. It would affect the output of the enclosure. It’s best to peak around 45hz. Doesn’t have to be exactly 45hz, just around that to generate the best output. If you have decided on bandwidth over spl, then you would have to focus more on the ratio and leave the tuning around where I said with about 20sq” of port area per cubic foot of the ported section and then make the ratio 2:1 like you said. So let’s say the ratio is 2 cubic feet on the sealed section and then 4 cubic feet on the ported section, port area would be 4x20=80sq”. Make sure you factor in displacements of bracing, subwoofers and port if the port isn’t 100% external. So net volumes are what is calculated into ratio and port sizing. -
Help with 10" sdr 4th order
1point21gigawatts replied to Jscales69's topic in SKAR AUDIO - (READ ONLY ARCHIVE)
A square port creates better air flow. And do 20sq” of port area per cubic foot of the ported section if you are looking to get louder. And if you want better bandwidth, then do a smaller ratio like a 2:1 ratio. Tune it to 45hz. Port area and ratio can differ depending on build but tuning should always stay around 45hz. Tuning has nothing to do with bandwidth. Tuning is what it peaks at. The sealed section plays lower frequencies and the ported section plays higher frequencies. A larger ratio makes it louder but less bandwidth. A smaller ratio makes the enclosures bandwidth better but output is less. So more or less port area can help one or the other depending on other factors. Let me know what type of vehicle and subwoofers and amp. -
v2 100.4ab crossover, lpf, hpf setup
1point21gigawatts replied to SuzukiGS750EZ's topic in SKAR AUDIO - (READ ONLY ARCHIVE)
There’s no need to use head unit filters. That just adds extra room for error. If you can turn the filters off, turn the filters off, if not, then basically set the filters on full range. Just use the amp filters. Most people don’t use head unit filters. I always hear people saying they make things confusing and don’t coincide correctly. -
v2 100.4ab crossover, lpf, hpf setup
1point21gigawatts replied to SuzukiGS750EZ's topic in SKAR AUDIO - (READ ONLY ARCHIVE)
I looked at that Skar amps filter settings and it’s crazy that it has a subsonic filter and a hpf. Those are the same exact thing. Lol! Im saying this because it’s on the same side as the hpf settings which doesn’t make sense because if it was there to be used in conjunction with the lpf on subwoofers if somebody wanted to use that amp on subwoofers then it would be on the same side as the lpf setting. Then on the subsonic filter on that amp, it has a range that begins at 10hz and the hpf has a range that begins at 50hz. It’s gonna be hard to tune that amps filters unless you have a cc1. So what I would do is just set that amp switch on full which allows any frequency to play to them speakers. If you have tweeters in that circuit, then just put 3.3 microfarad 100v non-polarized capacitors on the posited feed on each tweeter to block lower frequencies. If you have external passive or active crossovers, then you don’t have to worry about capacitors/bass blockers. -
v2 100.4ab crossover, lpf, hpf setup
1point21gigawatts replied to SuzukiGS750EZ's topic in SKAR AUDIO - (READ ONLY ARCHIVE)
You can test the clipping points on your rca ends. No problem. On your head units filters, which I’m guessing you are speaking of the EQs, those have to be flat, at zero, when you are tuning and then left like that after tuning or if you don’t like that sound, then instead of zero on certain frequencies you can tune in the negatives below zero. But if you go above zero then you are introducing distortion to your setup. You don’t need to retune your subwoofer amp after installing your speaker amp. Just leave the subwoofer amps gain the same and leave it with your subsonic filter off or at zero and the lpf at 80hz. This is because the speakers amp settings don’t affect the subwoofer amps settings. They interact. -
v2 100.4ab crossover, lpf, hpf setup
1point21gigawatts replied to SuzukiGS750EZ's topic in SKAR AUDIO - (READ ONLY ARCHIVE)
It’s impossible to tune by ear. You can get kinda close to correct tuning by ear. But there is no possible way to tune correctly by ear. You can find your head units distortion point with an oscilloscope since you said you have one. Make sure the eq’s are flat and the loudness and bass boost and other bullshit is off. And never tune the eqs in the positive after tuning. Only negative. Positive creates distortion at this point. Make sure you have some alligator prongs on your oscope leads and now it’s time to check the subwoofer rca pre outs and front and rear pre outs for distortion points. Clamp the positive lead of the oscope on the subwoofer rca prong coming out of the head unit and then clamp the negative on the circular part that goes around the prong. Play a 0db 40hz test tone then adjust the volume until you see the wave clip then back off until it’s smooth. Do the same on the front and rear rca pre outs on the head unit but on a 0db 1000hz tone and do the same with the oscope. Once you find the volumes you can safely play on subwoofers and speakers, if the volume numbers are different, then find you he number in between them 2 numbers and tune at that volume on your head unit. Tune your subwoofer amp on a -5db 40hz tone and your speaker amp on a -5db 1000hz tone. Before tuning, the filters on each amp have to be set as so, hpf or subsonic filter off or turned all the way down and lpf turned all the way up. That 50hz test tone tuning on a subwoofer amp is when you are tuning with a digital multimeter. But you don’t have to do that since you have an oscilloscope. Once your amps are tuned, now it’s time to set the filters. Since your subwoofer enclosure is sealed, there is no need for a subsonic filter. Turn that off. Turn the lpf to 80hz. Then on your speaker amp, turn the amp on hpf and tune it to 75hz so you don’t miss a frequency and it overlaps instead of gaps on frequencies. You can find frequencies points on filters on your subwoofer amp using a digital multimeter. But it doesn’t work on on speaker amps. The best thing to do is actually use a cc1 and dd1 to do these tunings, but if you don’t have the money, then just guesstimate on the frequency on the hpf on the speaker amp but make sure it overlaps with the subwoofer amp. If you accidentally set it to like 50hz or 60hz hpf, the fugh it and it would work. Just set the speaker amp on hpf and try to tune it to 75hz. But if you don’t want to stress about that then just set your filter to full instead of hp or lp and you won’t have to worry about setting your speakers filter capabilities. It would work but it wouldn’t sound as good as a nice crossover or small overlap setup. It would sound like the speakers you have now but louder and clearer. Because the speakers you have now are playing the same frequencies as your subwoofers. If you are fine with that sound but just want louder, then just click that speaker amp switch to full and and say fugh it. That’s what I’m having to do on my taramps 800.4 because it doesn’t play hpf lower than 90hz and I need my speakers to play below that. But when I get a crescendo s4, I’m gonna tune it to 50hz-60hz hpf. I have to wait to test my subwoofer enclosures bandwidth accurately once installed. -
v2 100.4ab crossover, lpf, hpf setup
1point21gigawatts replied to SuzukiGS750EZ's topic in SKAR AUDIO - (READ ONLY ARCHIVE)
What is you subwoofer amp filters set to an what is your enclosure tuned and net volume of that enclosure and port volume. I need to know subwoofer enclosure specs to determine a rough estimate on your subwoofers capable bandwidth. Once I figure that out, I can help you set the filters on both your amps. -
You are clipping. Turn your amps gain down to begin with or your subwoofers are gonna need to be reconed. Then invest in a dd1 and tune your amp correctly to save money on fixing and replacing gear. Then your gear wouldn’t crap out.
- 4 replies
-
- 1
-

-
- subwoofers
- car audio help
- (and 3 more)
-
Electrical car audio
1point21gigawatts replied to Ramon's topic in XS Power Batteries / Chargers! (and other stuff too)
That would be sufficient if you had that d3100 as a secondary battery and another agm under the hood with a big 3 upgrade. And you won’t be pulling 415 amps of current. No where near. Those current readings are readings done at the lowest impedance stable and on a sinusoidal signal, not music. Music current draw is around half that value. Then you have to factor in impedance rise which minimizes the current draw as well. There are fluctuations in impedance rise and in music that there would be at times quick bigger current draws. Then you have to factor in the current the alternator does at idle and at certain rpm’s. And xs makes an agm battery that would fit in your vehicle factory battery slot. That and a big 3 upgrade would work just fine. What brand of alternator are you using? -
Help with 10" sdr 4th order
1point21gigawatts replied to Jscales69's topic in SKAR AUDIO - (READ ONLY ARCHIVE)
You have to factor in subwoofer displacement and bracing displacements then add .95 cubic foot then do the ported section 2.85 cubic feet with about 46 square inches of port area. -
Help with 10" sdr 4th order
1point21gigawatts replied to Jscales69's topic in SKAR AUDIO - (READ ONLY ARCHIVE)
You are gonna have to buy marine grade plywood because even if you bedliner spray it it would still get damaged by the weather. Do a 3:1 ratio and 16 square inches of port area per cubic foot. So if the ported section is 3 cubic feet the multiply 16 square inches by 3 cubic foot which would equal 48 square inches of port area. Make the port as close to a square as you can. Not a slot. And make sure wherever the subwoofer is mounted that you factor in the subwoofer displacement. Say the subwoofer is .1 cubic feet of displacement and the section the magnet is gonna be facing needs to be 1 cubic foot, then you add in that .1 cubic foot subwoofer displacement and whatever bracing displacements, let’s say it’s .03 cubic feet, and it would equal 1.13 cubic feet and that’s what that section has to measure to net 1 cubic foot. -
Help with 10" sdr 4th order
1point21gigawatts replied to Jscales69's topic in SKAR AUDIO - (READ ONLY ARCHIVE)
What type of vehicle is it going in? -
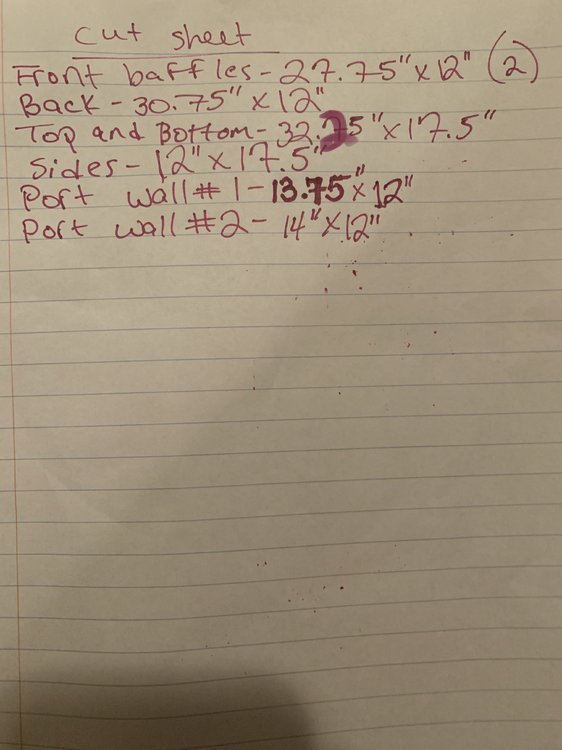
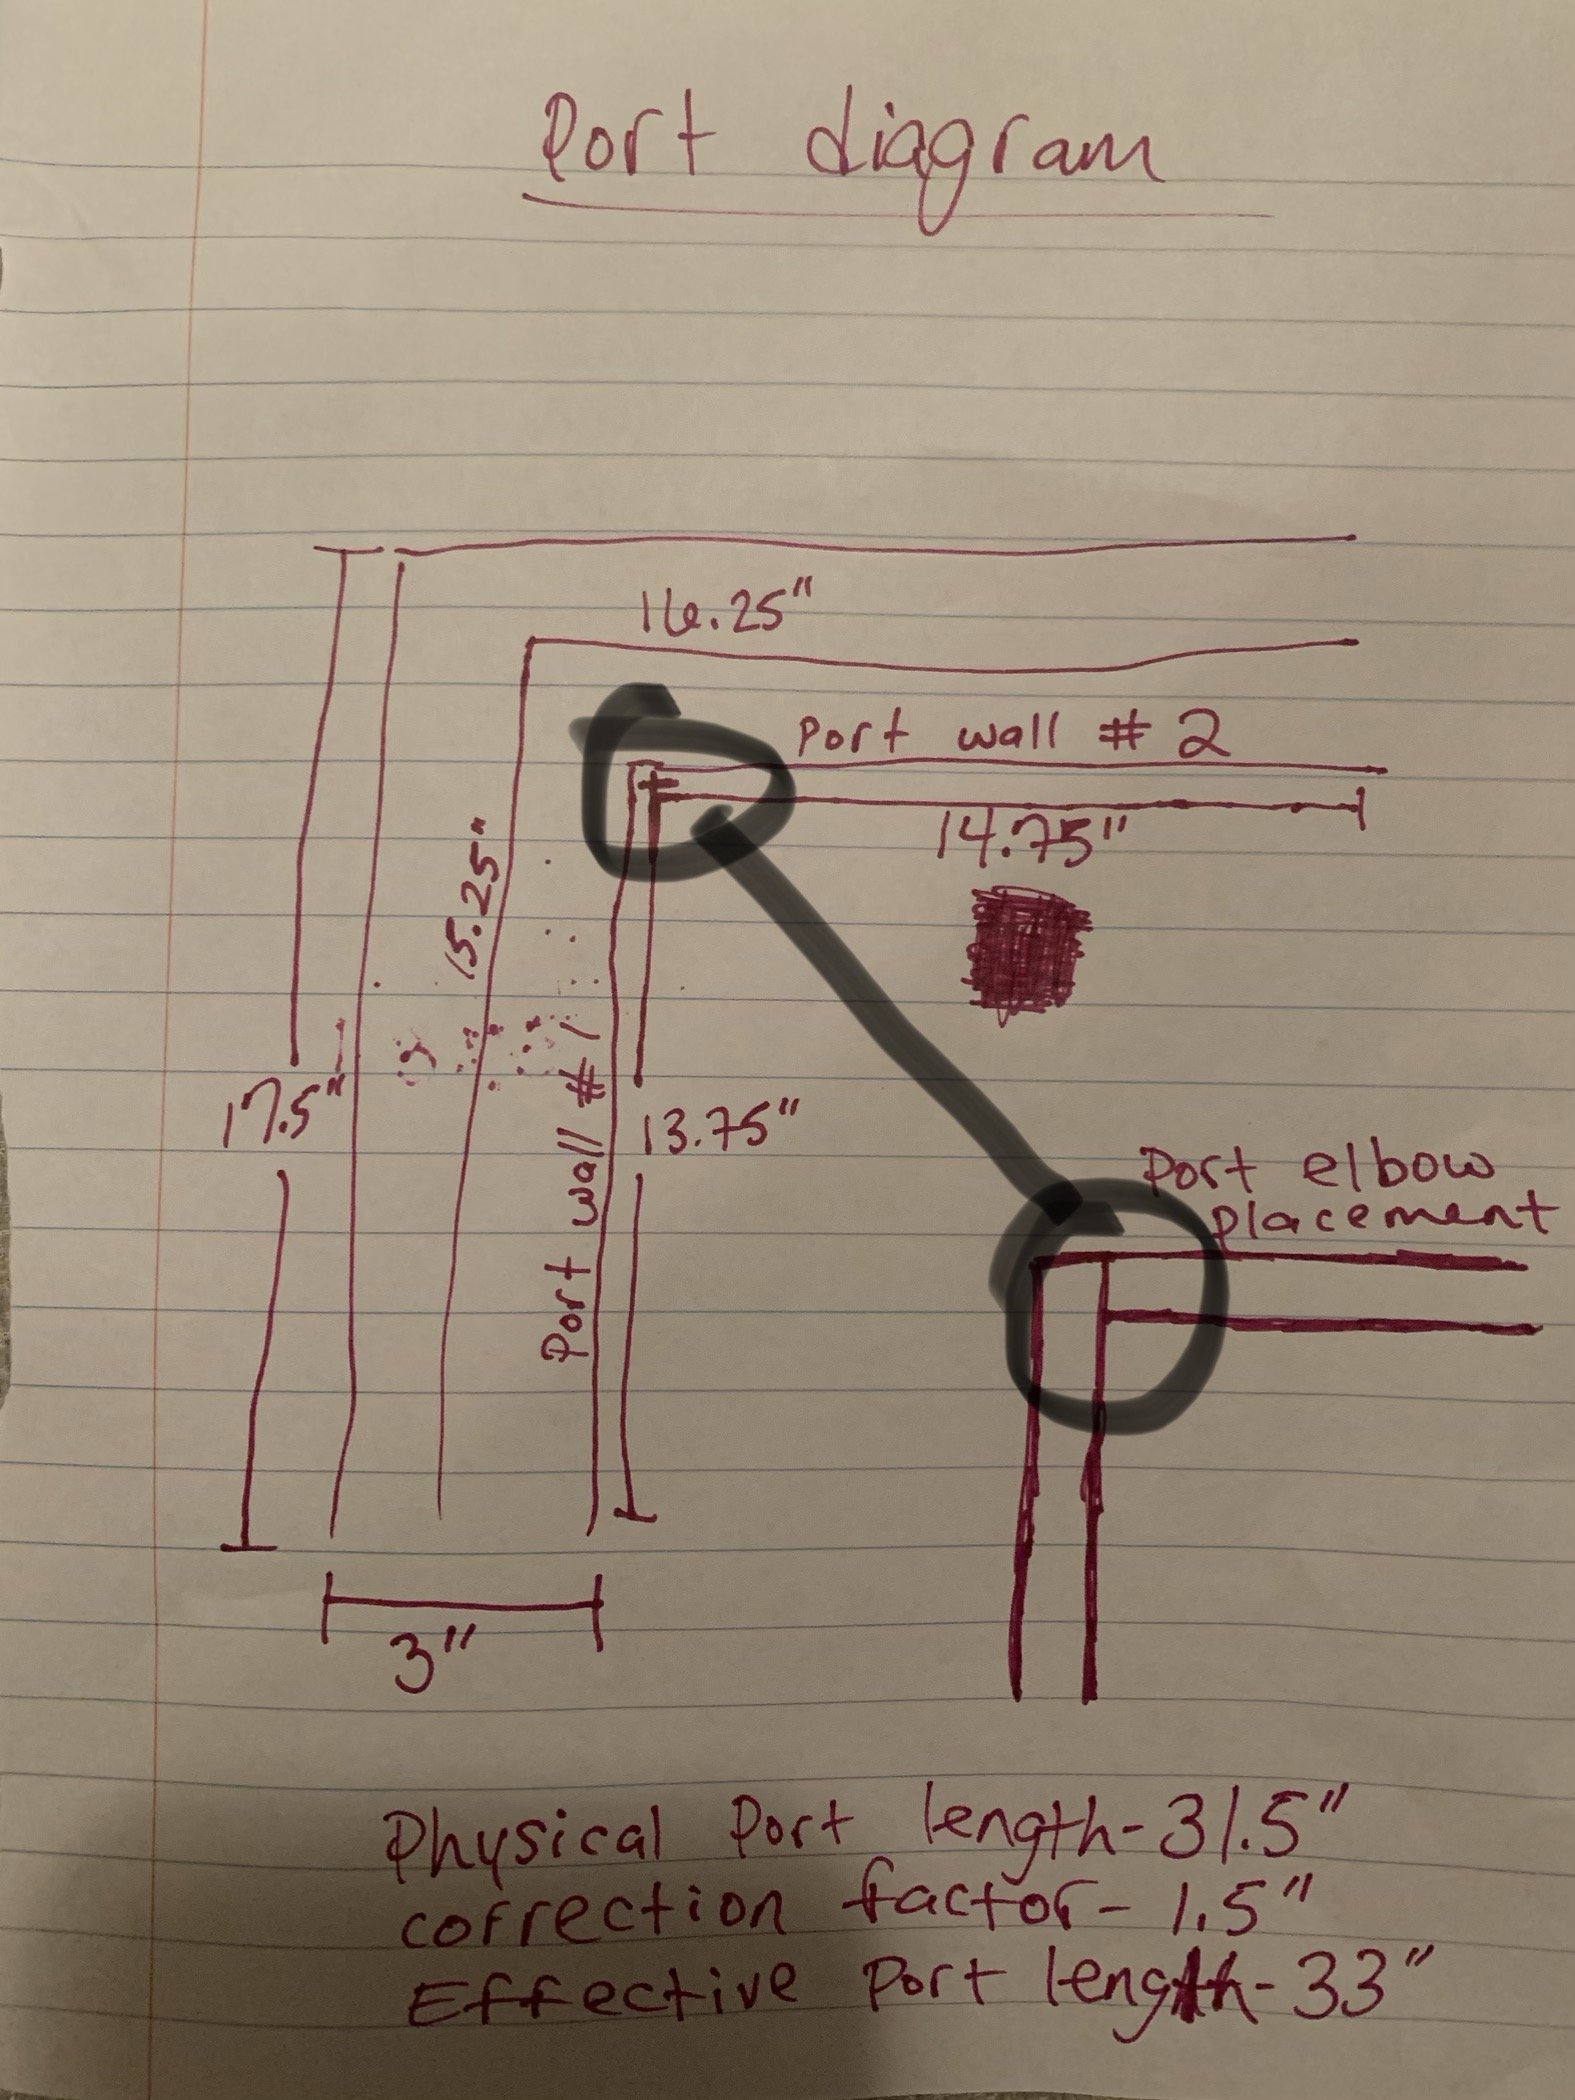
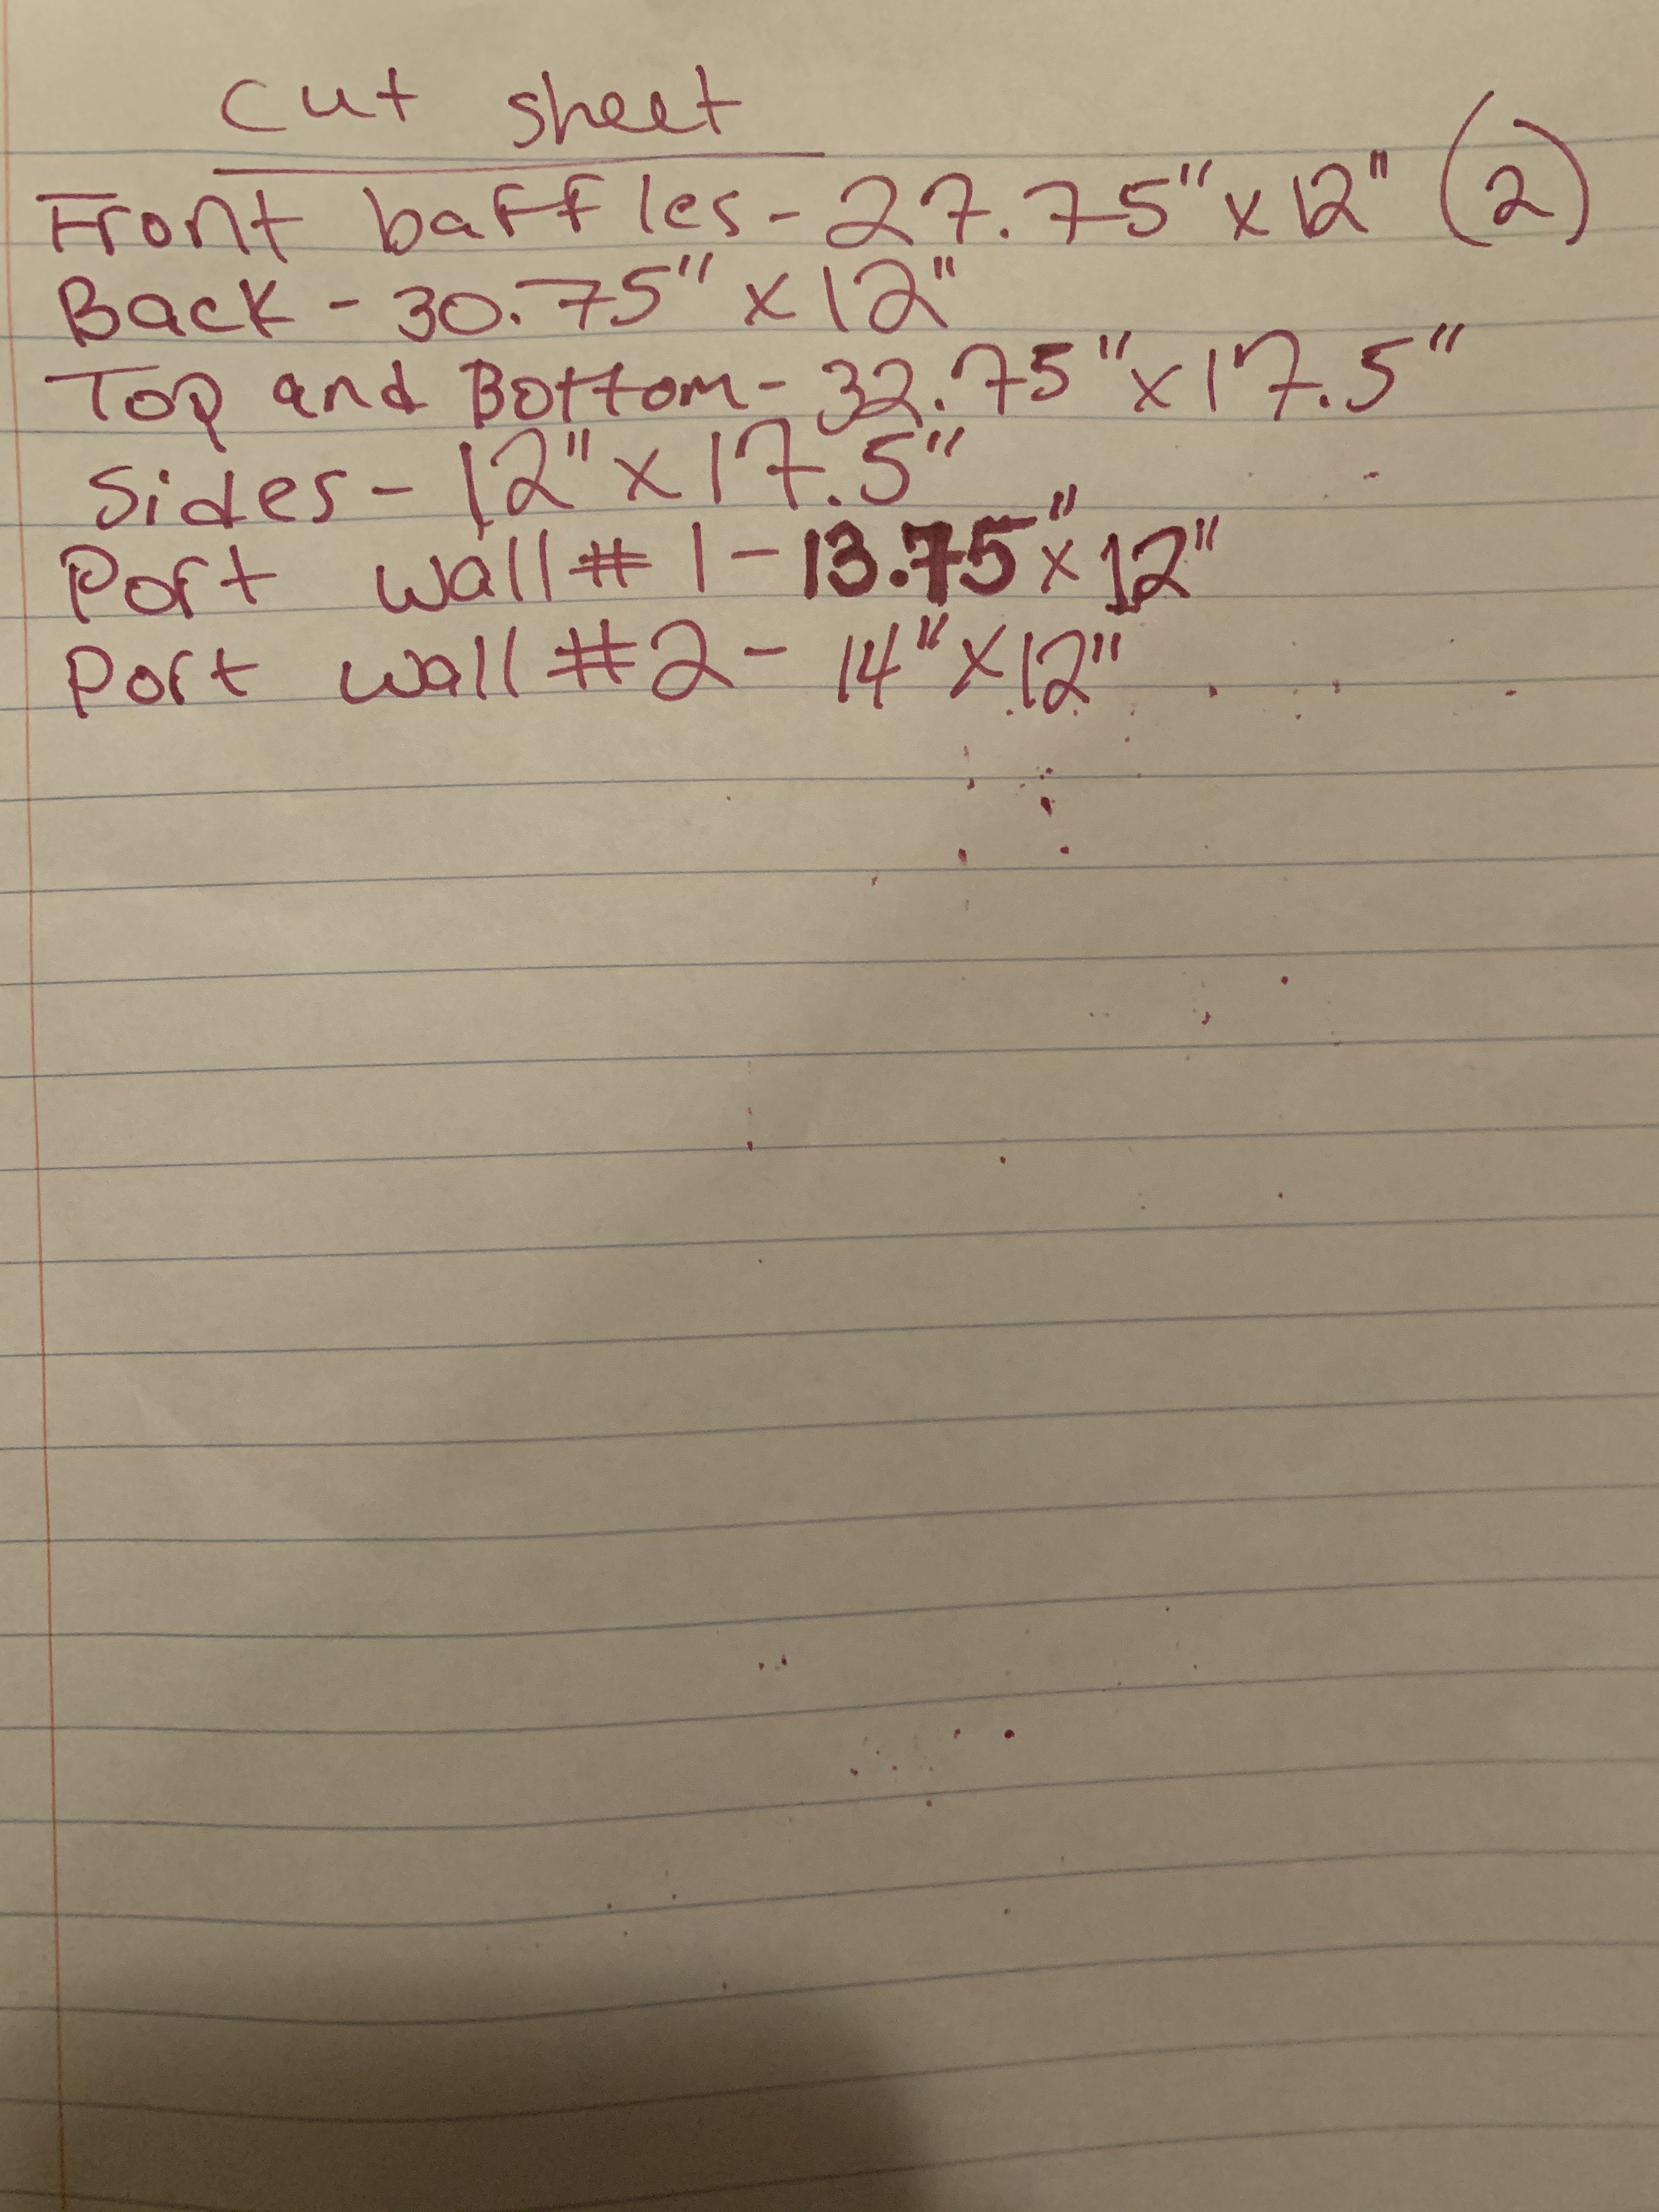
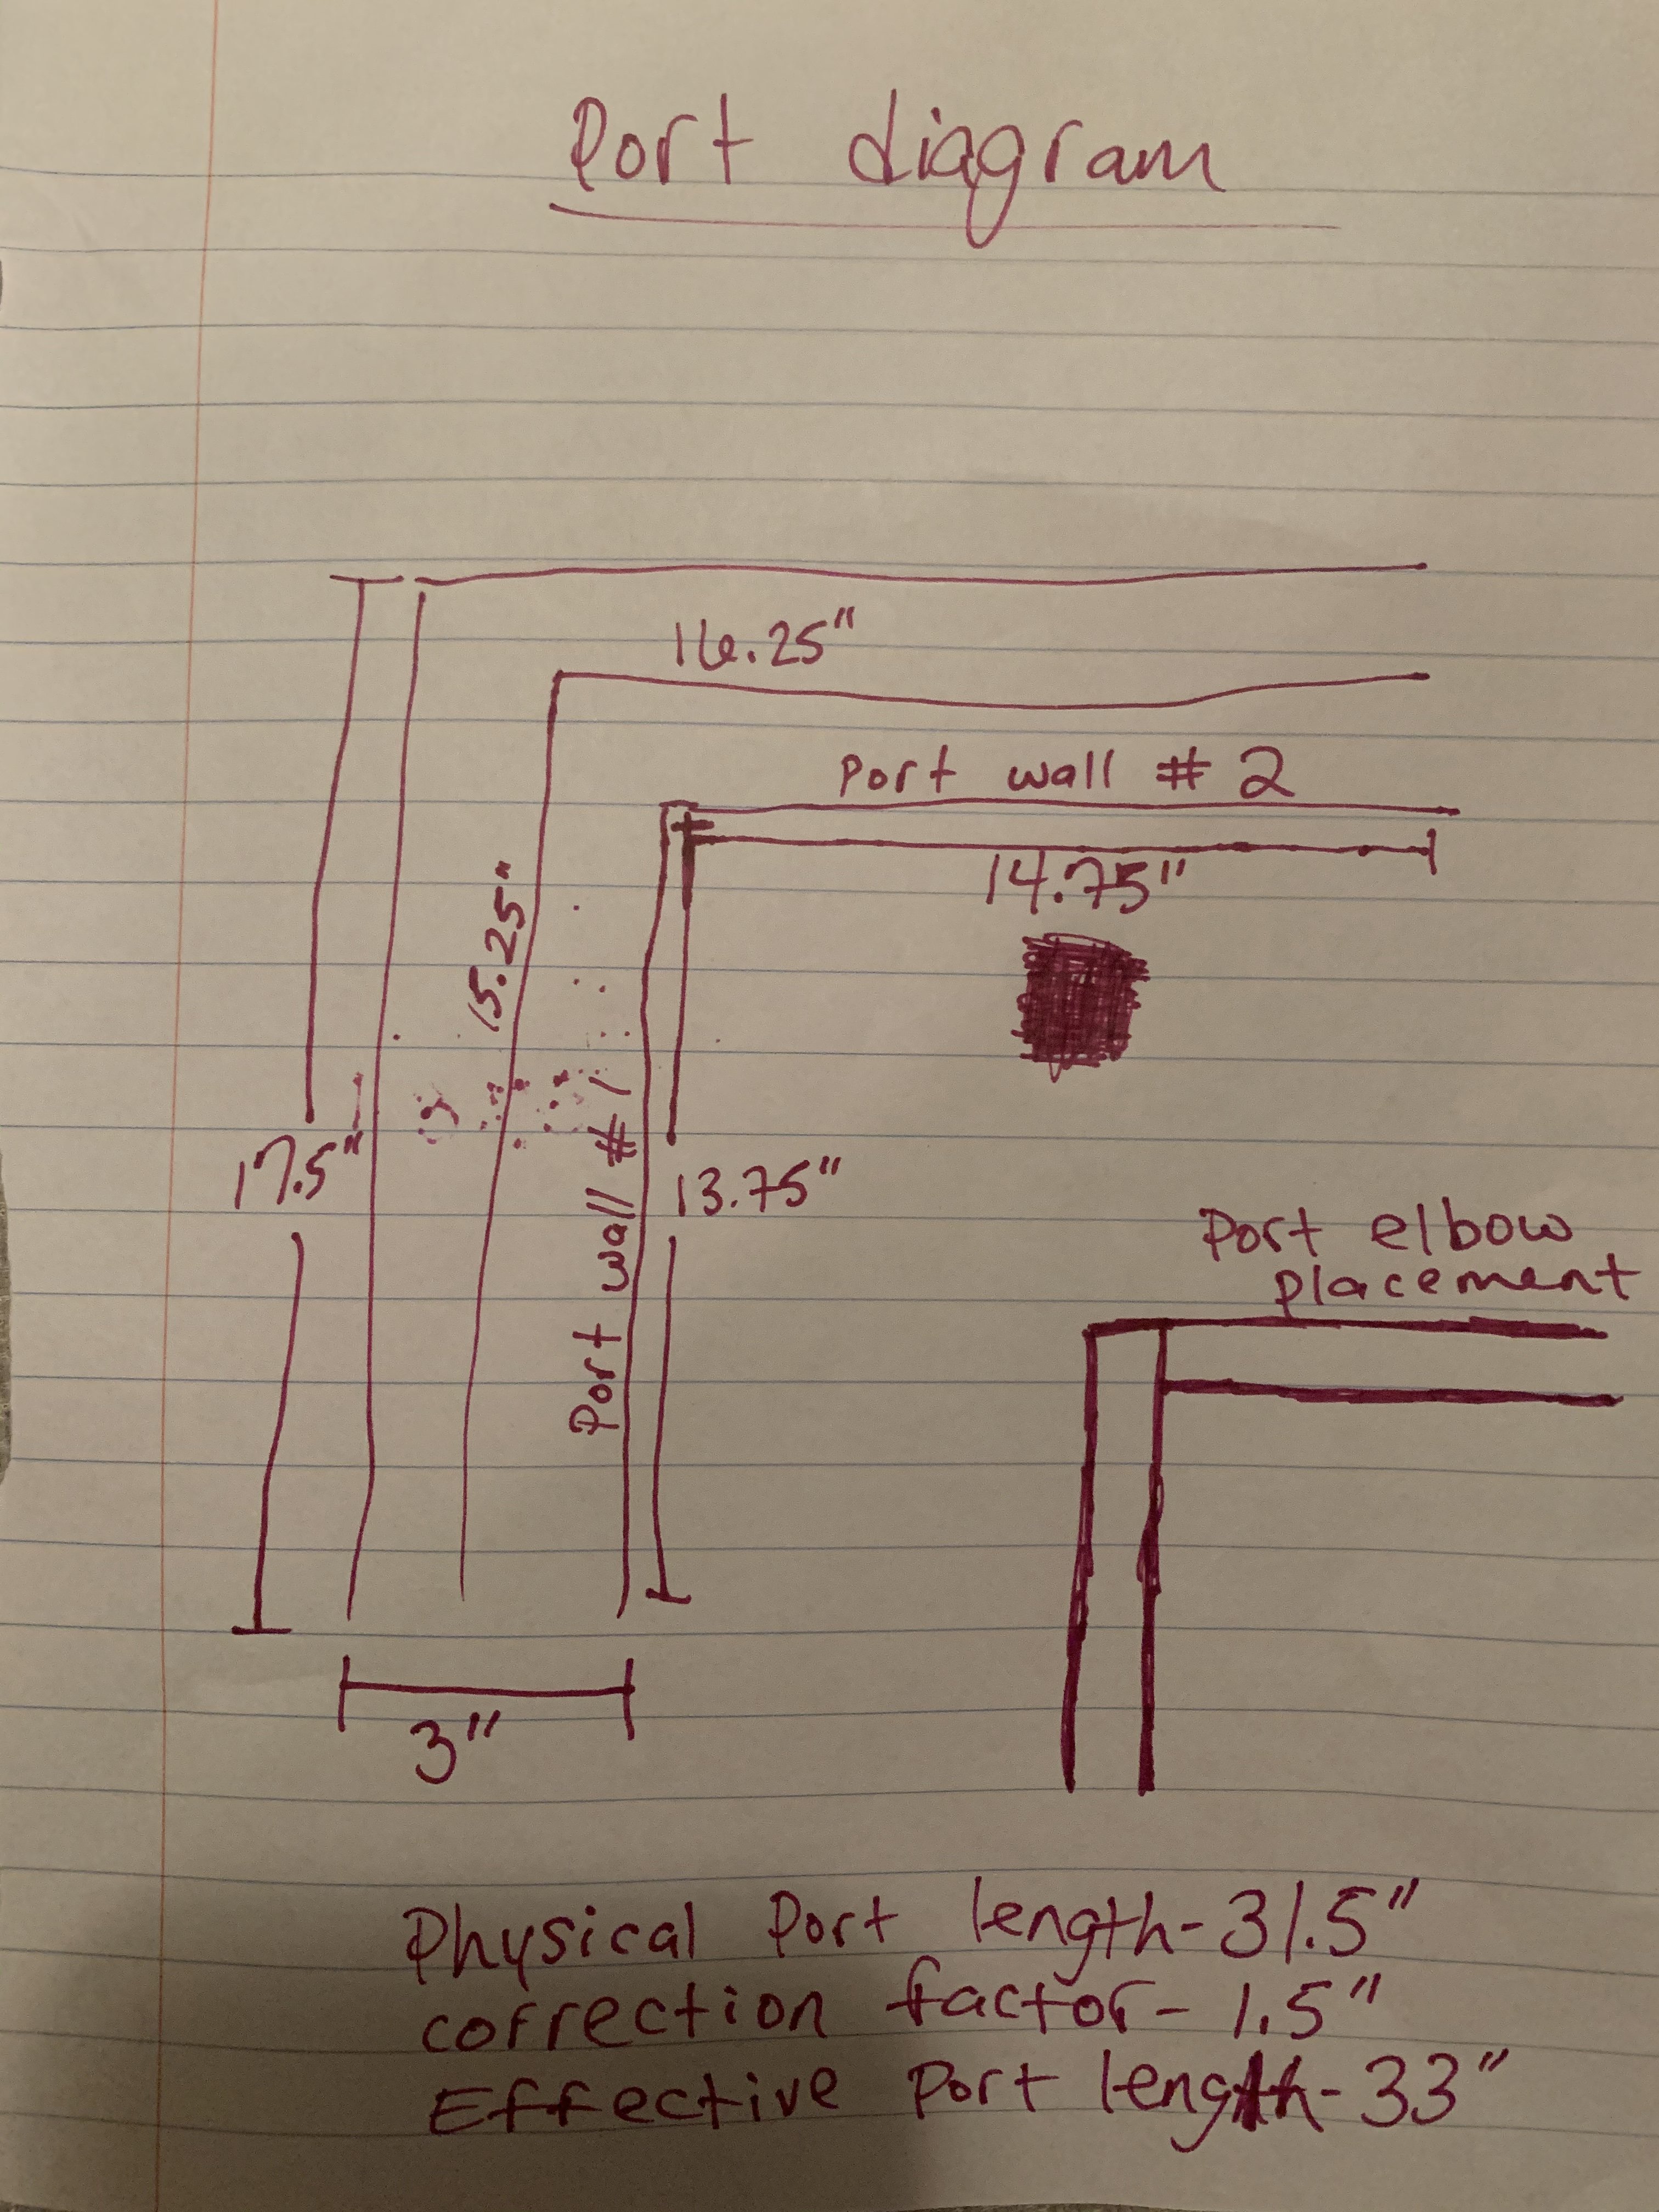
The length of the port is measured down the center of the port, not on the port walls. Add up the middle length. Since the port is 3” in width, the measurement down the middle would add 1.5” on each port wall. So that’s 3”. 13.75”+14.75”=28.5”+(3”)=31.5”. The tuning is 32.76hz and net volume is 2.29 cubic feet after bracing.

-
And you would cut that second port piece as 14”, even though that wall is 14.75” because the way the port elbow connects adds an extra .75” to the length. So the piece should be 14” in length but that wall is 14.75” in length.
-
And 32.75” was a misprint. I meant to put 32.25”. Lol my bad! All the other cuts measurements I used 32.25” as the width to do my calculations but I accidentally wrote 32.75” instead of 32.25”.