alaskanzx5 Posted February 12, 2012 Report Share Posted February 12, 2012 so, if you wre to add say 3 layers of matting about how much thicker will it be? i know that yu use a fleece or stretchy fabric to get the general shape you want but then when you add matting it builds up. im wanting to know how much it builds up from 2-4 layers so that when i do my doors i can make sure i compensate for that. i like my leg room and im gonna try to keep it all flush with the rest of the door you can add matt to the back side too. keep that in mind Doors look good man! yeah that is true, didnt even thing of that. t1500bdcp 2 t2d4 15" 1 t600.4 1 t400.2 1 set p1 tweets singer alt, tons of wiring, smd vm-1, 80prs, back seat delete, still in the works, aiming for a 145-147 with the ability to play 25hz up to 50hz. Link to comment Share on other sites More sharing options...
zxsonnyxz Posted February 12, 2012 Report Share Posted February 12, 2012 Looks like you're getting there! On you question of things you should do, as I see some wrinkles: the tighter and smoother you can strech your cloth over your frame, the easier it is, and less sanding is requred. STD Passat Build 151db+STD Omega BuildMitsubishi Colt Build - Alpine|Focal|PeerlessHome Stereo BuildSmall Tang Band build - 4" fullrangeBox for 4 8"My Saab 9000 Build- I'd be very happy if you cared to check out the logs and give feedback! Link to comment Share on other sites More sharing options...
Loslam Posted February 12, 2012 Author Report Share Posted February 12, 2012 Looks like you're getting there! On you question of things you should do, as I see some wrinkles: the tighter and smoother you can strech your cloth over your frame, the easier it is, and less sanding is requred. Yeah thanks bud, learning as you go is always beneficial. I tried to make all the wrinkles in one spot, making that the only spot I'd really have focus on as far as the filler. I'll have a video up in a bit 1997 Chevrolet Silverado Extended Cab, 350 Vortec Things to come at some point... Build Log: http://www.stevemead...2200ds-133-ohm/ Link to comment Share on other sites More sharing options...
Loslam Posted February 12, 2012 Author Report Share Posted February 12, 2012 Was cold that's why she's shaking lol Hood flex ftw 1997 Chevrolet Silverado Extended Cab, 350 Vortec Things to come at some point... Build Log: http://www.stevemead...2200ds-133-ohm/ Link to comment Share on other sites More sharing options...
alaskanzx5 Posted February 13, 2012 Report Share Posted February 13, 2012 thats coming along great. t1500bdcp 2 t2d4 15" 1 t600.4 1 t400.2 1 set p1 tweets singer alt, tons of wiring, smd vm-1, 80prs, back seat delete, still in the works, aiming for a 145-147 with the ability to play 25hz up to 50hz. Link to comment Share on other sites More sharing options...
msmith Posted February 13, 2012 Report Share Posted February 13, 2012 looks good! Link to comment Share on other sites More sharing options...
Loslam Posted February 20, 2012 Author Report Share Posted February 20, 2012 Pretty much done at this point, went with glossy black but ehhhhhh not looking as well as I thought A lot of errors and they're not completely smooth. Probably going to cover them in some pimp fur before it's over with filled in last spots with putty 400, primer, 400 adhesion promotor, color coat then clear 1000, 2000, rubbing compound then swirl remover 1997 Chevrolet Silverado Extended Cab, 350 Vortec Things to come at some point... Build Log: http://www.stevemead...2200ds-133-ohm/ Link to comment Share on other sites More sharing options...
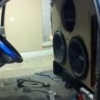
carshateme Posted February 20, 2012 Report Share Posted February 20, 2012 Lol the dual sub box in the first picture (in the background) looks like the one I just built o.0. But everything look good. What are those subs, 15s? New build coming soon. [center][url="http://imageshack.us/photo/my-images/3/sigtoo.jpg/"][img]http://img3.imageshack.us/img3/9541/sigtoo.jpg[/img][/url][/center] Link to comment Share on other sites More sharing options...
n8ball2013 Posted February 20, 2012 Report Share Posted February 20, 2012 not bad. i see lots of spots you could have touched up to make it smoother though. got any rubbing on the bottom of your doors? THERE IS NO BUILD LOG! 1998 Chevy Silverado ext cab Alpine CDA-9887 4 Team Fi 15s 2 Ampere Audio TFE 8.0 2 Ampere Audio 150.4 3 Digital Designs CS6.5 component sets Dual Mechman 370XP Elite alternators inbound! 8 XS Power d3400 6 XS power d680 Second Skin Stinger Tsunami Wiring Sky High A Real Voltmeter not a piece of shit stinger. Link to comment Share on other sites More sharing options...
dwright27 Posted February 20, 2012 Report Share Posted February 20, 2012 Damn that was a cake of bondo 2006 F-150 4 DC XL M2 18's Walled Daily Driver XS Power 4 DC 3.5kw Team DC Team S.P.L. Lot of Audio Technix and 1/0 DC Audio Dealer American Bass Dealer XS Power Dealer Audio Technix Dealer Link to comment Share on other sites More sharing options...


Recommended Posts
Archived
This topic is now archived and is closed to further replies.