gckless Posted June 18, 2013 Author Report Share Posted June 18, 2013 Damn, no love huh? Well, been working on the amp rack. Got both amps figured out, mounting holes drilled and test-mounted, power wire holes drilled and routed, just waiting on fans now to measure and cut holes for before I start to stain the top piece. Also got it mounted on hinges and latches. Used butterfly latches, pretty much the only latches I know of that I trust not to eventually rattle loose. Thinkin about getting some hood or trunk gas springs, not sure yet. Probably will just use a strap or something to keep it from going too far over. I'm positive I'm staining the top a nice dark brown, still undecided on the bottom, will probably just carpet. "Clipping" is the biggest forum boner now. It's like witchcraft... it automatically explains just about everything people don't understand. My build log: http://www.stevemeadedesigns.com/board/topic/200295-gckless-2011-chevrolet-impala/ High resolution photos: Gilbert Kless Photography Link to comment Share on other sites More sharing options...
Kyblack76 Posted June 18, 2013 Report Share Posted June 18, 2013 That is some of the cleanest work ive seen for some time. You do great great work. And, yet another blazer... and, even the same year..... Well done man.. well done.. Id LOVE to see where this goes, and wish you the best of luck. Go get it.. SMD SUPER SELLER The Burban Build Blazer Build sold Acura trunk build sold Link to comment Share on other sites More sharing options...
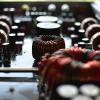
subsonicluv Posted June 18, 2013 Report Share Posted June 18, 2013 Nice equipment! Is the tuning on the PR's adjustable by adding/removing weights on the studs that are attatched to the backs of the spiders? I've done some research on PR's and always have been curious on how they would do with cabin gain thrown into the equation. Also can you just t-tap into the power cable feeding the amp with the ammeter? I know it has to be in series but I'm not sure if has to be between the power cable and the amp. Seems like there would be a lot of current going through that little thing. Please correct my noobness if i'm wrong. lol! Either way, looks good! 04 Blazer Xtreme HU: Kenwood KDC-MP235 Front Stage: Lanzar MX6C Components Rear Stage: Lanzar MX693 6X9's Sub Stage: (2) Obsidian 18 D2 V2 Mids / Highs Amp: Boston Acoustics GTA 704 Sub Amp: Boston Acoustics GTA 1000m Optima Yellow Top (up front) Singer 275A Alternator Future Plans: One More GTA 1000m (maybe) More batteries More runs of 1/0 Pioneer DEH-X7500S (on order) Link to comment Share on other sites More sharing options...
gckless Posted June 18, 2013 Author Report Share Posted June 18, 2013 That is some of the cleanest work ive seen for some time. You do great great work. And, yet another blazer... and, even the same year..... Well done man.. well done.. Id LOVE to see where this goes, and wish you the best of luck. Go get it.. Thanks! I'm trying to make it real nice, plan on having this in there for a while. Might as well do it right the first time! Nice equipment! Is the tuning on the PR's adjustable by adding/removing weights on the studs that are attatched to the backs of the spiders? I've done some research on PR's and always have been curious on how they would do with cabin gain thrown into the equation. Also can you just t-tap into the power cable feeding the amp with the ammeter? I know it has to be in series but I'm not sure if has to be between the power cable and the amp. Seems like there would be a lot of current going through that little thing. Please correct my noobness if i'm wrong. lol! Either way, looks good! Yes, you just add or remove weight on those studs on the back, in the form of washers (most PR's use washers and nuts). Not real sure how they would do with cabin gain, I would think they are pretty similar to a ported enclosure in that aspect. For the ammeter, I have to use the shunt that's also pictured. That's a 500A 75mV shunt, so that shunt goes in series with whatever I am measuring (I will be attaching all my amp grounds to the ammeter, and the ammeter directly to the buss bar on my battery bank), and the ammeter is attached to both of those smaller leads. The shunt only allows 75mV across the smaller leads that the ammeter is connected to, while the rest of the current (up to 500A rated, but shouldn't be that much) travels across the shunt, and the ammeter just measures voltage drop across that connection (the ammeter has to match the shunt, so this is also a 75mV ammeter). 500A is wayyyyyyyy too much for a small meter like this lol. Most of these smaller ones, to include this one, are rated up to 10A or so without a shunt. "Clipping" is the biggest forum boner now. It's like witchcraft... it automatically explains just about everything people don't understand. My build log: http://www.stevemeadedesigns.com/board/topic/200295-gckless-2011-chevrolet-impala/ High resolution photos: Gilbert Kless Photography Link to comment Share on other sites More sharing options...
subsonicluv Posted June 18, 2013 Report Share Posted June 18, 2013 That is some of the cleanest work ive seen for some time. You do great great work. And, yet another blazer... and, even the same year..... Well done man.. well done.. Id LOVE to see where this goes, and wish you the best of luck. Go get it.. Thanks! I'm trying to make it real nice, plan on having this in there for a while. Might as well do it right the first time! Nice equipment! Is the tuning on the PR's adjustable by adding/removing weights on the studs that are attatched to the backs of the spiders? I've done some research on PR's and always have been curious on how they would do with cabin gain thrown into the equation. Also can you just t-tap into the power cable feeding the amp with the ammeter? I know it has to be in series but I'm not sure if has to be between the power cable and the amp. Seems like there would be a lot of current going through that little thing. Please correct my noobness if i'm wrong. lol! Either way, looks good! Yes, you just add or remove weight on those studs on the back, in the form of washers (most PR's use washers and nuts). Not real sure how they would do with cabin gain, I would think they are pretty similar to a ported enclosure in that aspect. For the ammeter, I have to use the shunt that's also pictured. That's a 500A 75mV shunt, so that shunt goes in series with whatever I am measuring (I will be attaching all my amp grounds to the ammeter, and the ammeter directly to the buss bar on my battery bank), and the ammeter is attached to both of those smaller leads. The shunt only allows 75mV across the smaller leads that the ammeter is connected to, while the rest of the current (up to 500A rated, but shouldn't be that much) travels across the shunt, and the ammeter just measures voltage drop across that connection (the ammeter has to match the shunt, so this is also a 75mV ammeter). 500A is wayyyyyyyy too much for a small meter like this lol. Most of these smaller ones, to include this one, are rated up to 10A or so without a shunt. Ahh I see! I didn't even notice the shunt at 1st. Reading>me 04 Blazer Xtreme HU: Kenwood KDC-MP235 Front Stage: Lanzar MX6C Components Rear Stage: Lanzar MX693 6X9's Sub Stage: (2) Obsidian 18 D2 V2 Mids / Highs Amp: Boston Acoustics GTA 704 Sub Amp: Boston Acoustics GTA 1000m Optima Yellow Top (up front) Singer 275A Alternator Future Plans: One More GTA 1000m (maybe) More batteries More runs of 1/0 Pioneer DEH-X7500S (on order) Link to comment Share on other sites More sharing options...
gckless Posted June 20, 2013 Author Report Share Posted June 20, 2013 Got my $100 worth of fans in from Newegg. 140mm fans, top will be pulling, side will be pushing out from box. Sorry, the pictures are a bit shoddy, it's da iPhone. I think the top is ready for stain after some light sanding. I was thinking about putting a voltage meter and the switches for the fans up there, but I think I'm going to keep it clean and put them on the sides. I think it would ruin the classic stained look. Also, I LOVE this Craftsman Bolt-on kit. I've done all of this with the driver, jigsaw, and router attachments (besides the side cuts with a trim saw). "Clipping" is the biggest forum boner now. It's like witchcraft... it automatically explains just about everything people don't understand. My build log: http://www.stevemeadedesigns.com/board/topic/200295-gckless-2011-chevrolet-impala/ High resolution photos: Gilbert Kless Photography Link to comment Share on other sites More sharing options...
Kyblack76 Posted June 20, 2013 Report Share Posted June 20, 2013 sick man.... sick.. SMD SUPER SELLER The Burban Build Blazer Build sold Acura trunk build sold Link to comment Share on other sites More sharing options...
Karkov Posted June 20, 2013 Report Share Posted June 20, 2013 Dang man, love the fans for cooling, Love the bit about mosquitoes, LMAO. Looking good, you definitely been busy. New tools you getting serious now! Where you get window tint done at? 2007 Chevy Tahoe (SOLD) 12 ~ FI Audio X series 10" w/BP option 2 ~ DC Audio 5.0K @0.67 3 ~ DC Audio 5.0K @1.0 2 ~ PPI 3 way sets (not installed yet) 1 ~ RF T400-4, 1 ~ RF T600-2, 1 ~ RF T600-4 4 ~ CT Sounds 5.25" Strato comps (rear fill only) 1 ~ XS Power D4800 1 ~ XS Power D3400 8 ~ XS Power XP3000 160 stock alt, Mechman 370 Elite, 185 DC Power 320+ Sq. Ft. Sound Deadener Pioneer AVH-X5500BHS Youtube: https://www.youtube.com/user/knfjdkghjudfhsgkjdhf/videos?sort=dd&view=0&shelf_id=0 Link to comment Share on other sites More sharing options...
gckless Posted June 20, 2013 Author Report Share Posted June 20, 2013 Dang man, love the fans for cooling, Love the bit about mosquitoes, LMAO. Looking good, you definitely been busy. New tools you getting serious now! Where you get window tint done at? The mosquitoes are crazy as soon as the sun goes behind the building. I have until like 7 to work outside, because I am not working in 95*+ in pants lol. I got the tint done at an authorized 3M installer near here. Place was called Precision Solar Tint. "Clipping" is the biggest forum boner now. It's like witchcraft... it automatically explains just about everything people don't understand. My build log: http://www.stevemeadedesigns.com/board/topic/200295-gckless-2011-chevrolet-impala/ High resolution photos: Gilbert Kless Photography Link to comment Share on other sites More sharing options...
Karkov Posted June 20, 2013 Report Share Posted June 20, 2013 Dang man, love the fans for cooling, Love the bit about mosquitoes, LMAO. Looking good, you definitely been busy. New tools you getting serious now! Where you get window tint done at? The mosquitoes are crazy as soon as the sun goes behind the building. I have until like 7 to work outside, because I am not working in 95*+ in pants lol. I got the tint done at an authorized 3M installer near here. Place was called Precision Solar Tint. Cool man thanks. Yea they are horrible up here too. I work for 3M but we don't have installers like that up here, of course our tint laws are different I think, Wish we did have easier ways to get professional tint installed. I've done it myself but to me it's a PITA, either way looks great and with warranty even better. 2007 Chevy Tahoe (SOLD) 12 ~ FI Audio X series 10" w/BP option 2 ~ DC Audio 5.0K @0.67 3 ~ DC Audio 5.0K @1.0 2 ~ PPI 3 way sets (not installed yet) 1 ~ RF T400-4, 1 ~ RF T600-2, 1 ~ RF T600-4 4 ~ CT Sounds 5.25" Strato comps (rear fill only) 1 ~ XS Power D4800 1 ~ XS Power D3400 8 ~ XS Power XP3000 160 stock alt, Mechman 370 Elite, 185 DC Power 320+ Sq. Ft. Sound Deadener Pioneer AVH-X5500BHS Youtube: https://www.youtube.com/user/knfjdkghjudfhsgkjdhf/videos?sort=dd&view=0&shelf_id=0 Link to comment Share on other sites More sharing options...


Recommended Posts
Archived
This topic is now archived and is closed to further replies.