Purplehaze Posted May 4, 2013 Author Report Share Posted May 4, 2013 Ewwwwww, good luck to you! I wish you all the best! LOL Well she is now on board! She said do it, they will look much better. So I just ordered the poppers! Front door handles will be removed soon! In the meantime, I will have some updates probably tomorrow, stay tuned! Kickin' Cruiser Seller Feedback Stage 3 Dash, Door Panels,4th Order wall 4 - 15'son a DC 5.0K 2 DC 5.0K'sSolo X 15 (v.2) Sub Build Link to comment Share on other sites More sharing options...
MrSkippyJ Posted May 4, 2013 Report Share Posted May 4, 2013 woot!! F150: Stock 2019 Harley Road Glide: Amp: TM400Xad - 4 channel 400 watt Processor: DSR1 Fairing (Front) 6.5s -MMats PA601cx Lid (Rear) 6x9s - TMS69 Link to comment Share on other sites More sharing options...
scooter99 Posted May 5, 2013 Report Share Posted May 5, 2013 Ewwwwww, good luck to you! I wish you all the best! LOL Well she is now on board! She said do it, they will look much better. So I just ordered the poppers! Front door handles will be removed soon! In the meantime, I will have some updates probably tomorrow, stay tuned! Sweet!!! I agree they'll look much better! Let me know how those work out so I can get them when it comes time for the truck to get done. Facebook Page: S99Creations 2006 F250 Lariat Build Link to comment Share on other sites More sharing options...
Purplehaze Posted May 11, 2013 Author Report Share Posted May 11, 2013 Okay, so I managed to find time here and there to get a little bit done, check it out. The doors are good for now, till I'm ready to start wrapping stuff up. Next up is the roof bracing. I got some ideas, so let's do it!Start out making a template.Test fitCut timeFits goodNow to attach it to the roofTwo of them cut and screwed in placeTime to make it stay Then remember this? Time to countersink, sand, prime and paint. Oh and how about some for the roof too...Much more on the way... Kickin' Cruiser Seller Feedback Stage 3 Dash, Door Panels,4th Order wall 4 - 15'son a DC 5.0K 2 DC 5.0K'sSolo X 15 (v.2) Sub Build Link to comment Share on other sites More sharing options...
Purplehaze Posted May 11, 2013 Author Report Share Posted May 11, 2013 Roof bracingSanded, ready for primer and paintAlso I added a little more wood up top, connecting the twoNext, I put the sealed section back up, and started cutting the poster board for the baffle. Glad I used it, Ghostlines FTW!Started with 3 whole shets.passenger sideDrivers sideWhole thing done.Then I pulled it all out, including the floor, to open up the battery cutout for larger batteries, hopefully in the near future. I figured it would be easier now then later.First I had to remove the bottom layer, damn this tightbond is really strong.But I got it w/o breaking the small this board!More on the way... Kickin' Cruiser Seller Feedback Stage 3 Dash, Door Panels,4th Order wall 4 - 15'son a DC 5.0K 2 DC 5.0K'sSolo X 15 (v.2) Sub Build Link to comment Share on other sites More sharing options...
Purplehaze Posted May 11, 2013 Author Report Share Posted May 11, 2013 So that's about all I got done as of now, hopefully this rain will let up this week and I can get this thing in there!In the meantime, I have been getting quit a bit of supplies, most of what all is needed, check it out!First, I noticed this up front. Time for a change...Thankfully it is only one of them, so I'll use the other in my girl's ride..So I jumped on the sale Mechman had on their batteries, and less than 24 hours after ordering, this was waiting for me when I got home.2 XS Power D5100's, (one is a 5100R)Also, I needed cable, so I hit up Jon at Sky High Car Audio, and ordered 100' OFC 1/0. Awesome deal on some really nice cable. Top quality for sure, reminds me of Kicker Hyperflex. Although mine came beat to hell (thanks USPS) and had no pretty labek like Rusty's. Still, I am pleased. Check it out!Thanks Jon for the stickers and lanyards! And for the great product!Here is how it showed up, damn USPSAlso I got some fuse holders for up front.And for the back tooAnd, as some of you already know, I am determined to get a second alternator on my car, in place of the a/c compressor. So after some research, I found one from another Chrysler that I think will work. So I ordered one from a scrapyard and I'm gonna make this happen! Stay tuned!It's a Denso unit, stock 120 amp. But it will work perfect for mock-up. Only thing is, my car has a 4 rib belt, this unit has a 6 rib pulley. So I ordered a new 4 rib pulley for it!And up next, I needed some terminals, and I've been wanting to try a place I found online, (Crimp Supply), since they offer a really good deal if you buy bulk. so I started w a small pack just to check them out.And I'm very pleased, these are solid copper with tin plating. Very nice terminalsCamera had a hard time showing the copper color, but you get the point Kickin' Cruiser Seller Feedback Stage 3 Dash, Door Panels,4th Order wall 4 - 15'son a DC 5.0K 2 DC 5.0K'sSolo X 15 (v.2) Sub Build Link to comment Share on other sites More sharing options...
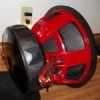
Purplehaze Posted May 11, 2013 Author Report Share Posted May 11, 2013 So I ordered some bulk! Well, not really, I got 100 more! Next, I had to order a new router bit, for making my ports. 1" roundover, very nice! I also ordered some new black poly dust caps, to make these Skars look a little better. What do you all think?I also picked up some more resin, this time I got high quality stuff...Not sure why they put this hole in it though?Next up, I ordered all new carpet. Black. Assholes folded it when they weren't supposed to. Check it out!Also I got all my vinyl glue and spray gunFlat blackSilver (All-Sport)Regular black (All-Sport)Glue and gunMetal for new busbars. 3/8" for the front, 3/4" for the rear. Kickin' Cruiser Seller Feedback Stage 3 Dash, Door Panels,4th Order wall 4 - 15'son a DC 5.0K 2 DC 5.0K'sSolo X 15 (v.2) Sub Build Link to comment Share on other sites More sharing options...
Purplehaze Posted May 11, 2013 Author Report Share Posted May 11, 2013 Got my new dual inputs for my 5.0K, and although they took a little while to get here, I am very pleased with them.Ahh yeah!!!Then I do this for storage. Helps keep the set screws from getting lost.A shot of most of the electrical upgrades that will be the next step in the build; 4 runs front to back, 7 batts total in the rear, 2 up front, busbars front and back, etc...FusesTerminalsHeat-shrink, tech flex, crappy meters...100 ft 1/0 Sky High OFC cableBrass studs, screws, bolts, washers, and nuts. Busbar hardware and speaker terminals.Aluminum for busbars (3/8 & 3/4)Old busbar for compairsonAnd I think that's about it, for now. I'm still waiting on those door poppers, and also I am thinking hard about selling these Skars and getting something a little better. So stay tuned, this should get interesting very soon! And thanks again for looking! Kickin' Cruiser Seller Feedback Stage 3 Dash, Door Panels,4th Order wall 4 - 15'son a DC 5.0K 2 DC 5.0K'sSolo X 15 (v.2) Sub Build Link to comment Share on other sites More sharing options...
b-eazy Posted May 11, 2013 Report Share Posted May 11, 2013 Nice work I'm tuned in for sure Link to comment Share on other sites More sharing options...
ptcary Posted May 11, 2013 Report Share Posted May 11, 2013 PTCary 2003 SMD PT Cruiser 2011 Honda CBR 250R 2010 Mazda 3i Sport MY BUILD LOG Link to comment Share on other sites More sharing options...


Recommended Posts
Archived
This topic is now archived and is closed to further replies.