bmxscion
-
Posts
282 -
Joined
-
Last visited
Content Type
Profiles
Forums
Events
Media Demo
Store
Collections
Videos
Everything posted by bmxscion
-
SD-3 -- help matching amp
bmxscion replied to pumin's topic in Sundown Audio - GREAT Amps/Subs! GREAT Customer Service!
Markous- just make sure you set the gains on your amp carefully. These SD-3's are easier to bottom out than the other beefier models. But when you get it set right they are really nice. Do you plan on doing a separate chamber sealed box or shared chamber sealed.....or something else? I know how good my single 12 sounds, and I bet two would be pretty nice. What is your frontstage consist of? I have a full active HAT 3-way front stage in mine. -
SD-3 -- help matching amp
bmxscion replied to pumin's topic in Sundown Audio - GREAT Amps/Subs! GREAT Customer Service!
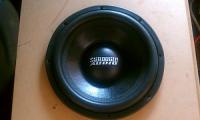
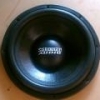
I have an SD-3 12" D4 in a sealed box just under 1 cu ft. The one I have was the prototype unit that has the machined outer spokes unlike the production models. I have it powered by a RF 501bd and processed with an MS-8. It is an awesome sub but I will be upgrading next year so I may sell this one. -
I like your idea with the the two screens in the bedroom. Top notch as always!
-
how is your HU grounded? i have mine straight from the harness to the metal bar under the dash. I do not use the ground side of the vehicle harness at all. I am also running a 501bd and I have 2 551X's in my setup and I have zero alt noise.
-
Happy birthday, and that looks a cool fun toy. You will have to get a cop buddy that can clock your speed on that thing!
-
I'll be selling my SD-2 12" when the 12's in the SD-3 become available.
-
Thanks for updating my location. Please add DMM and hydraulic crimper as well please.
-
DD-1 first time user - this thing is boss
bmxscion replied to may03LT's topic in SMD Distortion Detector (DD-1) Topics
A tip for those who have a DD-1 or any other SMD tool that doesn't plan on using them for extended periods of time.....disconnect the battery when storing. Protect your investment. -
Best bet is to just build the correct box for whatever sub you decide to use.
-
long term review 220A Scion xB Alternator
bmxscion replied to bmxscion's topic in MechMan Alternators and 12v Accessories
Do you have the AVBM on yours? If so adjust it when full hot and with a load and that may help at lower RPM's. -
long term review 220A Scion xB Alternator
bmxscion replied to bmxscion's topic in MechMan Alternators and 12v Accessories
What is your resting voltage on your battery? Maybe you need to put it on a slow charge for a few days to top it off. What kind of battery is it? Shoud be minimum 12.6 V. Mine will rest at 13.1 after keeping my battery maintainer on it. -
long term review 220A Scion xB Alternator
bmxscion replied to bmxscion's topic in MechMan Alternators and 12v Accessories
The stock alternator is much smaller than the Mechman and there is room to remove it without taking the bumper off. The Mechman has to be put in from the front next to the radiator. With the bracket that is on the Mechman you have 2 lower bolts and it is hard to get to the one without having access to the bottom. Plus you have to check the belt alignment and you need the bumper off so you can see down the belt properly. I do agree with the guy in the video about the bracket with the airbag sensor on it being in the way to get the lower bolt out, although I did not remove mine but it was a PITA. You can try it without taking it off and if you can't then just remove it if you need to. Another thing is if you decide you put a ground wire from the alternator case to the beam connected to the radiator support like I have, you will have to have the bumper off to reach it. Make sure to sand down the paint/primer on it first and leave enough slack in the ground wire to allow for engine movement or it will rip itself out over time. Yes this happened to me the first day I had it hooked up. The bumper is not hard to remove. It only takes like 10 minutes. If you don't have factory fogs it is even easier and a few less steps to do too. -
long term review 220A Scion xB Alternator
bmxscion replied to bmxscion's topic in MechMan Alternators and 12v Accessories
I decided to do some cleaning and updates the other day. I cleaned up my terminals, did a little polishing, nothing serious, and added a few small details and connected a run of 2AWG of power wire from alternator POS to battery POS. Here are some pics: Check out the .38 Special shell I used to cover the threads on my battery hold down rod. Added some shrink tubing on the POS inputs to the battery. From left to right we have 4 AWG from starter, 1/0, 2AWG from alternator. The 2AWG was there already and is actually ran through the factory wire harness where the stock wire used to be. It wasn't being used and I figured it was a good time to make use of it while I was in there and now I have 2 runs of both POS and NEG to my battery from the alternator. POS connections at the alternator. The template I made for the new upper bracket to allow for proper belt tensioning. -
long term review 220A Scion xB Alternator
bmxscion replied to bmxscion's topic in MechMan Alternators and 12v Accessories
1. Gates Micro-V. I don't have the part # right this minute, but it is not the stock belt part #. 2. Having a helper is always nice, but I have gotten good enough where I can rip the bumper off, and do everything by myself. You will need to remove the bumper to do this properly. So if you have never removed the bumper having a second person is nice especially if your paint is in flawless condition. I recommend putting some frog tape or something similar on the edges of the bumper and on the fender to prevent scratches when taking off and putting back on, where the bumper and fenders meet. 3. I actually took out the OEM wires, but you can use both. I replaced my OEM wires with 2AWG Knukonceptz wire and then added 1/0AWG to compliment that. 4. All the bolts and hardware used came with my alternator. I only used the factory hardware on the upper bracket. I have found that i need to make a longer upper bracket to get the proper belt tension, because after the new belt stretches I am now at the limit of the upper bracket and I still need it to be tighter. It squeals like a mofo at start up and is annoying. EDIT: Now that I look back at some other pics I have, I did use the factory bolt on the lower bracket also. The silver colored bolt you can see in the pic above came with the alternator, the other bolt at the other end of the bracket is the factory bolt. -
long term review 220A Scion xB Alternator
bmxscion replied to bmxscion's topic in MechMan Alternators and 12v Accessories
Here is a shot from the side with the front bumper cover removed. I had to zip tie the AC line out of the way as well to keep it from hitting the pulley. Top looking down: 2 AWG frame ground and a 1/0 AWG direct to battery ground. Single 1/0 positive run to battery also: D3400 and custom designed (by me!) Toolmaker terminals: -
It is coming up on 3 years since I have had my 220A Alt installed on my 2005 xB and I just wanted to say a few things that I have encountered and experienced in this time. First off if you have a gen 1 xB and are going to install a large case conversion alt you will have to get a longer belt. What I have discovered is that by using the stock upper bracket that the belt over time stretches and eventually can not get enough tension on the belt as you max out the adjustability that the bracket will allow. All the rest of the hardware you will need comes with the alt so there are no worries there. The AVBM is awesome and it is a must to fine tune in your voltage output. I have had to slightly tweak the output for the different seasons because in the colder months the resistance was too low at startup and I was regularly charging at 15.1 or sometimes as much as 15.3V. My MS-8 processor does not like 15V+ and would make a crazy bad hissing sound at those levels. So the adjustability is awesome to have so that can be turned down a tad when needed. My output is always strong as long as I keep the engine RPM's up a little after it is fully hot in the hot summer heat of the south where I have lived since I have had this alt. I do notice that sometimes when slowing down and downshifting the RPM's will drop down 1.5-1.8V momentarily but it goes back to 14.4-14.6 where it usually is set at once I stop and maybe give the throttle a rev or two. All in all this alt is awesome and has met all of my expectations. I am working on getting a new upper bracket made so I can get a but more tension as to eliminate the cold start engine belt squeal. I hate hearing that in the early morning hours when I have to leave for work. Here is a comparison pic to the stock alt for reference:
-
I was just thinking the other day if these were still available as I hadn't seen them for sale on WCCaraudio or off the D'Amore site. I may have to sell a few things to get one. I really want an AF-12.
-
Also just to clarify, by having the DD-1+ that would eliminate the need to have the DD-1HV to use on the bigger amps?
-
wire size
bmxscion replied to jmfrb1's topic in Sundown Audio - GREAT Amps/Subs! GREAT Customer Service!
I am using the silver plated 12AWG that Knu used to carry on my 12" SD-2 and what I did to make room for both wires in the terminal was to take small ring terminals and unbolt the back of the terminal and just attach directly to there so I only have to have one wire in the push terminal. It was kind of a PITA but it cleans it up a little even though it is inside the box. I never did take a pic of that but I will get one next time I have my sub unbolted from my box. You can see the black wire coming out of the amp in this pic: -
Just a question about water cooling....I know they make heatsinks for water cooling RAM. Is that even something that would be necessary to consider? Or does just good airflow from fans suffice? I am sure water cooling the RAM would add some significant cost to the cooling system. Everything looks super awesome on this rig and I can't wait to see the radiators when they come in!
-
Does Sun Flash have a shelf life? If i were to order some and not be able to use it for several months would it still be ok?
-
SD-2 10D2
bmxscion replied to f16fxr4real's topic in Sundown Audio - GREAT Amps/Subs! GREAT Customer Service!
I have an SD-2 12" in a sealed box and it is rather impressive ran off a RF Power 501bd. I only have my gain around half maybe less and it sounds real nice. I can only imagine in the proper ported box it would have higher output but it also depends on what you listen to. I listen to more rock than rap so the kick drum bass is amazing in my set up. Also it is processed with an MS-8. -
Low Voltage? Check out our AVBM 2
bmxscion replied to MECHMAN's topic in MechMan Alternators and 12v Accessories
I have an AVBM on my 220A Mechman on a 2005 Scion xB and I find myself having to adjust voltage slightly from summer to winter, b/c in the winter the morning temps are cool enough where my cold voltage is 15.0-15.1V at startup and my JBL MS-8 does not like anything above 14.8-14.9V. It makes a funny screeching noise that is scary sounding until it heats up and the voltage drops down a little. Being able to adjust on the fly from in the cab would be awesome especially when parked and wanting to demo with a specific voltage. I have a Scan Guage II that gives me my real time voltage and intake temps and coolant temps plus other's if I wanted to monitor those. That voltage is always the same as when I put my Fluke DMM directly on my alt for readings, but I usually use both when adjusting my AVBM anyways. I would love to have a AVBM2 but I have nothing blue themed in my car and since I have the Scan Guage II I actually wouldn't need a readout at all. Would it be possible to get just an in cab knob to be able to adjust on the fly? Edit: I have a XS D3400 as well for a battery and big 3 and all that (actually way overkill in my setup). -
Damn them are sexy!!! how much did they run you? Just sent you a PM Bronson to answer your question.